Homemade walk-behind tractor - do-it-yourself options! How to make a walk-behind tractor with your own hands from inexpensive components How to make a homemade walk-behind tractor
If you are seriously thinking about growing any garden crops at your dacha or near a private house, you will need a motor cultivator. This universal miracle machine can fully automate most of agricultural activities on your site, allowing you to plow the soil, plant and dig up potatoes, remove snow, and sometimes transport some goods, including crops and fertilizers.
It is no secret that such an indispensable device can be bought at any agricultural hypermarket, but its cost can be prohibitively high. Therefore, more and more often, summer residents are trying to make a walk-behind tractor with their own hands. But in fact this does not require special efforts and skills, and the amount of expenses is reduced to a minimum.
 A walk-behind tractor, or motor-cultivator, is a self-propelled two-wheeled unit that is equipped with an engine internal combustion. The device moves freely forward, and the summer resident walks behind it, holding handles with various components and controls. Many available models have multiple gears for forward and reverse movement. . To exploit such an invention was as productive as possible, it is equipped with additional tools, including a plow, which allows plowing and cultivating the land.
The average weight of a walk-behind tractor reaches 100 kg, and the engine power often exceeds 8 horsepower. Due to such features, such a tool can become indispensable for plowing a garden area.
You should pay attention to the fact that all walk-behind tractors are equipped with a special drive for attachments, which allows you to transfer part of the engine power to a suspended mower. Basically, such a universal mechanism allows you to cope with various agricultural work, including:
- plowing the land;
- cultivation;
- transportation of the crop (in this case, you need to get a small trailer);
- cutting the grass.
With the help of such miniature trucks, residents of our regions transport firewood, fertilizers and crops. IN winter period it can be used as a snow removal tool. Even the weakest model can easily pull a load weighing up to 400 kg.
Advantages of the cultivator
 Despite many advantages, not every summer resident needs the excessive versatility of a walk-behind tractor. And the rather impressive weight sometimes complicates the operation of the device when performing daily tasks. Therefore, many owners summer cottages they prefer a simplified version in the form of a cultivator. Similar solution characterized by affordable cost and low energy consumption.
Most cultivators are much smaller than walk-behind tractors. Instead of wheels, which are provided in the classic version, special cutters are installed here that are capable of loosening and grinding the earth while moving. They are the main working element of the cultivator. Unfortunately, it is not possible to use additional equipment powered by the power plant of this device. This is due to the lack of an appropriate drive.
Among the possible “equipment” only “passive” tools, such as:
- plow;
- potato digger;
- hillers, etc.
 The weight of the cultivator does not exceed 50 kg, while on the market you can find many powerful models weighing up to 20 kg. Due to these characteristics, it is very easy to hold the car with your hands, and fuel consumption remains at a minimum level. By the way, some products are equipped with an electric motor.
The cost of cultivators differs significantly from the cost of walk-behind tractors. Relatively low power and inexpensive walk-behind tractor with a power of 6 horsepower will cost twice as much as a cultivator with similar performance indicators.
Features of choosing a unit
If desired, select suitable model walk-behind tractor, pay attention to a number of important parameters. Among them:
- processed area;
- type of tasks to be solved;
- equipment power.
 If the size of your plot does not exceed 10 acres, then, naturally, it is better to opt for a device for cultivating land. If you own a larger territory, it makes sense to think about buying a full-fledged walk-behind tractor.
As for power indicators, they are selected taking into account the type of work that will be carried out on the site. For seasonal plowing of soil in autumn period It is enough to purchase a unit with an engine power of 5.5-6 horsepower. However, if we are talking about processing virgin lands and dry soils, then you will need to purchase a heavier model with a stronger motor. Most likely, it will run on A92 or A95 standard gasoline fuel. There are also diesel developments that consume from 2 to 2.5 liters of fuel mixture per hour of hard work.
If you want to purchase a miniature version of a tractor, give preference to products from trusted brands. It's no secret that small equipment European production can be equipped with “native” power plants of more than famous manufacturers, so such an engine will be able to serve the future owner very for a long time. If you provide the equipment with proper care and maintenance, it will work freely for about 15 years, and the same amount after overhaul in a good service center.
As for Chinese products, they cannot boast of good power, reliability and durability. However, in this segment you can find quite a good solution. Just carefully study the company’s reputation, find out reviews from real customers on forums and portals for farmers.
Homemade walk-behind tractor according to Arkhipov’s instructions
 The design of such a walk-behind tractor is made in the form of a self-propelled two-wheeled unit, which comes with an engine from a VP-150M scooter. This motor model has such a design that at increased loads the cylinder head is forced to cool using air.
If you follow Arkhipov’s instructions, then at the next stage you will have to make a U-shaped frame welded from a corpse, and then turn the wheel axle on a lathe. For the main and control rods, 3 hinges should be created, which will act as connecting elements between the walk-behind tractor, the steering wheel and the plow.
In turn, the frame of the unit is equipped with a steel pipe with an axle, using welding machine. This will allow tension the cables, going to the gearbox. The tension itself is provided by a rocker arm. Gear shifting is carried out using a welded piece of steel pipe.
As for analogues of such a development, there are really a lot of them, however, original version has some undeniable advantages.
Advantages of the Arkhipov walk-behind tractor:

Step by step assembly guide
 You need to start assembling the unit by arranging the drive shaft. Then it is equipped with a housing with bearings, a sprocket is welded and overrunning clutches are fixed, which act as a differential. Then the structure is equipped with wheels and a frame with a telescopic rod, a plow and a steering wheel.
A homemade version of an agricultural walk-behind tractor has at its disposal special wheels that are capable of providing maximum traction with the ground.
To connect the unit frame with the suspension and frame of the scooter, you should use two metal pipes arched appearance. A container for storing the fuel mixture is installed between them.
When arranging the power plant, a bracket is used, which is equipped with a steel axle 150 mm long. It is welded in a cantilever manner to a U-shaped frame. The axle itself is equipped with a motor and suspension, and the assembled product is connected to the frame arches. Only after this the secondary shaft is installed, pulling cables and tensioning chains.
Modernization of a homemade design
 The Arkhipov walk-behind tractor is extremely popular among a wide audience of summer residents and gardeners due to its versatility. Very often it is used as a plow or cultivator. To expand the functionality, it is enough to replace the removable parts for the plow with parts with removed moldboards for the cultivator. As it moves around the garden, the device will deepen furrows into the ground, placing potato tubers there. For plowing planting material It is enough to equip the unit with dumps and walk again between the planted rows.
Hilling up of sprouted plants occurs in a similar way. The agricultural walk-behind tractor is characterized by excellent productivity and ease of use, even for purposes such as harvesting. To change the working width, it is enough to use different blades. In addition, the unit is capable of collecting missed potatoes and remaining tops in the presence of a rake or harrow.
The universal design is indispensable not only for work in the field agriculture. It can also be used for snow removal in winter. Such a faithful assistant will become good tool when clearing paths and garden areas from leaves or debris. It is enough to equip it with a roller with a round brush and an additional star, which will allow you to clear sidewalks.
Every self-respecting summer resident sooner or later comes to the question of buying or manufacturing a motor cultivator. A similar unit - a truly valuable find for people involved in organic farming. It can be used to process small vegetable gardens, and large territories from 30 acres.
Despite its compact size, such a miniature “truck” It is not inferior in productivity to some tractors. The powerful engine is capable of processing the heaviest soil, and ease of use allows you to operate it even in the absence of specific experience. In addition, making such a device is much simpler than it might seem at first glance. It is enough to pay attention to existing instructions and take advantage of the recommendations of professionals.
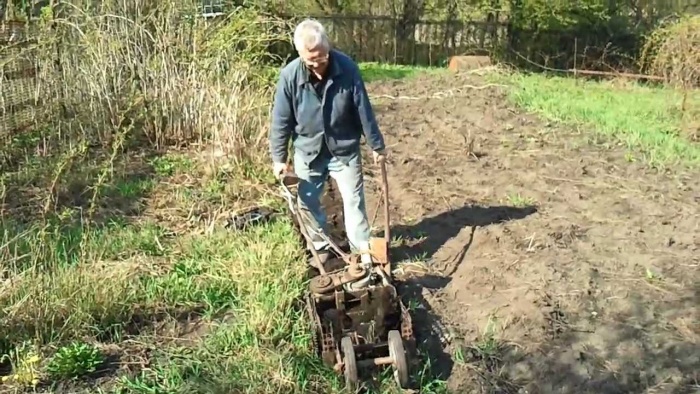
An avid gardener and gardener has to dig large plots, which is very tiring, especially when a person is already retired. Moreover, this monotonous work is quite boring for most people. Digging, loosening and weeding will take much less time if you do not use the simplest tools, but use homemade walk-behind tractor, with whom things will be more fun!
Application of cultivators
Since for processing even small area land requires a lot of effort, summer residents are thinking about making a motorized hoe. These workers come to the idea of making a homemade walk-behind tractor with their own hands because factory-made walk-behind cultivators are expensive.
Homemade walk-behind tractors are used to carry out the following procedures:
- plowing;
- hilling,
- mowing,
- application of fertilizers.
 Also, a do-it-yourself motorized plow will help with snow removal and weeding, and if you add a trailer, you can use it to transport cargo weighing up to 200 kg. A light walk-behind tractor usually includes only a cutter and a weeder. On a medium-weight product you can find a milling cutter, a plow, a mower and a hiller. Heavy products are reliable, have high maneuverability and non-removable wheels. With this design of the walk-behind tractor, it is possible to use the following equipment:

Advantages of homemade structures
The main advantage is saving money. Enough to assemble a walk-behind tractor the following materials and tools:
- Motorcycle engine or chainsaw engine, welding machine.
- Steel pipes.
- Wheels from a car or sheet metal for the manufacture of lugs.
- Parts for connecting the motor to the frame.
 For example, you can make a walk-behind tractor with your own hands if you have a drawing and necessary equipment. In this case, the motorized trimmer will perform all the functions of the factory models. If you choose a powerful engine for a milling cutter, the product will not be inferior even to modern factory walk-behind tractors.
Attachments can also be made independently: a single-wheel unit will not need a differential.
Frame making
Frame - load-bearing structure, on which the parts and components of the walk-behind tractor are attached. Manufacturing algorithm:

Power part
When manufacturing the power unit, the following conditions must be met:

The engine is mounted on the finished frame.
Features of handling equipment
The most widespread is the Arkhipov walk-behind tractor with a hinged connection between attachments and a tractor. This feature allows you to expend less effort during operation, and the furrow created remains uniform when turning. The plowing depth provided by the unit is the same throughout the entire area, and no additional effort is required to complete the operation.
Motoblock Arkhipova
 A self-propelled vehicle on two wheels with an engine from a VP-150 M scooter. This power unit is selected for design reasons: for forced air cooling of the cylinder head.
It is attached by welding to the frame of the unit. steel pipe, which ends with an axis necessary for tensioning the cables going to the engine gearbox. The tension is carried out by a swinging rocker arm, the gear shift knob of which is a welded section of steel pipe. Chain pitch is 12.7 mm and 15.9 mm. Number of teeth on sprockets: running axle - 40, secondary shaft - 20 and 60, output shaft - 11.
There are enough analogues of the model, but original design Kaluga master has undeniable advantages:

Additional equipment
Attachments are often:
- plow;
- cutter;
- rake;
- harrow.
These tools are secured to a special bracket mounted behind the engine.
Potatoes are dug up using a special digger, which removes the tubers from the ground without damage. A rake canopy is used to collect mown grass or tops.
WITH additional equipment The walk-behind tractor not only cultivates the soil, but can also be used for cleaning the territory. If you attach a bulldozer blade to a block, it will effectively remove snow; he will sweep with a roller and brush garden paths.
Trailer for walk-behind tractor
The walk-behind tractor is also used for transporting goods if it has a trailer.
You can also make a trailer yourself u. Manufacturing stages:

It is noteworthy that the walk-behind tractor can be turned into a mini-tractor.
So, you can make reliable equipment yourself, and at the same time do it with virtually no financial costs.
Many owners land plots know that soil cultivation using hand tools takes quite a lot of time and effort. That is why they are becoming more and more popular mechanical devices. But since high-quality devices are quite expensive, many landowners create such mechanisms with my own hands. If you have a welding machine and some materials, creating a cultivator is quite simple if the diagram of such a device is created in advance.
How to make a cultivator from existing materials
Before starting work, it is worth understanding the types of mechanisms that are designed for cultivating the land. Based on the type of power mechanism installed in the unit, they are divided into products with an electric motor, as well as with an internal combustion engine. The first type of mechanisms should be chosen only if there is an energy supply on the site.

All designs with an internal combustion engine can be used in any area, as they run on gasoline. It is worth remembering that when using them you need to spend more money, but at the same time they are more effective. It is worth remembering that their maintenance is more complex.
Motor cultivators also differ in soil cultivation methods. Some products are equipped with driven wheels, while others are equipped with attachments that simultaneously serve as both a means of movement and a tool for cultivating the soil. In the first case, two gearboxes are used. The first is necessary to move the device at a certain speed. The second rotates the attachment.
It is worth noting that there are also walk-behind tractors in which the wheels are not driving, but are installed as a support on the ground; thanks to these elements, the movement of the unit is simplified. In this case, the movement of the unit occurs due to the rotation of the attachment. It is worth noting that when using mechanisms without drive wheels, you have to spend more effort to keep a homemade motor cultivator on a given path. That is why many land owners create cultivators with drive wheels, which facilitates the process of cultivating the soil.

The wheels of the cultivator allow you to more effectively regulate the depth of immersion of attachments into the ground. It is worth remembering that products with one drive axis have several advantages. For example, you can put wheels on the axle and install a plow behind them. Also, instead of wheels, you can attach volumetric cutters for loosening. It is worth remembering that a creeper must be installed on the cultivator. This device helps with wheel slipping, as well as when working on heavy soils.

Components of a motor cultivator
Cultivators consist of the following elements:


Drawings for a homemade cultivator can be taken from technical literature or create based on factory models. If you look for ready-made drawings, it is worth remembering that when using them you will be forced to look for specific components for future design. Before you make a motor cultivator from a saw with your own hands, it is worth considering the design already finished products to understand exactly how such designs work.
How to make an electric cultivator
Anyone who is at least a little familiar with the operating principle of such equipment can make an electric cultivator.
To work you will need the following parts:
- motor from a meat grinder;
- metal pipes;
- corners;
- wheels with axles;
- screw;
To create an electric cultivator, you will need tools such as a welding machine, a sledgehammer and a set of keys. Also, pliers and a hammer will be used during the work. The creation of a motor cultivator is as follows:
- First, 2 corners are screwed to the metal gearbox housing.
- After this, you need to bend the ends of the two tubes to create handles. The pipes must then be welded to the corners.
- Then the axles for the wheels are welded to the corners. When choosing wheels, it is worth considering that too large products are inconvenient. If small wheels are installed, the cultivator will dig in on soft ground. Therefore they should be medium in size.
- After this, the shaft of the structure is created. Using a sledgehammer, you need to break the nozzle from the meat grinder and place the workpiece, which is made from scrap, into the sleeve.
- Then you need to weld the grouser screw.
- You need to attach the engine switch to one of the previously created handles. To make using the unit more convenient, you should place the controls based on the size of your hand.
It is worth remembering that when moving quickly, the cultivator is capable of breaking the soil into clods. If the created device works slowly, this will lead to the soil becoming soft and processing will be carried out more carefully. Such electric homemade products allow you to process small areas.
Treat the area with large area, in which a significant part of the territory is allocated for a vegetable garden, making do with only available tools - not an easy task. The work of loosening, digging, and weeding the garden manually takes a lot of effort and time. It’s good when you have the opportunity to purchase a walk-behind tractor that will become an indispensable assistant on the site. But you can make work on the ground easier by making a walk-behind tractor with your own hands.
We build a walk-behind tractor according to instructions from Arkhipov
The walk-behind tractor is a self-propelled machine on two wheels, equipped with an engine removed from a VP-150M motor scooter. The reason for choosing this particular engine was that it has such constructive solution, due to which the cylinder head is forced to be cooled with air.

Such a motor from a scooter is capable of operating at the lowest speeds and at fairly heavy loads.

To build the walk-behind tractor, the master used control cables, engine mounts taken from a motor scooter, as well as a double arc of the frame, handles and chains. The rest of the design details were industrial production
Separately, the designer produced a U-shaped frame welded from pipes and a wheel axle turned on a lathe. He also made 3 homemade hinges for the main and control rods. They will be used as connecting elements between the walk-behind tractor itself, its steering wheel and the plow.
A steel pipe is attached to the frame of the unit by welding, ending with an axis, which is necessary for tensioning the cables going to the engine gearbox. The tension itself is carried out by means of a swinging rocker arm, the gear shift knob of which is a welded section of steel pipe.
The pitch of the chains used to create the device is 12.7 mm and 15.9 mm. Number of teeth on sprockets: output shaft – 11, secondary shaft – 20 and 60, running axle – 40.
What is good about this particular design?
There are dozens of analogues of this model, but in comparison with them original model The walk-behind tractor of a Kaluga master has a number of undeniable advantages.
- Swivel joint. The processing tools and tractors of most of these models have a rigid connection, which complicates the maneuvering of the unit and thereby makes it difficult to work with it. The parts of this agricultural unit are connected by means of hinges. This makes it possible to change the direction of movement during work, if necessary, without removing the plow from the furrow.
- Shift of the axis to the direction of movement. Many owners, when cultivating soil using a walk-behind tractor, have encountered such a difficulty that in the process of moving forward under the influence of soil resistance, the unit moves to the side. To level the furrow, a lot of effort must be made. To compensate for such a skid, the master positioned the plow axis at a slight angle in the direction of movement. When plowing, the structure is slightly turned to the left. The desired position can always be adjusted using three rod joints.
- The level of the specified plowing depth. If in other models the plowing depth is maintained by lowering or raising the plow, then when working with this walk-behind tractor it is performed automatically. Regulation is carried out by changing the angle of the plow in relation to the furrow. The structure is equipped with a field board, which acts as a lifting force when burying the plow. If, on the contrary, the ploughshare appears above the surface of the earth, then its angle of attack instantly increases, under the influence of which it again plunges into the ground to a given depth.
Step-by-step device assembly technology
The assembly of the structure begins with the arrangement of the drive shaft. To do this, a housing with bearings is attached to it, a sprocket is welded and overrunning clutches are mounted, which will perform the function of a differential during operation. After this, the structure is equipped with wheels and a frame. A telescopic rod, a plow and a steering wheel are installed on a fixed frame.
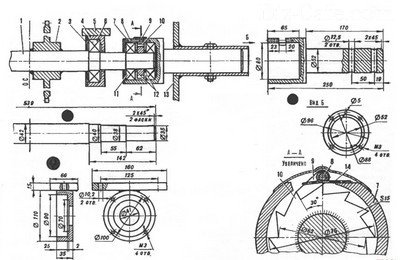
The main elements of the running shaft: 1 – shaft, 2 – sprocket, 3 – cover, 4 – bearing housing, 5 – support platform, 6 – bearing No. 308, 7 – freewheel housing, 8 – pawl axis, 9 – pawl, 10 – ratchet, 11 – bearing No. 307, 12 – washers, 13 – wheel, 14 – pawl spring
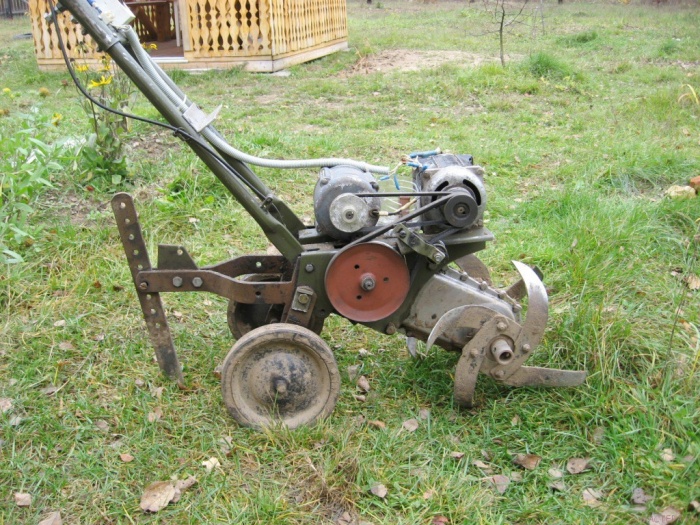
The agricultural walk-behind tractor is equipped with special wheels, which, unlike rubber counterparts, are able to provide better traction with the ground.

Such metal wheels do not become clogged with soil. When they come into contact with the soil, they do not compact it, but rather loosen it.
To connect the frame of the unit with the engine mount and the frame of the scooter itself, two arc-shaped pipes are used. Between them there is space for placing a fuel tank.
To equip the engine, a bracket is used, ending with a steel axle 150 mm long. The bracket is welded cantilever to the U-shaped frame of the structure. The motor with suspension is suspended on the axle itself. Assembled structure connected to the arc-shaped arcs of the frame. Only after this the secondary shaft is mounted, the control cables are pulled and the chains are tensioned.

Main elements of the control unit: 1 – connecting axis, 2 – bar, 3 – pipe, 4 – handles

Connecting elements of the structure: 1 – main rod, 2 – control rod
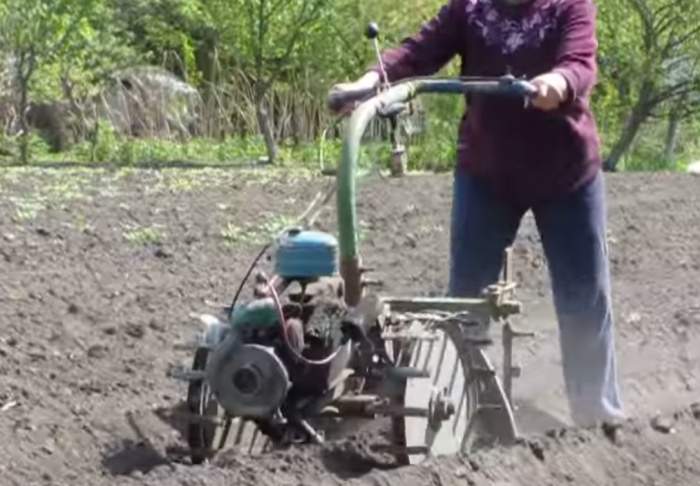
How this whole thing works - video example
A clear example of using a walk-behind tractor:
How can you upgrade a homemade walk-behind tractor?
The Arkhipov walk-behind tractor is multifunctional. It can be used as a plow, or. To do this, it is enough to replace the removable parts for the plow with parts with removed moldboards for the cultivator. As it moves, the walk-behind tractor will deepen furrows into the ground and place potato tubers in them. To plow the tubers, you just need to put the moldboards in place and walk the unit between the planted rows.
The agricultural unit is also convenient for harvesting. Using different blades you can change the working width. The unit is also good because it is capable of collecting missed potatoes and plant tops remaining after harvesting. For these purposes, it is equipped with a rake or harrow.
The universal design can be used not only for agricultural work. In winter, it is successfully used for snow removal. A faithful assistant will also come in handy for cleaning paths local area. By installing a roller with a round brush and an additional sprocket on the walk-behind tractor, the owner will make it easier for himself to clear the sidewalks.
Manually process land plots long and laborious, it’s better to hire help mechanical device- walk-behind tractor or cultivator. It can be purchased at the store, or you can also make it yourself. To purchase a factory-made device you will need a lot of money, but a homemade one will cost much less, but of course it will require a lot of free time.
To assemble it and, as a result, get a full-fledged small-sized agricultural machinery, you will need components, tools, basic skills and, of course, patience.
Preparing to create a homemade product
To make a homemade agricultural machine, craftsmen use scrap materials and used motor vehicle components. Thus, the basis of a walk-behind tractor is often a chainsaw, a motor scooter or a moped, and when you need to get a powerful and more functional unit, an outdated model of a motorcycle (“Voskhod”, “Java”, “Minsk”).
Before you start assembling a walk-behind tractor or a walk-behind cultivator, watch a thematic video on the Internet and look for necessary information in magazines and other publications. Then the tools and material are prepared, sketches and drawings are developed, which clearly depict all the functioning organs of the homemade product, including the power and chassis, control and aggregation systems. The drawing below shows what the standard design of a one-wheeled motor cultivator looks like.

1- power unit of the cultivator; 2- metal protective cover; 3- fuel tank; 4- ignition bobbin; 5- switch; 6- pin that fixes the tilt of the hitch; 7- bolt M-16; 8-axis for mounting the hitch; 9- mounted plow; 10- bracket; 11- bed; 12- handles; wheel with grousers.
It would be useful to make a kinematic diagram of the homemade product, reflecting in it the order of interaction of the working mechanisms and showing how the transmission is organized.
To make a light motor cultivator or a heavier walk-behind tractor, use the following tool:
- electric drill with a set of drills;
- grinder and metal discs;
- wrenches (open-end, spanner);
- welding machine;
- vice.
The materials for homemade products are high-strength channels, steel plates and pipes.
Frame
A homemade frame for a walk-behind tractor or motor-cultivator is made welded, but at the same time very durable, since all the homemade components will subsequently be attached to it. For the construction of the frame they use iron pipes or channels.
Sometimes, to assemble a homemade walk-behind tractor or cultivator, they use a converted motorcycle frame.

Fig.2. Converted motorcycle frame
1- steering wheel; 2- instrument panel holder; 3- platform for installing the battery; 4- channel (spar); 5- crankcase; 6- bed; 7- chain tensioner; 8- chain tensioner stop; 9- strut; 10- subframe mounting holder; 11- bracket connecting the cultivator to the adapter or trailer; 12- cross member.
The front fork and other elements are cut off from the previous design so that they do not interfere with the installation of attachments on the future cultivator. Attached at the back by welding homemade mechanism for coupling a motor cultivator with equipment, a trailed trolley. You should watch the video to see how to make the hitch yourself correctly.
Engine
When designing homemade motor cultivator some make do with a scooter or moped drive. But to assemble a more productive walk-behind tractor, the power of the moped engine will not be enough. It will require a 16-18 horsepower diesel engine from a motorcycle. It is “customized” to the required parameters through a series of alterations.
First, the cooling system is rebuilt into an active air one in order to improve the technical performance of the motorcycle. This is easy to do using a 12-volt electric motor with a small iron impeller. At the same time, the valve is replaced with a reed valve, which helps facilitate starting, increase traction and reduce fuel consumption.
The prepared engine is mounted in rigid clamps. They are first welded to the front of the homemade frame, then securely bolted together (the whole process is clearly shown in the video).
Be sure to ensure that the clamps cover the journal of the output shaft of the diesel motor of the walk-behind tractor and hold it firmly.
To KP homemade device attach a lever, which can easily be made from an iron rod by welding a ball at the end. The length of the handle is left such that, being behind the control handles of a walk-behind tractor or cultivator, you can easily reach it.
Next, for a homemade product, assemble an air purification filter using available materials, For example, tin can, metal tube. Then prepare the fuel tank of the homemade motor unit. You can make it yourself from any sealed container or take it from a broken motorized stroller.
Transmission
For a homemade diesel walk-behind tractor, just like a motor-cultivator, you will need chains, sprockets, and an adapter shaft. They are mainly borrowed from decommissioned motorcycle, auto, and agricultural equipment. Sprocket hubs are not difficult to make yourself using pieces of iron and lathe, fortunately, this topic is easy to find on the Internet detailed drawing or video. A ready-made gearbox for a homemade product can be taken from any model of moped. In preparation homemade gearbox use steel plates and cylindrical discs with teeth.
The kinematic diagram of the homemade product is created as simple as possible in order to ensure greater reliability of the functioning of its mechanisms. The transmission of torque from the engine to the intermediate shaft is organized using a standard roller chain with driving and driven sprockets. At the same time they increase gear ratio intermediate and reduce the speed of rotation of the output shafts.
Sometimes the transmission of a walk-behind tractor or cultivator includes a so-called creeper. This is a reduction gearbox, which is necessary to obtain slow operating speeds (you can see how to assemble a creeper in the video).
Installing this device allows you to improve the control of the homemade product and make its operation safe for humans. The creeper is purchased or assembled on your own. How to make a creeper yourself and what you will need for this, you can watch both in the video and inquire on thematic forums organized by skilled technicians.
Chassis
TO diesel walk-behind tractor with a self-made creeper, wheels with a diameter of up to 10 inches, taken from decommissioned agricultural machines and motorcycle strollers, are best suited. Sometimes they take from passenger cars, if you need to increase cross-country ability homemade equipment. And when using a walk-behind tractor on heavy soils, they are replaced with iron ones (you can see how they perform in practice in the video).
When creating a homemade motor cultivator, a rototiller is installed instead of wheels to allow digging and loosening the soil. Thanks to the use of such a soil improver, compaction of the soil over which the motor cultivator has recently passed does not occur.

Fig.3. Cultivator chassis
1 and 2 wheels; 3 - gear; 4 - drive shaft; 5 - gearbox; 6 - drive gear; 7 - bushing; 8 - locking screw; 9 - drive shaft housing; 10 - axle box flange; 11 - nut and bolt M-8; 12 - splined bushing; 13 - shaft; 14 - M-14 nuts; 15 - washer; 16 - oil seal; 17 and 18 - wheel bearings; 19 - motor.
When making a homemade cultivator axis, it is recommended to use a monolithic piece of steel. Welded pipe will not work, as it may not withstand the load.
Control device
The operation of a homemade walk-behind tractor or cultivator, like any machine, needs to be controlled. The control devices for such homemade products are usually handles - they are attached directly to the frame frame. They are made from two thick-walled pipes, which are bent to give a convenient shape (the video demonstrates this well).
At their ends, gas handles and clutches are installed, removed, for example, from an old moped.
The gearbox and kickstarter levers of a motor cultivator are made of a metal rod with a diameter of 10 mm. The homemade Kickstarter is brought back, closer to the operator, thereby making it easier to start the diesel engine. Also in convenient location secure the brake and gear levers.
In a self-propelled walk-behind tractor, you can make a convenient steering adapter instead of handles. A car steering column with a bipod or removed from a tractor is ideal for this. In such a mechanism, the bipod acts as a hitch, combining the cart with the homemade product. The steering adapter assembly uses ball joint- it allows you to make the coupling independent. The entire process of preparing a homemade hitch is best viewed in the video.
Hitch
A homemade walk-behind tractor or motor-cultivator is complemented with all kinds of attachments. This is done in order to expand:
- functional;
- scope of application;
- seasonality of work performed.
Thanks to the possibility of layout, the homemade product can be used in any season, even in winter, which allows all year round use technology. In addition to plowing and cultivating with attached equipment, they plow the land, plant and hill up crops, dig up potatoes, as well as clean up areas and prepare haylage. If, in addition to the walk-behind tractor, you make a trailed trolley, then it will also be able to perform transport functions, helping to transport heavy, bulky loads. Due to the high cost of mounting equipment, many try to make it themselves, using drawings, sketches, and author’s videos.
Potato digger
Making a homemade potato digger begins with preparing the carriage body, welded from wire and thin twigs. The sketch presented here will help you understand this process (you can also use the video).

Fig.4. Potato digger
A shovel made of steel sheet and repeating the shape of the potato digger body. At the back, twigs are welded to it, slightly bent to the bottom.
Plow
To make a plow, high-strength alloy steel or sheet steel with a thickness of at least 3 mm is used for the motor cultivator.

Fig.5. Homemade plow
First, based on the drawing, a pattern is prepared and transferred to cardboard, and then to metal, after which it is cut out using a grinder. It is recommended to reinforce the plowshare with high-strength metal, for example, from circular saw. The blade and the stand can first be made separately and then joined together. This design is less vulnerable and if any element breaks, it will be easy to replace it.
Trailer
Many people try to make a ready-made walk-behind tractor homemade trailer or an adapter equipped with a driver's seat. 
Fig.6. Trailer device
1- holder mounted implements; 2- console; 3- carrier; 4- footrest; 5- driver's seat; 6- frame; 7- body; 8- support beam; 9- bolt M-8; 10 - thrust ring; 11th wheel.
The frame for such a trailer is made of pipes and angles of any section. For the wheel axle use metal rod with a diameter of 30 mm. The body of a homemade device can be made from boards, corrugated sheets or sheets of metal 1.2-1.5 mm thick. To increase strength, a wooden trailer is reinforced at the corners with metal plates, and one made of corrugated sheets is supplemented with stiffening ribs.
Inexpensive device with great functionality
A homemade walk-behind tractor or walk-behind cultivator is an economical and very useful walk-behind tractor unit. It is capable of performing all kinds of agricultural operations, thereby freeing a person from tedious physical labor. In the video below you can see all the functionality of this miracle machine.
Such homemade products are applicable not only as an assistant in agricultural work. They are successfully used when cleaning the local area, and in winter - for clearing snow. If you make a high-quality homemade walk-behind tractor or motor-cultivator, then the operational parameters of the homemade product will be no worse than those of an expensive factory analogue.