Three-tier vertical fish dryer. And also my recipe for homemade dried fish. Fish dryer with fan Fish tray mesh
Often fishermen get a big catch, which is measured not in pieces, but in kilograms. At the same time, difficulties arise in preserving fish.
To prevent the prey from spoiling, it can be dried in special dryers. They can be made independently or purchased in specialized stores.
Features of salting and drying fish using a dryer
When preparing the resulting catch, you must remember the recommendations that allow you to properly dry and:
- For a piquant taste, it is better to add several dozen black peppercorns and crushed bay leaves to the salt;
- To enhance the taste, some salt is mixed with sugar, the ratio should be 3:1;
- To prevent the fish from spoiling, it is better to gut it before salting or drying;
- Dried fish is very attractive to flies; to prevent their appearance, it is necessary to make special insect traps.
Where to buy a fish dryer and at what price?

A fish dryer is required device for the fisherman. It can be purchased:
- in a specialized fishing store;
- hardware store;
- in online stores;
- in sports stores in the fishing department.
The device protects fish from insects thanks to a special mesh that can be fastened with a sewn-in zipper. The dryer is made from durable, high quality materials.
There are several types of industrial dryers:
- On stretch marks;
- On the frame;
- Rectangular;
- Single-tier;
- Multi-tiered.
The cost of fish dryers varies, it all depends on what material it is made of:
- 300-600 rubles (the basis of such devices is a dense mosquito net, which is stretched over a frame made of light metals, quite convenient to use, you can easily take it with you fishing);
- 700-1500 rubles (the device has several tiers and chains, holds a large amount of catch);
- From 1500 and above (the dryer frame is made of durable heavy metals, mainly steel is used, not mobile).
When choosing a dryer in a store, you need to weigh all the advantages of each model, and then choose the device for yourself.
What can you use to make a fish dryer with your own hands?
Despite the wide variety of models of fish dryers, each fisherman needs his own, which will fully satisfy his needs. Not all purchased devices are suitable for use in in some cases. Therefore, quite often, fishing enthusiasts make dryers themselves.
This takes into account:
- Place for drying fish;
- Materials from which the dryer is made;
- Conditions in the rooms where drying is planned.
Taking into account all the nuances, the fisherman decides for himself which device is suitable for him. Most often the dryer is made:
- From wooden blocks;
- From plastic panels or boxes.
The production technology of each type is different and includes its own characteristics.
Wooden blocks
The dryer, which is made of wooden blocks, is considered the simplest design.
To make such a device, you need to prepare:
- Self-tapping screws;
- Wooden bars;
- Mosquito net.
After preparing everyone necessary materials, you can start assembling:
- It is better to make this type of dryer on legs, so first of all you need to measure the height of the product, as well as the length of the supporting elements.
- Slice wooden blocks According to the measurements taken, connect them together using self-tapping screws. The frame is ready.
- On the sides of the frame it is necessary to make two small blocks on which a string or clothesline will be placed.
- Cover the entire structure, starting from the top. mosquito net, attach it to the dryer using a stapler.
- Build a lid; for this purpose, any available material that fits in size can be used.
Let's celebrate! When making a device from wooden blocks, the main thing is to choose the right tool that will allow you to obtain a high-quality and durable structure.
Plastic panels and boxes
Dryers made of plastic have quite poor throughput, therefore, when manufacturing them, it is imperative to ensure the presence of a hood.
To build the structure you should prepare:
- Corners made of plastic;
- Adhesive base (liquid nails are possible);
- Bolts;
- Screwdriver and jigsaw;
- Hood;
- Mosquito net.
Manufacturing plastic construction carried out as follows:
- Take measurements of the height of the structure.
- Cut off required quantity plastic strips.
- Cut out the necessary parts for the lid and inlet.
- Fix the panel in a corner, connect the rest together using adhesive base or liquid nails.
- After making the frame, make a lid and attach it using a corner.
- Do all sides of the dryer in a similar manner.
- It is necessary that there is a finishing strip along the entire length of the dryer at the top.
- Make corners that will be the basis for the rods.
- Using thick wire, make rods that are located on opposite sides.
- The first side of the rod must be attached to one side, making a 90-degree bend, the second end of the rod must be freely detached from the structure in order to string fish onto it, then inserted into the hole in the corner without any problems.
- Make a hole anywhere in the side wall and insert the hood.
The design should only work when the hood is turned on and the lid is closed on top.

To make the fish tasty and aromatic, you need to listen to some drying tips:
- If the fish is larger than 30 cm, it must be gutted and placed in a cool place mixed with nettles for a couple of hours.
- Before drying, the fish must be washed under running water. clean water, remove all dirt.
- It is important that the carcasses do not touch each other, and the abdomen is outward, so no more than 10 pieces should be placed on one rod or rope.
- Small fish are dried for 2 weeks, large fish for at least 6 weeks.
- The most delicious fish comes from spring period, since it is cool and fresh outside, it is not recommended to dry carcasses in the summer, as they will quickly deteriorate.
- When drying under pressure, it is very important to apply one nuance: for as long as the fish has been lying under salt, it must be soaked in salt for the same amount of time. clean water, then place in the dryer. I caught this pike using a bite activator. I’ve never caught one of these before, but now every time I bring back trophy specimens from fishing! The time has come for you to guarantee your catch!!!
How it's done DIY fish dryer photo Our website will show all the stages. Making it is not at all difficult. Today our article is about how quickly you can make a fish dryer from available and inexpensive materials. If you fish not far from home and you have a stationary, convenient, large fish dryer, this is good. But if you are planning a trip for several days with scarves and relaxing in nature, then experienced fishermen will definitely not forget to take all the gear with them or make a float rod themselves while on vacation.
Here Imagine, you have a rich catch, you boil fish soup, bake fish in foil, and there is still a lot of it left. We offer you a good option: dry or wilt it and bring it home and enjoy the ram with your friends over a beer and remember how wonderful the catch was. Also, this simple device can be disassembled and taken with you when traveling to the sea and dried gobies, which are found in abundance in salt water. And the main thing is that annoying flies, which are so attracted by the deliciously smelling dried pike perch, will not be able to get inside and spoil such a wonderful product.
ForTo make a dryer with your own hands you will need:
- An old umbrella, the main thing is that it folds out and the canopy is intact.
- Fine mesh or thick gauze.
- A needle and thread to sew the bag, or you can prepare it at home in advance and sew a snake along the entire height for convenience.
- Wire for making the bottom ring.
- A cord or rope for tying the top and bottom of the dryer.
- Hooks or clips for hanging catch.
Making a dryer with your own hands is not at all difficult:
- We sew mesh or gauze along the diameter of the umbrella.
- We make a ring from wire, which is equal in size to the diameter of the umbrella.
- At a distance of 70-80 cm, attach a wire ring to the mesh using a thread and a needle.
- Below the ring we pass a rope or cord to tighten the dryer.
- At the top of the umbrella we attach a loop or hook to hang our invention.
How to use the dryer
Picking up net or unfasten the snake, the salted fish is hung on hooks, the protection is lowered at the bottom, and tightened with a cord. Large bream, crucian carp and roach must be cut, but the scales must not be cleaned. You need to hang it in the shade and in a drafty place. Everything is ready, you don’t have to worry about your catch, it is reliably protected from flies and insects. Such a dryer for it is compact, does not take up much space in your luggage, and most importantly, you can bring the finished dried fish home and treat it to your loved ones and friends. You can use such a dryer not only in camping, natural conditions, but also at home. The main thing is that it turns out to be an excellent, high-quality ram.
The idea to make a dryer came to me immediately after I finished renovating my house. There were a lot of different unused materials left that could be used for this project. And, to be honest, I’m tired of drying fish on ropes and wires covered with gauze. Firstly, this is extremely inconvenient, and secondly, such a primitive method of drying does not completely exclude its infestation by flies, which, you see, is no good.


Materials
So, what should the ideal dryer be? Pondering future design In my head, I wanted to get a durable, light and capacious box in which I could dry various fish, both large (balyk) and small, for example, roach. Therefore, as the material for the frame, I chose a profile used for installing drywall and an aluminum corner. Side walls and decided to cover the bottom of the dryer with a thick plastic mosquito net.
I immediately planned to make the lid also from a mesh, but a neighbor suggested (many thanks to him) that a fly can lay eggs through the upper holes without even contacting the fish. To avoid such troubles, I made it from polycarbonate and decorative metal corner, and she turned out to be a sight to behold. All components of the dryer were secured with rivets and small bolts with nuts and washers of the appropriate size (diameter 5 mm). That's basically all the materials. Oh yes, for better fixation of the mesh at the corners of the structure you will need another plastic corner (2/2 cm).
Tools
Making a drying box with your own hands took only two days, and incomplete ones at that. I worked slowly, enjoying the process. To make this idea a reality, I needed the following tools:
- cordless drill;
- Bulgarian;
- riveter;
- pliers;
- wrenches;
- scissors;
- stationery knife.
Dimensions
The dimensions of my dryer are: height - 1.2 meters, length - 1 meter, width - 70 centimeters. Why are they like this? These figures, of course, were not taken out of thin air. When deciding on the size of the box, I thought about how to make loading and unloading fish as convenient as possible. Given my height (180 cm), these parameters turned out to be optimal. The drying chamber turned out to be spacious, consisting of three levels, each of which has three metal rods for hanging fish. In it you can wither a hundred weighing 0.3 kg or five hundred pieces at a time. Agree, not bad at all.

Installation
Conventionally, all work can be divided into three stages:
- frame assembly;
- lining the box with mesh;
- making a lid.
First of all, I made blanks from the profile. To do this, I cut it with a grinder as follows: four 1.2-meter-long sections (for corner supports), six meter-long and the same number of seventy-centimeter crossbars. Then, at a distance of 20 cm from the floor, I alternately fastened the blanks together using rivets. In order for the parts to fit better together, the profile at the joints must be adjusted by making small cuts on the side surfaces. As a result, I ended up with a rectangle standing on legs.

The top and middle of the structure were assembled in the same way. I additionally reinforced the bottom of the box with an aluminum corner, which I screwed from the inside. Thanks to this, the dryer acquired additional rigidity. Important nuance: the profile should be mounted so that its outer surfaces form an ideal plane with each other. Subsequently, this will greatly facilitate the process of installing the mesh.

Actually, to implement the second stage, it is advisable to have an assistant. I was lucky in this sense; my wife agreed to help. It was much more convenient for two people to work with the mosquito net: she held it where it was needed, and I secured it. It is better to cut the mesh for each side with a small margin so that you can wrap it a little inward, thereby improving the overlap with the adjacent canvas. The main task in this matter is to close all possible cracks so that flies cannot reach the fish.


Do-it-yourself fish dryer is ready

Making the lid was also easy. Having cut out a piece of polycarbonate (0.6 mm thick) of the appropriate size with a stationery knife, I screwed it to the frame from the decorative corner with small bolts. It turned out beautiful and reliable. This lid is easy to remove and put on, and most importantly, it completely eliminates the possibility of contamination of the product from above.
Conclusion
Finally, dear readers, I would like to draw your attention to a few tricks that will help you not only speed up the process of drying fish, but also improve its quality.
Firstly, it is advisable to load it into the dryer at night (at this time it is cool outside, and there are no annoying flies).
Secondly, during the first 24 hours it must be blown with a fan, this will significantly speed up drying and eliminate the unpleasant odor.
Thirdly, do not even try to dry large roach, bream or crucian carp in uncut form in the heat. In summer, the insides of these fish are full of greenery, which, under the influence high temperature begins to rot, which inevitably leads to their damage.
The drying box should be placed in a place where it will not be exposed to precipitation and direct sunlight (in the shade, under a canopy, in a draft). If you use these simple recommendations, then rest assured that you will end up with a truly high-quality and useful product that your loved ones will appreciate.
ewgeni63 (Kutsenko E.N.) - Especially for, Krasnodar, Russia
A dehydrator is a device that is a dryer for food (greens, fish, meat, mushrooms, nuts, vegetables and fruits). This device can also be used to prepare healthier (dried, without any other processing) food, for example, various desserts, sprouted grain breads, cookies, chips, etc. Handicraft lovers use the machine to create dried flower bouquets, papier-mâché objects, herbariums and others. decorative crafts. Dehydration of products in the device occurs due to the action warm air, infrared or sun rays.
Store-bought equipment is quite expensive. They allow you to maintain a constant set temperature inside the drying chamber. Making a dehydrator with your own hands is an opportunity available to everyone to save on equipment and get a device that allows you to quickly dry food in the required quantities.
A homemade dryer can be made from an old refrigerator. This will make a good dehydrator for fruits and vegetables.
Manufacturing algorithm
The process of manufacturing a drying installation from a refrigerator occurs according to the following scheme.
- Carefully dismantle the compressor, radiator and freezer so as not to damage the tubes and avoid leakage of the working substance (refrigerant).
- Filming interior lining and insulation, leaving a rubber seal on the door.
- A fan is installed in the place where the compressor was installed.
- A hole is made on top (on the roof) of the refrigerator for a pipe (a two-meter piece with a diameter of 100 mm is enough) or an aluminum corrugation 3 m long, which is secured with glue.
- A hook is attached to the door to securely fix it.
- Attach wooden slats to the side walls of the refrigerator box with self-tapping screws or bolts approximately 10-20 cm apart, so that shelves can then be placed on them.
- If there are any holes left, they are sealed.
- To speed up the drying process, place a hood on the pipe or corrugation.
The final design is shown in the photo below.

Nuances of creating a design
The inner lining and insulation are removed because plastic and foam decompose when heated, releasing harmful substances.
When dismantling the insulation, you should wear gloves and a respirator to protect against glass wool (if it served as insulation).
Since the remaining tin cabinet is not particularly rigid, its degree may need to be increased by installing spacers or a galvanized inner casing.

To blow food, it is allowed to use a regular hood fan power 18 W, diameter 125 mm, only installed to pump air inside. Installing a fan heater will significantly speed up the entire process, increasing the productivity of the installation. Instead, you can attach one or two to the back wall electric heating elements with a total power of up to two kW - then the device will work like an electric dryer. In this case, a second exhaust fan should be installed in the upper part of the box.
The created unit can be used all year round. But if a regular fan is installed, then painting the case black, as well as installing the device in the sun in warm time year helps to increase the temperature inside, which speeds up the entire process of drying products.
In order for the created dryer to work effectively, it is necessary to ensure good airflow of the product laid on the sheets. This is achieved by leaving a gap of 2 cm between the frame and the door on one side, and the back wall of the box on the other.
When using the refrigerator with conventional fans without installation heating elements It is enough to remove only the compressor with the freezer and the radiator. Thus, the grooves for installing shelves on them remain, but if necessary, you need to add more. As shelves can be used:
- grates intended for grilling, but with cut off handles;
- metal sheets with holes drilled in them;
- mesh with different sizes cells;
- old mesh refrigerator shelves;
- made of wire or wooden slats lattice structures.

It’s easy to come up with a variety of options for creating shelves for vegetables and other products yourself and make them from scrap materials.
If the compressor is in working order and the coolant circulation system is not damaged, then these spare parts may be useful for creating.
Creating a dryer from a refrigerator takes, if available, necessary details and tools for several hours. The design can be improved in various ways, equipping, for example, temperature sensors And the simplest system automation, or experimenting with the location of fans. To protect yourself from insects entering the dryer, you should: ventilation holes close mosquito net or gauze folded in 2 or 3 layers.
Dehydrator from a homemade cabinet
A dehydrator can be made from homemade wardrobe in a manner similar to the previous one. Only instead of refrigeration chamber there is a plywood cabinet protruding here. For this you will need the following materials:
- plywood or chipboard, fiberboard;
- wooden slats;
- metal corners and screws;
- aluminum foil;
- electric heater;
- 2 fans;
It is better to use a fan heater instead of a separate heating element. The other fan will be a regular one, working for exhaust.
The cabinet must be arranged in such a way as to provide unhindered air circulation. It is collected in this order.

The fans can be connected in parallel and turned on with a switch. The structure can also be additionally equipped with light bulbs indicating the operation of the installation. The fan heater is equipped built-in thermostat. It will automatically turn on the heating element. If necessary, you can turn off one spiral to reduce the power of the installation.
Simple solar dryer for fruits and vegetables
The solar dryer can be manufactured in various ways. At the same time no energy costs: Vegetables or fruits are dried using the energy of the sun's rays. Suitable for summer residents simplest design, which can be done using a hammer, saw, stapler and scissors. Work on creating the installation is carried out in the following sequence.
- Assembling the frame the right size, based on the required volumes of workpieces, for example, from wooden blocks 50 by 50 mm.
- It is sheathed on the sides and back with plywood or boards.
- The back wall is sheathed from the inside with a metal sheet.
- Color inner part black to make the air hotter.
- Shelves made of mesh, wire, plywood, tin, plastic and other materials are installed at an angle that provides the best exposure to sunlight.
- Ventilation holes are made in the upper and lower parts of the structure, the size of which must correspond to the dimensions of the installation.
- Cover them with gauze or mosquito net to prevent insects from getting inside. drying cabinet.
- The front part of the box is made in the form of a frame mounted on canopies.
- It is covered with glass, transparent plastic, polycarbonate or plastic film(attached with a stapler).
- Make a stand for the box from bars or metal pipes.
Also, the created structure can simply be supported on anything. Possible appearance shown in the photo below.
In such a cabinet due to heating metal sheet achieved temperature 40-50 degrees. Ventilation ensures the removal of moisture released from the fruit.
Solar dehydrator with collector
More difficult option solar dryer(shown in the photo below) consists of two sections:
- air heating zone consisting of a collector;
- drying zones where products are placed.

The front parts of both zones are covered transparent material, for example, glass, polycarbonate.
Collector It is a box, the bottom of which is covered with a thin sheet of metal painted black. A heat insulator is placed under it ( mineral wool or sawdust) to minimize heat loss. Air enters the heating zone through the ventilation holes. Then it goes up through the food shelves and out.
By installing black tubes as an absorbent, for example, painted aluminum corrugation, you can increase the temperature at which the air is heated by the collector.
For the device to work effectively, it must be constantly kept with the collector directed towards the sun.. If the collectors are installed on three sides, then there is no need for rotation, and such a drying unit will work all day. All cracks are sealed with sealant.
Solar dryer with fan and thermostat
To create a working automated model 1 m long, 0.6 m high and 0.53 m wide, you will need the following materials:
- glass;
- wooden blocks and slats;
- plywood;
- metal corners;
- aluminum sheet;
- fan with a diameter of 120 mm with a voltage of 12 V;
- mosquito net;
- thermostat (for example, W1209), consisting of a temperature controller and a thermostat;
- voltage stabilizer with KR142EN8B microcircuit;
- solar battery producing a voltage of 12 V;
- metal mesh for pallets.
The device diagram is shown in the photograph below.

The algorithm for manufacturing the structure is as follows.
- According to the diagram above, a frame is assembled from beams and plywood, connecting individual elements with self-tapping screws and metal corners.
- The made body is sealed.
- Wheels (40-100 mm in diameter) are attached to the bottom to make it convenient to turn the structure in the direction of the sun.
- The back door is made of glass so that you can place food and also monitor the drying process.
- Install seven shelves every 7 cm.
- They make shelves from mosquito cloth or steel mesh and slats.
- An aluminum sheet is laid on the collector panel, pre-painted with black heat-resistant paint.
- Mount the fan on top.
- Assemble an electrical circuit by connecting the stabilizer together, solar battery, thermostat and fan, as shown in the diagram below.
- Set the controller to the required operating temperature.

The door must close tightly to prevent insects from getting inside.
A stabilizer is needed to maintain a constant voltage at the fan contacts of 12 V. Further improvement of the created design is possible by fan speed adjustment. It is recommended to rotate the device so that the collector and battery are constantly illuminated by sunlight.
Assembling an infrared dryer
Suitable for mushrooms, vegetables, nuts and fruits infrared dryer. It’s quite easy to make it yourself. To do this you will need the following materials:
- iron wire with a diameter of 5 to 8 mm;
- a cardboard box, for example, from a vacuum cleaner;
- aluminum foil;
- metal mesh;
- light bulb socket;
- awl;
- screwdriver;
- self-tapping screws;
- socket for a regular light bulb with fasteners;
- thermometer;
- infrared lamp;
- aluminum tape or glue.
The installation is created in the following sequence.
- The insides of the box are covered aluminum foil using tape or glue for this.
- Shelves are made from mesh according to the size of the box.
- On any wall near the bottom, make a hole for the supply wire and secure the cartridge with self-tapping screws.
- Screw in the infrared bulb.
- A thermometer is attached to any sidewall.
- Cut the wire into pieces that are approximately 5 mm longer than the width of the box.
- Punch holes in the sides for the rods for the shelving.
- They insert a wire into them and seal its protruding ends with tape on the outside.
- Stack the shelves.
As a result, after all the manipulations, you will get an installation similar to that shown in the photo below.

The lid can be the side parts of the box, or it can be made separately from the same cardboard. If you want to automate the design, you should use temperature sensor. Under his control, the light will turn on automatically.
Also in the created design you can use an incandescent lamp (its sufficient power is 60 W) or heating film, used to create heated floors. In the latter case, at home, a piece of 50 by 100 cm with a power of 110 W is sufficient. IN general case The length of the fragment is selected according to the box used.
When using film you will also need:
- insulation, for example, bitumen, used to create heated floors;
- a set consisting of 2 clamps, two eyelets and the same number of terminal rings, which is intended for connecting power to the film.
PVC tape is laid on top of the bitumen insulation. To connect the film, you will need to solder wires and contacts.

This dryer allows you to achieve temperatures almost 60 degrees. It can be rolled up and placed on the bottom of a box made using the previously indicated method.
Do-it-yourself dehydrator for meat and fish
A dryer for meat and fish can be easily made from a plastic container. For this you will need:
- fan;
- plastic container equipped with a lid;
- steel rods with a cross section of 5 mm or studs with threads, washers and nuts;
- pipe cut or coupling.
The entire process of making a dehydrator for drying fish, meat and drying other products from a plastic container is demonstrated in the video:
It’s easy to assemble a dehydrator for fish, meat, vegetables, fruits and other products from scrap materials: plywood, boxes, a refrigerator. Various working old fans are suitable for blowing. In each case, you will, of course, need to think over a way to secure them, but the economic costs will be reduced. In small installations, you can use a fan from a computer, having previously provided the required supply voltage. If you automate the dryer, then in terms of functionality it will be able to compete with factory analogues. When drying meat and fish, it is imperative to prevent flies from entering the interior of the installation so that they do not spoil the products.
It’s one thing to catch a large amount of fish, and quite another to properly manage the catch. One of the popular ways of processing harvested trophies is drying and drying them.
To prevent the processing process from becoming burdensome and to protect hung carcasses from insects, use a fish dryer. In this review we will talk about various types these devices produced industrially and sold in fishing stores.
Most of the material will be devoted to how to make a fish dryer yourself at home.
Types of dryers
The simplest device for drying is a wire stretched under a canopy or an ordinary clothesline. To protect against insects, gauze is simply thrown over the fish. You can hang roach, crucian carp or bream either on wire hooks made from ordinary paper clips or by pinching them with clothespins.
This option is simple, but it is good for one-time preparation of fish in hiking conditions or on a summer cottage. When the business is up and running and good catches are regular, you need to think about a more or less decent design.
Fish dryers can be divided into two large categories:
- mobile portable;
- stationary.
Each option has its own advantages. The first ones can be used anywhere: from the river bank to the balcony in the apartment.
The simplest portable dryer made in China. When folded, it is very compact, you can take it with you fishing or to the country. On the spot, you can easily unfold it and hang it on any tree branch.
The latter can be called drying cabinets; they are most often used not only for fish, but also for storing vegetables and berries, drying meat and other food purposes.
You can simply dry fish on fresh air, but you can do this with forced submission air fan. At the same time, the drying process is much more intense, and the products are cooked more evenly.
In cold weather, the drying cabinet can be equipped with electric heating elements, which will also help to quickly prepare the fish for use.
A distinctive feature of drying chambers is also the number of compartments they have. Most often, single-section options are used, but there are dryers with a large number compartments, some models have up to 5 sections.
Industrial models
Of our favorites industrial models, let's highlight two varieties. The first is structurally made in the form of a tall cabinet made of metal pipes, covered with mosquito netting. Similar models are produced different companies under the brands "Mitek" and "Kedr".

In the photo there is a dryer for meat and fish “Cedar”, products under the Mitek brand of a similar design
The second interesting model is the two-tier design IdeaFisher ECO-2. This collapsible design is also compact and easy to transport. In addition, depending on the conditions, it works as in hanging version, and installed on a table or on the floor.

The dryer is assembled on plastic corners, and the fish is strung on special skewers.
Homemade products
Let's move on to the most interesting part, let's talk about how to create a fish dryer with your own hands. It must be said right away that there are a lot of designs of dehydrators. All options homemade designs It is impossible to describe in one article, because the imagination of our Kulibins is truly inexhaustible.
Reference! Dehydrator literally translated from Latin is a dehydrator, that is, the same as a dryer.
More often homemade dryers made in the form wooden box, covered with mosquito netting. At the same time, one of the popular variants is the one with dimensions: 500x500x500 mm.

Depending on the location conditions, the dryer is manufactured in a vertical or horizontal version
At the first stage of production, you need to prepare the required number of wooden slats, sand them and coat them protective composition. The coating should protect the structure from moisture and salts, but at the same time not produce harmful fumes that drying products can absorb.
Then, according to the previously completed drawing, the frame of the future dryer is assembled. Self-tapping screws and metal corners are used for installation.

For a small structure, the cross-sectional size of the slats can be 25x25 millimeters. As the volume of the drying cabinet increases, more powerful bars will be required.
Note! The stationary dryer can be mounted directly on the wall.
After the frame is ready, begin tensioning the mesh. In this case, you need to decide how access to internal space. To do this, make a door or sew in a zipper.

Wall-mounted stationary dryer with a hinged door. When using this design, you need to make sure that insects do not fly in while hanging the fish.
An option for such a homemade product is to use it as a cladding tension mesh, and the designs are from modern plastic windows. In this case, you do not need to make a separate door, but use the frame from a ready-made mosquito repellent.

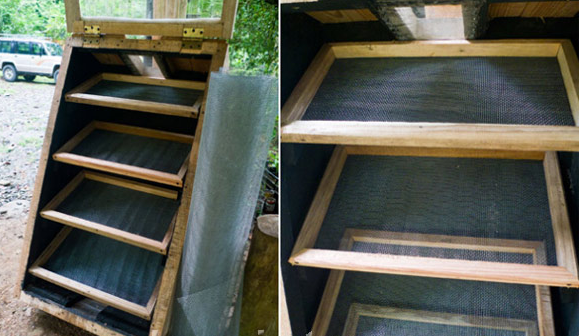
The design is also based wooden frame. At the bottom of the dryer there are trays to collect liquid dripping from the fish.
With fan
Some of the dryers made by our DIYers have fans in their design. Air convection in such dehydrators speeds up the drying process.
Similar dehydrators are made from various plastic containers or in the form of closed cabinets through which air is forced.
Let's look at the manufacturing process simplest dryer with a fan, for this we need:
- large-volume plastic container, from 20 liters and above;
- exhaust vent fan;
- ventilation grille;
- metal rods with threads and matching nuts;
- mounts for grille and fan.
We proceed in the following sequence:
- We make a hole in the lid of the container for ventilation grille and fasten it.
- We fasten the fan in a similar way in one of the side ends of the plastic box.
- In the upper part of the container we make holes for the rods and insert them, tightening them with nuts. This is where we will hang fish and meat.

To dry mushrooms, berries or vegetables, you can install special grates.
If you need to increase the temperature in such a dryer, you can use electric mats. Similar models are sold in pet stores for keeping reptiles.
Advice! You can increase the temperature in the dehydrator by installing regular incandescent light bulbs. In this case, they should be positioned so that drops from food do not fall on them.
When the dryer is ready and the fish is caught, you can start salting it and actually drying it. The whole process requires description in a separate article, but here we will give brief advice.
- Do not wash the fish before salting; it is enough to simply skim it lightly to remove any adhering sand, grass and other debris.
- Use only coarsely ground salt for pickling; under no circumstances use “Extra” or iodized salt.
- Peaceful fish caught in hot weather, feeding plant foods, be sure to gut before salting! Otherwise, the food in the stomach may rot and spoil the finished product.
- When hanging fish inside the drying box, do not let it touch, otherwise uniform drying will not be ensured in these places.
Conclusion
A well-made dryer will not only be a reliable assistant in drying fish, but will also allow you to prepare other products, such as meat, fruits and berries, vegetables and mushrooms. In addition, it will encourage you to use it, which means it will help increase your catches.