Connection diagram for a hot air soldering gun. Schematic diagram of a technical hair dryer. Is your hair dryer broken? Repair and description of work Why the hair dryer does not heat
Construction hair dryer (technical) - a hand-held power tool for directed supply of heated air for the purpose of non-contact (indirect) heating of the material being processed. The scope of application of the tool is very wide: from simple air drying room temperature, to powerful exposure to temperatures above five hundred degrees Celsius. The demand for construction hair dryers is fueled by their low price (on models entry level), due to the simplicity of the design and, in many ways, time-tested circuit solutions.
Interskol FE-2000 is a representative of household construction hair dryers with the minimum required set of functions: smooth temperature control, two blowing intensity modes. This set, as a rule, is quite sufficient to perform the vast majority of tasks. A specific copy of this hair dryer (the first modification, board DB3011) was purchased about three years ago and had a very considerable (but not prohibitive) daily operating load. For this reason, all the imperfections in the design of the hair dryer appeared quickly.
A few months after the start of operation, the first breakdown occurred: there is no temperature control, the outgoing air is always cold. The cause of the breakdown is overheating of the BTA16 triac, its failure due to insufficient pressure to the radiator and non-use of thermal conductive paste. The repair consisted of replacing the triac with preliminary application of KPT-8 paste. This failure did not occur again.


Hairdryer Interskol FE-2000. Suitcase included.

Nozzle. A ceramic heater with a spiral inside is visible.
At the end of the first year of operation of the hair dryer, a fracture (internal wire break) occurred in the power cable near the body of the tool. This malfunction is often found among non-professional tools. The original power cable is not of high quality, it has medium-hard insulation, the fourth or fifth class of flexibility of copper current-carrying conductors. Installation of a new cable KG 2x1.5 (in rubber, double insulation) made it possible to forget about this type of fault.
In the second year of operation, the high-resistance winding of the heater, which serves as ballast for powering the electric motor, broke. The cause of the break is difficult to establish; it could be either a manufacturing defect (which is most likely) or spontaneous rubbing of the nichrome wire on the hard edges of the ceramic due to many heating-cooling cycles. The winding broke and the engine stopped. As a result of stopping the engine with subsequent overheating of the main (high-temperature) winding of the heating element, the thermal fuse tripped (the high-temperature winding remained intact). The body of the hair dryer was disassembled and disassembled heating element, the location of the nichrome wire break has been localized. The break point turned out to be not far from one of the ends of the winding, for this reason it was decided not to connect the ends of the wire, but to wind (remove) a short section. The resistance of the ballast winding was reduced, according to approximate calculations, by 8-12%, which is not critical for the engine. By this time, extraneous noise from the engine bearings began to appear occasionally and its time, unfortunately, was clearly coming to an end. The standard thermal fuse had a nominal response temperature of 125°C, it was replaced with a new one with a higher temperature of 150°C. The small temperature reserve is explained by the assumption that an additional 25°C is unlikely to allow the heating element winding to burn out (in the event of an emergency), but will give more time to promptly turn off the hair dryer before the thermal fuse trips (breaks). To replace the thermal fuse, you need to almost completely disassemble the heating element. About half of all the ceramic rings from which the heating element core is made cracked over time (apparently due to the poor quality of the ceramics) and, when the outer mica shell is removed, the rings disintegrate into small particles. The thermal fuse is connected to the winding of the heating element and to the power wire using miniature crimp sleeves, which must be re-crimped with high quality (without special tool) is very problematic. For the convenience of possible replacement of the thermal fuse in the future, it was installed using flat connectors (car terminals).
By the end of the second year of operation, the plain bearings in the engine began to “ring” loudly. Also, in a random manner, the voltage on the high-temperature spiral of the heating element began to disappear and reappear when the regulator knob was rotated. These malfunctions quickly worsened, and further normal use of the hair dryer for its intended purpose was not possible: the engine hummed, its speed dropped, and it was almost impossible to set the desired heating temperature. There is an urgent need to deeply restore the performance of the hair dryer.


The body of the hair dryer has been opened (photo above). Housing mounting screws (photo below).

The insides of the Interskol FE-2000 hair dryer.
From left to right: board, motor with impeller, operating mode switch, heater.


DB3011 board.


Heating element of the hair dryer Interskol FE-2000.
Replacing the electric motor.
Finding the right engine for sale is not an easy task. Therefore, when a suitable engine was discovered, the decision was made to purchase the engine regardless of its other characteristics (RPM, voltage). As a result, it turned out that the purchased motor had a supply voltage several times lower (12 V) and approximately one and a half to two times lower revolutions than the standard hair dryer motor. These problems had to be solved, but first we needed to remove the old one and install a new motor into the hair dryer body. The engine replacement process is not very complicated. The greatest difficulty is removing the plastic impeller from the motor shaft. Using improvised means, we organize a wedge-shaped stop at the bottom of the hub and, using a drill with a diameter of 2 mm, we gradually knock out the engine shaft. As the shaft comes out, the position of the stop (wedge) needs to be adjusted. Be extremely careful not to damage the plastic impeller hub! Before you wear removed impeller onto the shaft of a new motor, it is necessary to secure the motor with two screws and degrease the surface of the shaft with acetone. It wouldn't hurt to clean and degrease inner surface impeller hubs with gasoline or alcohol. We place the impeller on the shaft of the new engine manually (you can lightly pound it with a miniature rubber mallet), resting the other end of the shaft (located near the brush-collector assembly) against something solid.


Motor with impeller.

Close-up of a plastic impeller.

Remove the impeller from the engine.
We use tweezers as a stop. We apply light blows to the drill, which rests against the motor shaft, with a small hammer.


No capacitors were installed on the new engine.


Measuring the original engine.


Thermal fuse (photo on the left). Flat connector type RpIm+RpIp (photo on the right).
Motor power supply.
The problem of powering an electric motor can be solved in two ways: increase the length (number of turns) of the ballast winding or supply power to the motor from some other source. The first method is complicated by the need to find the necessary nichrome wire and a place to place additional turns in the heating element (which literally crumbles in your hands). Let's take the second path - we'll make a separate power source. A cell phone charger turned out to be very suitable in size and load current. The charger board is placed next to the standard board of the hair dryer; it is necessary to ensure proper levels of insulation (prevent unwanted touching of the boards) and fastening (fixation). But there is one catch - the output voltage. As you know, the charger has about 5 V, but we need 12. Therefore, we will increase the number of turns in the secondary winding of the output transformer of the power supply (charger). We desolder the transformer, disassemble the magnetic circuit, carefully separating the ferrite core into two halves (warming the transformer to 100°C and using acetone can simplify the task). As a last resort, if you cannot disassemble the magnetic circuit, you can wind it using the shuttle principle so that the number of turns is small. The main thing is not to split the ferrite!
We find the finishing end of the secondary winding and begin to slowly wind up turn after turn, counting their number and remembering the direction of winding the wire. When the secondary winding is wound, it is necessary to basic calculations to determine the number of turns for the engine supply voltage (in our case - 12 V): we find the number of turns per 1 V (knowing the former output voltage of the charger), multiply the target supply voltage by it. It wouldn’t hurt to add a couple of turns in reserve (if necessary, they can be quickly wound up).
We increased the output voltage by 2.4 times, the maximum load current naturally decreases by the same value. As is known, the current of a transformer winding depends on the area cross section conductor. To determine the minimum allowable cross-section of the wire for the new secondary winding, we measure the diameter (and calculate the cross-sectional area) of the wound wire, divide the resulting value by 2 (a rough approximation, we will not delve into the jungle of calculations). If the width of the gap for laying the wire allows, then it is not at all necessary to choose a thinner wire, the main thing is to fit the required number of turns and fit the magnetic circuit loosely. We wind the wire turn to turn, observing the direction of winding and counting the number of turns. Upon completion, solder the ends of the wire to the terminals of the transformer, not forgetting to remove the insulating enamel at the soldering points. We cover the mating ends of each of the two halves of the magnetic circuit with tsapon varnish, assemble the transformer by pressing the ferrite halves together until the varnish dries. We tightly wrap two or three layers of a thin strip of insulating tape or paper tape on top of the magnetic circuit, cover it with tsaponlak on top, and dry it. We solder the transformer into the power supply board, connect the motor, and measure the voltage. If it is too large, wind up the turns. When the voltage is correct, we fix the secondary winding - apply a thin layer of tsaponlak to it. The transformer is ready. It should be noted that as a result of this alteration, we received only one engine rotation speed, namely a certain average value in relation to the two original (nameplate) speeds.

Cell phone charger board before conversion.
![]()
![]()
Let's disassemble the transformer.
The secondary winding of the transformer had 12 turns of wire D=0.35 mm in one layer.

![]()
Photo on the left: a coil with PETV enamel wire D=0.32 mm, which will be used to wind the transformer.
Photo on the right: wound transformer coil (29 turns of PETV D=0.32 mm in two layers).
![]()
![]()
Circular winding with insulating tape (photo on the right).


The rewound transformer is installed on the power supply board (photo on the left).
The motor power supply board is ready for installation in the hair dryer (photo on the right).


The standard motor power diodes (D1-D5) were removed to obtain additional free space (photo on the left).
The motor power supply board is in place (photo on the right).
Replacing the variable resistor.
To verify that it is faulty, instead of the high-temperature winding of the heater, we connect an incandescent lamp (see a similar example in the article -). We supply power to the board and see that the lamp does not respond adequately to the rotation of the variable resistor. We unsolder the standard variable resistor, temporarily connect any other (known good) one with the same resistance of 100 K. We see correct work diagrams: the duty cycle of the lamp flashes is clearly tied to the angle of rotation of the variable resistor knob (switch), and in one extreme position of the slider there is no glow of the lamp, in the other there is full heat. The malfunction has been localized, we replace the variable resistor with a new (good) one. In our case, an engine with lower revolutions was installed, and the intensity of the spiral blowing decreased. It is necessary to limit the maximum heating temperature of the coil to avoid overheating and/or tripping of the thermal fuse. To do this, in series with a variable resistor (into the gap of the side terminal corresponding to the maximum power), we solder a constant resistor, the resistance of which is determined experimentally, visually observing the color of the filament of the spiral.


The left photo shows the old (left) and new (right) variable resistors.
The right photo shows the new dual type variable resistor (2 x 100 K). Opening the case is the most quick way determine the pin assignments.


Needle files will help give the resistor handle the desired shape (photo on the left).
The new variable resistor is installed (photo on the right). Inside the red heat shrink tube there is an additional 130K resistor.

The degree of heating of the spiral in the position of the regulator knob, corresponding to the maximum air temperature.


Measurement of minimum and maximum air temperature.
Conclusions.
The technical solutions used in the design of the Interskol FE-2000 construction hair dryer of the first modification are not unique and are not highly reliable. The hairdryer is rightly not positioned by the manufacturer as a tool for professional use. The tool is quite suitable for home use. If the user has some initial level of training, it will not be difficult to restore the hair dryer’s functionality on your own, since its maintainability is good. Future owners of the FE-2000 model, and those who plan to use the hair dryer intensively, can be recommended to check the quality of the thermal contact of the triac with the radiator immediately after purchase and, if necessary, apply heat-conducting paste. It would also be a good idea to immediately replace the power cord with a better one.
Almost every home has a small device called a hair dryer. The hair dryer can be used when resining wooden skis, removing old paint, blowing sawdust from a workbench, dispersing mosquitoes and husbands, drying things, cooling a frying pan with dumplings and how to fan on hot days. A hairdryer is also useful for drying hair.
Most hair dryers of Chinese origin have a primitive electrical circuit. In such hair dryers there is only one switch, which turns on the fan and the thermal electric heater (TEH). Heating elements can be made in various modifications, but in all hair dryers they are made of nichrome twisted into a spring. More advanced hair dryers have two regulators: one regulates the blowing speed, and the second regulates the temperature of the blown air. At the same time, the scheme does not become smarter.
So, I came across a certain hair dryer made in China. The malfunction was the hair dryer's inability to change the blowing speed. There was no upper airflow limit.
As often happens in Chinese manufacturing, the self-tapping screws have a very strange head. A special screwdriver is needed for such a head. You can buy such screwdrivers, but bad luck, you couldn’t unscrew the Chinese screws with Chinese screwdrivers. Therefore, using a regular grinder from a screwdriver, you can make a cunning screwdriver under the head with the required self-tapping screw.

Self-tapping screws can be used for a positive screwdriver, flat screwdriver, asterisk, hexagon, triangle, square and fork. In my case it was a fork.
On the handle there are control switches for regulating the functions of the hair dryer.

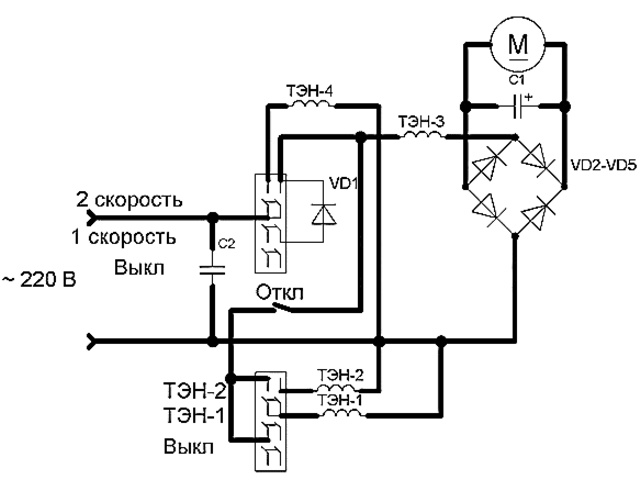
The hairdryer operates on 220 V, 50 Hz. There is a paper capacitor at the input to eliminate interference from the engine. The hair dryer has two regulators. One regulator includes a motor and a powerful heating element-4, and the second – auxiliary heating elements-1, heating element-2. Without turning on the blower, none of the heating elements will start working. When the blower is turned on at first speed, the voltage is initially supplied to diode VD1, designed for a current of at least 1 A. After the diode, the wires branch to heating element-3, which limits the voltage to the DC motor connected through the diode bridge VD2-VD5 and to the second blower temperature controller , switched on through a breaking temperature contact located inside the circuit with heating elements.
The voltage after the diode VD1 from 220 V becomes approximately 155 V, and the heating element-3 limits the voltage to the diode bridge to approximately 16 V. Capacitor C1 equalizes the pulsating voltage after the diode bridge VD2-VD5. At the second blowing speed, the VD1 diode is excluded from the circuit and the voltage of 220 V drops to the heating element-3, limiting to approximately 27 V.
At the first blowing speed with the heating elements turned on, the consumption is 0.9 A, but already at the second speed the current increases significantly to 6.8 A. The current corresponds to a load of about 1.5 kW. The electrical circuit diagram of the hair dryer is presented below.

After unscrewing the two screws, you can remove the upper part of the hair dryer body. If you can’t remove it, plastic parts hold it in place. Sometimes additional screws are hidden with stickers.
The case contains switches, a set of heating elements wound on one frame and covered with a cover. The case is needed to create air channel in which air will circulate. If the cover is removed, the heating element will heat up the air and melt the body of the hair dryer, so when making repairs, you should not heavily load the hair dryer without a cover. The cover is made of paper impregnated with a non-flammable base and painted with heat-reflecting paint.


This hairdryer has a gadget - an ionization button, but like everything in cheap equipment, this button only turns off the block of paired heating elements.

The diode bridge with a capacitor is assembled directly on the engine itself. This saved space.

In addition to Chinese cheap hair dryers for everyday use, there are professional-grade hair dryers. Typically, such hair dryers are made in Europe, but given the fact that cheap labor is concentrated in Asia, you can also find professional hair dryers made in China.

The main feature of professional hair dryers is the presence of a motor not of 16 V with voltage reduction through a heating element and DC power supply, but of a full 220 V AC. By design, such a motor is classified as a single-phase AC commutator motor and is equipped with brushes. The use of such an engine allows you to fully use the ionization function, which allows you to completely turn off the engine heating elements.

A beautiful element is the frame with wound spirals. Typically, spirals are wound from nichrome (an alloy of nickel and chromium). Nichrome has a dark gray color. The resistivity of nichrome is on average 1.1 ohm*mm 2 /m. The length of nichrome wire L, m is calculated by the formula
L=U 2 *P*d 2 /4*P*p
Where U is the supply voltage, V;
P – number pi, P=3.14;
d – wire diameter, mm;
P – power supplied by the spiral, W;
p – resistivity wire, ohm*mm 2 /m, p=1.1.
If it is necessary to wind a coil for a hair dryer with a power of 1200 W, designed for a voltage of 220 V, the available nichrome wire has a diameter of 0.3 mm, then substituting the values into the formula we have
L=220 2 *3.14*0.3 2 /4*1200*1.1=2.6 m
To reduce the required length, the wire is twisted into a spiral, winding it around the rod.
Modern heating elements have a silvery metallic color and are not wound from nichrome. Nichrome soft material, and the metal in heating elements is hard and holds its shape perfectly. I don’t know exactly what metal is used in modern heating elements.
Malfunctions:
|
Malfunction |
Cause |
Elimination |
|
No increased speed blowing |
Replace diode bridge |
|
|
Capacitor C1 is faulty |
Replace (disconnect) capacitor |
|
|
No reduced airflow speed |
Diode VD1 is faulty |
Replace diode |
|
No heating of one of the heating elements |
The niphrom thread broke |
Find the break point and twist the two ends of the wire |
|
Hair dryer won't turn on |
No contact on switches |
Disassemble the switches, clean the contacts with alcohol and stretch the pressure springs |
|
Engine doesn't work |
Faulty heating element-3 |
Find the break point and twist both ends together |
|
Diode bridge VD2-VD5 is faulty |
Replace diode bridge |
|
|
Engine faulty |
Replace engine |
Recently, a hair dryer was brought to me for repair, not one of the most old-fashioned, but times are different now, who repairs a hair dryer for $10, and sometimes it’s easier to buy a new one, taking into account that the entire market is literally filled with cheap Chinese hair dryers. So, let’s take this opportunity to look at the design and operation of hair dryers.
The hairdryer operates on 220 V, 50 Hz. Any hair dryer has two main parts - a heating element and an electric motor.

A nichrome spiral is usually used as a heating element; it provides warm air. Hair dryers mainly use DC electric motors with a power of up to 50 watts, there are exceptions.

Passing through the spiral, the current loses its initial strength, since the spiral has a certain resistance; it is this current that is rectified by the diode bridge and supplied to the electric motor.

Electric motors in hair dryers are designed for voltages of 12, 24 and 36 Volts; only very rare models use electric motors with a power supply of 220 Volts, in which case the voltage from the network is directly supplied to the electric motor. A screw (propeller) is attached to the engine rotor, which removes heat from the spiral, which is why the output produces a fairly strong directed flow warm air. The power of the hair dryer depends on the thickness of the coil used and the power of the installed electric motor.

The hair dryer I brought was disassembled, it turned out that the problem was a broken track on the circuit board with the switches. After filling it with solder, the device worked fine.

But most often, the main reasons for malfunction are a broken spiral, a non-working motor, switch contacts melted from heat, a broken power cord or plug.

Elements in the diagram: 1 — diffuser nozzle, 2 — body, 3 — air duct, 4 — handle, 5 — cord anti-twist guard, 6 — mode button “ Cold air", 7 - air flow temperature switch, 8 - air flow speed switch, 9 - "Turbo" mode button - maximum air flow, 10 - loop for hanging a hair dryer.

The electric motor is supplied with DC voltage obtained through a diode bridge consisting of four diodes (or simply from one diode).

Let's highlight two elements of the circuit that are consumers (loads), these are the spiral and the diode bridge (we do not count the motor, because it is the load of the bridge). In the circuit, the elements are arranged in series (one after the other), which means that the voltage drop across each of them will depend on its own resistance and their sum will be equal to the network voltage in the third position of the switch.
Most entry-level hair dryers have a simple electrical circuit; such hair dryers have only one switch that turns on the fan and heating element. Heaters can be made in various modifications, but in all hair dryers they are made of nichrome twisted into a spring.
However, almost all simple modern hair dryers have 2-3 stages of power and air flow adjustment.
More advanced hair dryers have smooth controls for blowing speed and temperature of the blown air.


The recommended maximum operating time is 5 minutes. Upon completion of work, turn the temperature regulator to minimum, leave it on cold air for half a minute, and only then turn off the hair dryer. Try not to take it wet hands, otherwise moisture may get into the internal elements circuit, which can lead to a short circuit.
This household appliance has been helping to dry hair for more than 75 years - the first example of this electrical product appeared in the early 40s of the last century. Today there is a hairdryer in almost every home, and everyone knows the rules for its use. But the internal structure of a hair dryer is familiar only to some - we will try to fill this gap in knowledge.
The design of the hair dryer is not complicated: the body is made of durable plastic, inside there is a miniature fan with a powerful electric motor and heating elements made of nichrome. The principle of operation is also simple: from the back of the product, as a result of the operation of the fan, an air flow enters, which is heated to the optimal temperature, and then leaves the device through a tapering nozzle.
You can put it on the nozzle of a hair dryer to dry your hair. various attachments such as a comb or round brush for treating long hair, as is done on the product from Rowenta. Other attachments are also used - in the form of small and large combs different designs. A protective grille with a fine mesh is installed at the end of the device to prevent small objects and long hair.
To adjust the speed of air flow, as well as the degree of its heating, different models of hair dryers have switches mounted on the pistol grip for the convenience of users.

Standard product designs are almost the same, with the exception of small nuances. The figure shows main parts of hair dryer:
- fan propeller;
- electric motor;
- heating element in the form of a spiral;
- base with thermal protection;
- start button and mode switch;
- power supply cord.
As can be seen from the diagram, the hair dryer is designed quite simply: the main components are heater and fan, which is built on the basis of a commutator type of miniature electric motors of 12-18 V. A plastic propeller is rigidly mounted on its shaft, the design of which varies depending on different manufacturers. The heating element is a base made of fireproof material, with wire threads or special spirals wound around its body. There can be several windings, which depends on the modes in which the hair dryer operates, but one of them must be step-down.

Hair dryer heater

Hair dryer fan
The photo shows a mini-motor and fan, and below is a heating element unit with two windings.

The coils must be constantly cooled by air flow so as not to overheat. If for some reason this does not happen, then the built-in overheating protection is immediately activated - this is what distinguishes hair dryers from the most famous brands, for example, Philips or Rowenta.
Overheat protection system
The main purpose of a hair dryer is to dry and quickly style hair, while the temperature of the exhaust air sometimes reaches 60 degrees. Many devices are equipped with switches that regulate the speed of air flow and its heat. To protect internal parts from high temperatures A protection system has been installed that turns off the power supply to a working product in emergency cases.
Few users know where the name of the product for drying hair, a hair dryer, came from - sometimes a dry, hot, strong and rather gusty wind comes from the mountains to the valleys, to which the locals gave the name hair dryer.
Any device modern model Two particularly sensitive elements are necessarily present:

Hairdryers are not as complex as they seem: a minimum of basic components, therefore, if available basic knowledge in electrical engineering, you can understand it if there is such a need. Full description can be found in the operating instructions for the specific product.
Typical faults
Let's consider the reasons for the failure of the main parts, because the failure of any of them guarantees the failure of the entire product, since it will not be possible to use it further without repair. You can carry out simple diagnostics yourself if you know the most typical problems of these household appliances.
If your home handyman easily understands electrical household appliances, then services professional craftsmen you won’t need it - all of the listed failures can be eliminated yourself.
Safe Operation
In order not to visit the service center frequently and save time and the family budget, you must strictly follow all operating requirements:
- Use only standard, factory-made extension cords.
- Inspect the cord before each use of the product and do not wrap it around the handle when storing.
- You can only use the supplied attachments that come with the kit.
- Do not use the product indoors with high humidity and do not allow water to come into contact with it.
- Install a special one in the air intake fine mesh filter, preventing hair from being sucked into the device.
- If any malfunction occurs, immediately disconnect the product from the electrical network.
- Do not pull the cord from the outlet or carry the device by the cord. Remember that the wires inside are not steel, but copper, which can be damaged by mechanical stress.
- Don't overheat the hairdryer, if you need a device for long-term use, purchase professional device, designed for long-term operation.
- Before storing the device, you must give it time to cool for at least half an hour.
- The product must be stored in a dry place, the drawer must be locked.
If you follow all the recommendations exactly, your hair dryer will work without repair, and your hair will look flawless and stylish.
Any hair dryer consists of a motor, a fan, heating elements and an electrical circuit that makes these elements work in harmony.
Depending on the number of modes and the manufacturer, the element base, appearance, and composition of the switches may be different. But there will be nothing more complex than a thyristor inside. Therefore, it is quite possible to repair hair dryers with your own hands.
Briefly about the design
The body is held on by screws. Their heads can be - and often are - of a non-standard design. This is a plus sign, an asterisk, a pitchfork.
Therefore, first of all, before repairing a hair dryer, you should take care of a tool that can cope with such a task.
Sometimes the case doors are additionally secured to each other with special latches.
This is a separate problem: experienced craftsmen They often break plastic, despairing of dealing with it using civilized methods.
There are no special tricks, but there are hidden screws hidden under stickers, plastic inserts, and removable regulator caps. (See also: Repairing hair clippers with your own hands)
The hair dryer motor operates on DC 12, 24 or 36 V. To rectify the mains voltage, a diode bridge or, in cheap models, a single diode is often used.
Filtering of power supply harmonics is carried out by a capacitor connected in parallel with the motor windings or included in a more complex filter. Due to their large mass, inductors are rarely used in hair dryers.
Therefore, knowledge of the principles of smoothing pulsations with RC circuits is quite enough to cope with the construction of a circuit diagram of a hair dryer being repaired.
Sometimes one of the spirals (inductance) is used as a filter element. The hair dryer switch, as a rule, simultaneously closes the circuit through which the coils will be powered and starts the motor.
Further repair diagrams depend on the complexity:
- only the rotation speed or only the temperature is regulated;
- It is possible to select heating and air flow intensity separately.
In most hair dryer models, there is protection against turning on the heaters when the motor is inactive.
All that remains is to add to this an optionally available thermostat in the form of a special resistance or other sensitive element, and we can begin to talk about what kind of breakdowns occur with these faithful assistants of the fair half of humanity.
Typical Inspection Procedure
If the device does not show signs of life or is unstable, the inspection begins with the power circuit. Below is a schematic description of the repair of Rowenta hair dryers.
Attention! All types of work described require skills in handling electrical appliances.
We are not responsible for any personal or property damage caused by attempting to follow these hairdryer repair recommendations. (See also: DIY radio repair)
Cord
Inspection of the power wire begins with the outlet. This is where some of the malfunctions lie: there is no voltage - the hair dryer does not work. If there is voltage in the outlet, inspection of the cord begins from where it enters the housing and follows towards the plug.
All work is performed on a de-energized device.
A visual search is carried out for kinks and any irregular formations - burns, insulation damage, breaks. Then the hair dryer body is disassembled.
There may be several options for electrical resistance of the wire inside:
- A pair of detachable contacts.
- Soldering.
- The wiring is sealed in plastic caps.
Permanent connection
 The last element of the list characterizes a permanent connection, therefore, this case is the most difficult to test.
Skillful hands, or rather, smart heads, Ukrainian brothers in wisdom are advised to use an ordinary needle to repair a hair dryer.
For those who immediately grasped the train of thought, you can skip the next paragraph and proceed directly to testing.
Repairing a hair dryer with your own hands begins with checking the wiring. Any tester, light bulb or indicator will do.
The bottom line is that a needle is attached to one of the terminals, which is then stuck into the power core in the area of the cap through the insulation to the copper itself. The second terminal feels the legs of the plug.
The bell must be present for both cores. When repairing a hair dryer, you should not make more than one puncture per wire (some will also try to look for the break point), since the nature of the operation involves the ingress of moisture from wet hair.
Contact pad
Even a child can ring the wire, with clearly visible junction points in front of his eyes. If damage is found, it is recommended to buy a completely new cord with a non-detachable plug.
The possibility of moisture ingress imposes certain restrictions on the insulation of conductive parts used to repair the hair dryer.
There are common cases when at first glance you can see the place of damage in the area where the cord enters the housing. Sludge, carbon deposits, black insulation - all this indicates a malfunction.
The most vulnerable point of the wiring is located at the junction with the body of the hair dryer.
The housewife often takes the delicate device by the cord, swings it from side to side, and winds the cable around the handle. A core with a crack sparks, the insulation heats up and burns, and the copper melts. This is the mechanism of damage to copper conductors.
Switch and Switch
When making repairs, it is useful to short-circuit the switch and see if the hair dryer changes its behavior in response to this step.
 There are three-position switches, each short-circuited position is tested separately.
You should remember or sketch the original wiring layout before starting to repair the hair dryer.
Checking the speed and temperature switches follows the same procedure.
A defective element identified during repair of a hair dryer must be inspected.
Existing carbon deposits are cleaned off with a file, sandpaper, or eraser. Contacts are wiped with alcohol.
Faulty components are replaced with analogues. Radical method- short-circuit the power button while searching for suitable components.
Fan
 Relatively often, the air duct of a hair dryer becomes clogged.
You just need to remove the filter, if any, and clean it thoroughly.
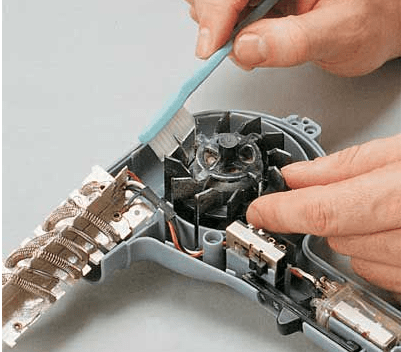
Use a small brush to remove any dust from the crevices.
No blade rotation or low rpm is often observed when hair is wrapped around the motor axle.
The propeller must be carefully removed from the shaft, avoiding unnecessary effort and distortions in every possible way. After this, foreign objects are removed.
Spirals
A hair dryer usually has several heating elements. Visually they should all look uniform. You need to make sure of this when repairing the hair dryer by opening the case. Existing breaks are eliminated by twisting the ends, soldering and tinning.
You can also get thin copper tubes and crimp the ends of the broken spiral inward.
All defects in heating elements during repair can be observed visually. A careful inspection will tell you how to fix the hair dryer. In some cases, replacing spirals with similar purchased or homemade products made from nichrome wire is effective.
Engine
 The electric motor of a hair dryer most often operates on direct current. If the diode bridge is burned out or the windings are damaged, normal functioning is violated.
A terrible crackling sound and sparks when turned on indicate a motor malfunction.
The motor windings are desoldered when repairing a hair dryer from the electrical circuit. Each wire must have a pair that rings.
The pins can be connected in threes, but none of them should just hang in the air. Replacing the winding when repairing a hair dryer is carried out only in a repair shop.
However, folk craftsmen work no worse than machines. Those interested can always try.
If the windings are in good condition, the brushes are inspected, the copper surface underneath them is cleaned, and the tightness of the fit is assessed.
The axle should rotate freely. When repairing a hair dryer, it doesn’t hurt to lubricate the rubbing surfaces and manually work in problem areas.
Chip
The getinax backing sometimes cracks, tearing the track. The damaged area must be tinned and lightly coated with solder.
Damaged capacitors swell slightly.
Typically, their top edge contains shallow slits, and when the product breaks, it literally swells, bending outward.
Such a capacitor must be replaced first if a characteristic defect is detected.
Burnt out resistors turn dark. Some still remain operational, but it is advisable to replace such a radio element.
Thermostat
Some hair dryers have a self-regulator. Typically, the effect is achieved by using a resistive divider, one of the arms of which is an element that responds to temperature.
Further actions depend on the implementation scheme for monitoring the parameter.
- exclude the sensor altogether by breaking the circuit and test the device’s response;
- After this, short-circuit the wires, turn them on, and see what happens.
There is a chance of failure if the device is trained to only respond to a certain resistance value. All that remains is to look for a circuit diagram on the Internet or draw it yourself.
 Repairing professional hair dryers is more complex. Basic design elements are often complemented by smooth controls and additional options like the Care button.
Spirals are made from special alloys that, when heated, create negative ions that have a beneficial effect on hair.
With everything else, the technique remains the same:
- cord;
- switches and buttons;
- dust removal;
- spirals;
- motor;
- visual inspection of capacitors and resistors.
Before repairing, it is advisable to obtain a schematic diagram.
Industrial models are not much different from household ones. But it is not recommended to dry your hair with them. Such products are distinguished by increased resistance to dust, shock, vibration, humidity, and other climatic factors.
Home renovation industrial hair dryers may not end well.
In particular, electrical radio products used in household models are not suitable for use in harsh conditions. Special requirements are placed on wires, power cord, motor and coils.
Any hair dryer has a motor with an impeller and a heater. The impeller sucks air from one side of the hair dryer, after which it blows on the heater and comes out hot on the other side. The hair dryer also has an operating mode switch and elements to protect the heater from overheating.
1 - impeller; 2 - electric motor; 3 - heater; 4 - thermal protection; 5 - mode switch; 6 - power cable
For household hair dryers, the fan is assembled on a DC commutator motor designed for a voltage of 12, 18, 24 or 36 volts (sometimes there are electric motors operating at an alternating voltage of 220 volts). A separate spiral is used to power the electric motor. DC voltage is obtained from a diode bridge mounted on the terminals of the electric motor.
The hair dryer heater is a frame assembled from non-flammable and non-conducting plates, on which a nichrome spiral is wound. The spiral consists of several sections, depending on how many operating modes the hair dryer has.
This is what it looks like:

The spiral is wound on a heat-resistant frame
The hot heater must be constantly cooled by a passing air flow. If the coil overheats, it may burn out or a fire may occur. Therefore, the hair dryer is designed to automatically turn off when it overheats. A thermostat is used for this. This is a pair of normally closed contacts placed on a bimetallic strip. The thermostat is located on the heater closer to the outlet of the hair dryer and is constantly blown with hot air. If the air temperature exceeds the permissible temperature, the bimetallic strip opens the contacts and heating stops. After a few minutes, the thermostat cools down and closes the circuit again.

Thermostat is highlighted in red circle
Sometimes a thermal fuse is also used as additional protection. It is disposable and burns out when a certain temperature is exceeded, after which it needs to be changed.

Thermal fuse, appearance
To better understand how a hair dryer works, you can watch these two videos (watch the first video from the 6th minute):
Video: how a hair dryer works
Video: what's inside the hair dryer
Schematic diagram

Household hair dryer diagram
The circuit of most household hair dryers is close to the above. Let's look at it in more detail. The heater consists of three spirals: H1, H2 and H3. Through spiral H1, power is supplied to the engine; spirals H2, H3 serve only for heating. In this case, the hair dryer has three operating modes. In the upper position of SW1, the circuit is de-energized. In the position the hairdryer works on minimum power: power is supplied through diode VD5, which cuts off one half-wave of alternating voltage, only one heating coil H2 is turned on (not at full power), the motor rotates at low speeds. In the position, the hair dryer operates at medium power: diode VD5 is short-circuited, both half-waves of alternating voltage enter the circuit, coil H2 operates at full power, the motor rotates at nominal speed. In this position, the hair dryer operates at the maximum possible power, as the H3 coil is connected. When you press the button, heating coils H2, H3 are turned off, and the motor continues to operate. Diodes VD1-VD4 are a full-wave rectifier. Inductors L1, L2 and capacitors C2, C3 reduce the level of interference that inevitably arises during operation of a commutator motor. F1, F2 are thermal fuse and thermostat.
How to disassemble a hair dryer
Attention! Before disassembling, unplug the hair dryer from the socket!
The parts of the hair dryer body are attached to each other using screws and special latches. Screw heads often have non-standard shape: asterisk, plus sign, pitchfork. Therefore, you may need the appropriate screwdriver bits. The latches, in turn, are sometimes very difficult to detach and even seasoned craftsmen sometimes they just break off. Sometimes the recesses for the mounting screws are covered with stickers, plastic covers, or plastic plugs. The plugs are removed using a sharp object - for example, a knife or needle. In this case, there is a high probability of slightly denting the body and plugs. True, this will not make the hairdryer work any worse. Sometimes the body halves are glued together. In this case, you have to cut them with a knife or scalpel, and glue them together after repair (for example, with epoxy glue).
You can watch an example of disassembling a hair dryer in this video:
Video: how to disassemble and repair a Scarlet hair dryer
Typical faults: DIY repairs
Let's look at the most common hair dryer malfunctions:
Cold air blows
Possible malfunctions: burnt out spiral
What to do:
As a rule, a break is visible to the naked eye, even without a multimeter. There are several ways to repair a spiral:
- You can place the broken ends of the spiral in a thin brass or copper tube and crimp it with pliers.
- The spiral is supported on a frame made of heat-resistant, non-conducting plates. In such a plate, you should carefully make a round hole with a diameter of about 2–3 millimeters with a sharp tool, insert a short bolt with a washer there, tuck the torn ends of the spiral under the washer and tighten.
- Throw one broken end over the other.
- The broken ends can simply be twisted together. It should be noted that the third and fourth methods are less reliable than the first two. The fact is that when the broken ends are connected by casting and twisting, the repaired section of the spiral has increased resistance and therefore overheats and soon burns out in the same place.
- Disassemble the donor hairdryer (of course, if you have one) and take it from there.
- (not for everyone): you can wind the spiral yourself. Where can I get nichrome? For example, order from China.
- You can buy a ready-made spiral. To find the one you need, enter > in your browser's search bar. There are spirals different power and are sold in bags of several pieces.
You can see examples of spiral repair in these videos:
Video: repair of Viconte VC-372 hair dryer (burnt out coil)
Video: where you can buy nichrome
Does not turn on, i.e. does not heat up and the fan does not spin
Possible malfunctions: no voltage is supplied, that is, a problem with the power cable
How to repair:
First, carefully inspect the cable from the power plug to the housing: there is no obvious damage. If there is, remove the damaged section and solder the ends of the cable. Perhaps these are all malfunctions and the hair dryer will work. An example of cable repair is in the video above: How to disassemble and repair a Scarlet hair dryer.
The impeller does not spin or spins at low speeds
Possible malfunctions: the motor is faulty or hair is wrapped around its shaft.
If hair is wound around the motor axle, you will have to remove the impeller to remove it. You will also need to remove the impeller if you intend to lubricate the motor shaft or replace it. You can see how to do this in these two videos:
Video: removing the impeller from the hair dryer
Video: how to remove the fan from the hair dryer motor
Also, in some cases, you can grab the base of the impeller with your fingers and pull it off to remove it.
Regarding checking the electric motor, the author believes that the best way- from a safety point of view - is to dismantle the motor and connect it to a suitable power supply with short circuit protection. If the motor does not rotate, you need to check the integrity of the windings with a multimeter. If the winding breaks, you will have to buy a new motor (although you can rewind the old one, but this probably only makes sense as entertainment). If the engine sparks excessively, you will also have to buy a new one. Rubbing with alcohol in this case, if it helps, will not last long. One of the options where you can purchase a new engine: order it in China (search).
Hair dryers with air ionization function and infrared devices
Ionic hair dryers- when this mode is turned on, many negative ions are released, neutralizing the positive charge on the hair, which makes it smooth and does not dry out. To create negative ions, a special module is used, located in the hair dryer handle. The wire coming out of this module is located in the heater area. The air is ionized when it comes into contact with this conductor.
It is possible to diagnose the serviceability of the ionization module without special instruments using indirect signs. If you no longer feel the difference when the ionization module is turned on and off - and you are convinced that the module is receiving normal supply voltage - therefore, the module is faulty. Next, you will need to find a module for the required voltage and suitable dimensions. Look, again, in China.
Photo gallery: approximate view of ionization modules
Infrared hair dryers dry hair not with hot air, but infrared radiation. They are quite expensive, belong to the professional category and dry hair much faster than conventional hair dryers. Instead of a nichrome spiral, they use an infrared heating element (as in infrared heaters). Otherwise, their design is similar to that of a conventional hair dryer.
Video: infrared hair dryer h2d
To disassemble and repair a hair dryer, you do not need to be a certified specialist. Enough knowledge of a high school physics course and the presence of straight hands growing from right place. Be brave and everything will work out for you!
The other day, my irresistible, unique and intimate Wife began to complain that her beloved Remington hair dryer not working. This manifested itself as interruptions in normal operation depending on the position of the power cable. That is, if you pull the cable, the hair dryer turns off, if you press it against the hair dryer, warm air comes out. I immediately realized what was happening and began to tear my shirt and wave my favorite soldering iron - they say, let me disassemble and repair the hair dryer right here and right now.
In general, after some moaning, my screwdrivers clashed with her hairdryer in an epic battle until the first... soldering. I’ll say right away - these instructions can be used for most hair dryers from Rowenta, Braun, Philips, Bosch and Scarlett. Of course, all hair dryers are used differently, but their design principle is the same. Let's go.
Remington hair dryer disassembly
First you need remove the plugs on the handle or throughout the body of your favorite hair dryer. In my case, these are three plugs on the hair dryer handle. Recently, it has become fashionable to make the hair dryer body with latches or even fuse the two halves together.
The latches can be defeated, but if the halves are soldered, then you can only cut along the seam and then glue it with epoxy, in general there is no prospect. So when buying a hair dryer for your loved one, pay attention to its design. Easy to remove plugs a needle or a sharp thin knife. Be prepared for the plastic to bend around you and immediately warn your Wife about this. The problem with burrs on plastic can be solved at the end of the repair using the same knife.
 Under the plugs I found U-shaped screws as in the photo. In general, such screws were invented against vandals for outdoor equipment and to protect equipment from inquisitive children. They are called Security.
Such screws, only bigger and with round holes They are in the elevator in my building. It’s good that I had the right two-pronged bit just for these screws. That's it, elevator, just try again to get stuck between floors.
 If you don't have such a screwdriver, you can make a U-shaped screwdriver from an old one slotted screwdriver
, simply making a cut in it with a hacksaw.
If you don't have such a screwdriver, you can make a U-shaped screwdriver from an old one slotted screwdriver
, simply making a cut in it with a hacksaw.
 After disassembling the hair dryer handle, we see the picture as in the photo - hot air supply switch (blue), hair dryer power mode switch (red), twisting of 220 V wires.
Everything is carefully here inspect for breaks any wire or scorch marks, melting on the switches.
 If everything is in order here, then unscrew the two screws of the wire holder at the very bottom of the hair dryer handle. Need to find the break in the wire– usually it is located near the exit of the wire from the hair dryer handle.
Such a weak point is immediately visible if you bend the wire in half.
Remington hair dryer repair
 To check strip the braided power cable at the bend point we see burnt copper wires.
 Boldly cut off the wire and prepare it for installation.
Today, the popularity of self-repair of small household appliances is steadily increasing. Moreover, there are different situations. For example, you urgently need to disassemble a Bosch, Philips or Rowenta hair dryer, but you don’t have instructions at hand. What to do in this case? Today we will try to tell you more about this.
How to disassemble a Philips hair dryer?
Sometimes after an unsuccessful fall or after another mechanical impact, this device stops working. A wonderful way out of this difficult situation will become complete disassembly hairdryer Do you want to know how to disassemble a hair dryer? There is nothing complicated about this, the main thing is to follow the steps of the instructions.
The first step is to disassemble the case. For most models (for example, rowenta pro 2300 and braun 3536), it opens into two identical halves. To comply with safety regulations, be sure to unplug the electrical cord from the outlet before unscrewing the screws.
Typically, the body of the device is held on by simple metal screws. They can be with non-standard heads in the form of a plus sign, a pitchfork or an asterisk. Therefore, before disassembling the Philips hair dryer, you will need to make sure that you have the necessary tools.
After opening the device, you will find the internal mechanisms of the device that are responsible for its smooth functioning. If the hair dryer breaks down, the cause of the breakdown will be hidden in these parts. In addition, some models have additional fastenings in the form of latches and hidden screws hidden under decorative overlays.
Do you want to know how to disassemble the philips salondry control hair dryer? To do this, you need to familiarize yourself with its internal structure and carefully examine all the details. The most common failure of many devices is a damaged power cord. If there are burnt parts or kinks, it will be necessary to re-solder it.
The main internal element of any hair dryer is the fan. It is driven by an electric motor and draws air through a special opening with a grille. In some cases, device failure is associated with contamination, so if there is dust, it should be thoroughly cleaned.
The air passes through the heating element - a wire that is wound on the thermostat. It should have a solid appearance. If there are breaks, the spiral parts should be twisted or soldered. Some models (for example, babyliss pro) are also equipped with a limiter that prevents the device from sucking in long hair and other fibers along with the air. It can also become clogged if the device is not working properly.

If you hear a crackling sound and see sparks when you turn on the device, this indicates a motor failure. This problem can be solved by replacing the copper windings and diode bridge. However, it is difficult to carry out such repairs at home, so in this case you should contact a workshop.
Do you want to know how to disassemble the rowenta brush activ 1000 hair dryer? The design of this device has several nuances compared to a conventional hair dryer. In order to inspect the internal elements and mechanisms in the event of a breakdown, you need to perform a few simple steps:
- Remove the plastic attachment from the front of the device, as it will interfere with disassembly later. To do this, it must be smoothly moved left and right until it is completely disconnected from the device;
- When removing the plastic ring, it is not recommended to use screwdrivers or other tools, as they can damage the case and leave visible scratches on it;
- Afterwards, you need to remove the rear mesh attachment, which interferes with disassembling the device. However, you should not apply a lot of force, as this may lead to its breakage;
- Modern models of hair dryers of many brands (Roventa, Remington, Scarlet and others) do not have metal bolts on the body. The two parts of the hair dryer are secured using latches. To separate them, the two halves of the housing should be pulled away from each other while rotating.
So that you do not have to repair household appliances yourself, do you need to buy from all the variety on the market? Before purchasing, you need to pay attention to the reputation of the brand, since only famous manufacturers engaged in the production of quality products. Other selection criteria are power, number of operating modes, cold air supply function.

We told you about the main features internal device hair dryer, so you should not have any questions about how to disassemble the Roventa Brush Active hair dryer and others brands. However, remember that when repairing small household appliances yourself, you should follow safety rules and be sure to remove the power cord from the outlet.
As a rule, hair dryers are quite often susceptible to various breakdowns, and you have to buy a new one. The device is not the most expensive, of course - you can easily buy another hair dryer, but at the same time it is quite simple, and many people will be able to restore its functionality without much effort.
Operating principle
All hair dryers, regardless of the brand and type of case, have the same operating principle - an electric motor drives a fan, which drives air through heating coils. Typically, hair dryers have a heat level switch, providing different thermal modes - the switch switches the serial connection required quantity spirals - the fewer of them there are in the circuit, the greater the current flowing - the greater the heating. Hair dryers are also equipped with thermal protection that turns off the device if the permissible temperature of the coil is exceeded. If such protection works, be sure to unplug the hair dryer from the network, because when the temperature drops, the thermostat will restore the electrical circuit and the hair dryer will work.
Basic faults
Troubleshooting involves disassembling the housing. It is usually held together with a pair of screws and latches on the body halves, which are quite easy to break, so you need to proceed carefully. Although there won’t be any special tragedy if the latch is broken - the case may well be held on by self-tapping screws, or during assembly you can apply spot glue in several places, but just a little - suddenly you will have to disassemble it.
Burning smell– quite often encountered when using a hair dryer, since the fan sucks through the air intake not only air, but also hair, which then falls on the hot coil and, when burned, causes an unpleasant odor.

Another possible reason is insufficient air flow passing through the fan. This may be caused by overlap ventilation grilles by hand, or by clogging the filter, if one is provided in this model, with hair, fluff, dust, etc. A weak flow can also be caused by slow fan speeds.
Fan rotation slow– This is usually caused by hair wrapping around the motor shaft, which prevents it from rotating. As a rule, the fan is placed tightly on the shaft, and it is not possible to remove it for easy hair removal, since applying great force is risky - the fragile plastic can easily be broken. Therefore, it is convenient to use tweezers - gradually pinching off the wound hair with it until it is completely removed.
The opposite situation also occurs (much less frequently) - the fan does not sit tightly on the shaft, as a result the engine operates at normal speed, but the shaft rotates in the fan housing. The solution is simple - place the fan on the shaft using suitable glue.
The air comes out cold– in this case there may be several reasons:
- Poor contact in the mode switch - the solution depends on the design of the switch. Flexible elastic contact strips of an open type are often used - it is enough to bend them correctly or clean the contact points. If the switch closed type– replacing it is inexpensive.
- Broken wiring - the conductor leading to the spirals or switch may well break off or fall off at the soldering site.
- Broken heating coil. It won’t just break off - most likely it’s a burnout. It can be restored simply by twisting, but such a connection will not be durable - poor contact will gradually provoke carbon deposits, which will further increase the resistance at this point - as a result, sooner or later it will have to be repaired again. It is better to make the same twist, but then crimp it with a copper or brass tube suitable diameter(a thin tube from a refrigerator compressor works well). Soldering is useless in this case - the heating temperature of the spiral will melt the solder.

– there can be many reasons and almost all of them can be easily eliminated – a break in the power cord, lack of contact in the sliding contact pair at the point where the cord enters the housing, break in the internal wiring, lack of contact in the switch, etc. The worst that can happen is This is engine combustion. If there is something to replace, good (so don’t throw away old faulty hair dryers - they are spare parts after all), but if not, then you really need a new hair dryer - there is little chance of repairing the engine.