We make a search magnet. Where to get neodymium magnets inexpensively, and sometimes completely free. What can you do with a magnet?
An electromagnet is a magnet that works (creates a magnetic field) only when electric current flows through a coil. To make a powerful electromagnet, you need to take a magnetic core and wrap it with copper wire and simply pass current through this wire. The magnetic core will begin to be magnetized by the coil and begin to attract iron objects. If you want a powerful magnet, increase the voltage and current, experiment. And so as not to have to worry about assembling the magnet yourself, you can simply remove the coil from the magnetic starter (they come in different types, 220V/380V). You take out this coil and insert a piece of any piece of iron inside (for example, an ordinary thick nail) and plug it into the network. This will be a really good magnet. And if you don’t have the opportunity to get a coil from a magnetic starter, then now let’s look at how to make an electromagnet yourself.
To assemble an electromagnet, you will need a wire, a DC source, and a core. Now we take our core and wind copper wire around it (it’s better to turn one turn at a time, not in bulk - the efficiency will increase). If we want to make a powerful electromagnet, then we wind it in several layers, i.e. When you have wound the first layer, go to the second layer, and then wind the third layer. When winding, keep in mind that what you wind, that coil has reactance, and when flowing through that coil, less current will flow with more reactance. But also keep in mind that we need and important current, because we will use current to magnetize the core, which serves as an electromagnet. But a large current will greatly heat the coil through which the current flows, so correlate these three concepts: coil resistance, current and temperature.

When winding the wire, select optimal thickness copper wire(about 0.5 mm). Or you can experiment, taking into account that the smaller the cross-section of the wire, the greater the reactance will be and, accordingly, the less current will flow. But if you wind with a thick wire (about 1mm), it would not be bad, because the thicker the conductor, the stronger the magnetic field around the conductor and, on top of that, more current will flow, because the reactance will be less. The current will also depend on the voltage frequency (if AC). It’s also worth saying a few words about layers: the more layers, the greater the magnetic field of the coil and the stronger the core will magnetize, because When layers are superimposed, the magnetic fields add up.
Okay, the coil has been wound and the core has been inserted inside, now you can start applying voltage to the coil. Apply voltage and begin to increase it (if you have a power supply with voltage regulation, then gradually increase the voltage). At the same time, we make sure that our coil does not heat up. We select the voltage so that during operation the coil is slightly warm or just warm - this will be the nominal operating mode, and you can also find out the rated current and voltage by measuring on the coil and find out the power consumption of the electromagnet by multiplying the current and voltage.
If you are going to turn on an electromagnet from a 220-volt outlet, then first be sure to measure the resistance of the coil. When a current of 1 Ampere flows through the coil, the coil resistance should be 220 ohms. If 2 Amps, then 110 Ohms. This is how we calculate CURRENT = voltage/resistance = 220/110 = 2 A.
That's it, turn on the device. Try holding a nail or a paper clip - it should attract. If it is poorly attracted or holds very poorly, then wind up five layers of copper wire: the magnetic field will increase and the resistance will increase, and if the resistance increases, then the nominal data of the electromagnet will change and it will be necessary to reconfigure it.
If you want to increase the power of the magnet, then take a horseshoe-shaped core and wind the wire on two sides, so you get a horseshoe lure consisting of a core and two coils. The magnetic fields of the two coils will add up, which means the magnet will work 2 times more powerful. The diameter and composition of the core plays a big role. With a small cross section, we get a weak electromagnet, even if we apply high voltage, but if we increase the cross-section of the heart, then we will get a good electromagnet. Yes, if the core is also made of an alloy of iron and cobalt (this alloy is characterized by good magnetic conductivity), then the conductivity will increase and due to this the core will be better magnetized by the field of the coil.

Conclusions:
- If we want to assemble a powerful electromagnet, then we wind the maximum number of layers (the diameter of the wire is not so important).
- It is best to take a horseshoe-shaped core (you will only need to power the 2nd coils).
- The core must be an alloy of iron and cobalt.
- If possible, the current should flow as much as possible, because it is this that creates the magnetic field.
Do you want to create magnets from scrap materials, but don’t know where to start? In this article you will find many ideas and plans that can be implemented.
This article is intended for persons over 18 years of age
Have you already turned 18?
How to make a magnet?
As you know, it is quite possible to make a magnet with your own hands, and even at home. Such a skill will definitely not be superfluous, because in this way you can make souvenirs for the New Year. It is important to remember that by making a magnet yourself at home, you get an absolutely unique thing and precious experience! In this article you will also learn whether it is possible to make a magnet from wood and how to paint a magnet from plywood.
In fact, making such a magnet is very simple. You just need to put in a little effort and show your imagination properly. By making magnets yourself, you will have a good time and get a wonderful souvenir, as well as a skill that will allow you to create things with magnetic properties literally from the materials at hand.
How to make refrigerator magnets with your own hands: ideas
Fridge door magnets are a great design solution if you want to give your kitchen a homey feel.
IN This list presents the most interesting solutions that can be implemented:
- a magnet with a photo will bring a feeling of comfort, because in the photo slot you can put photos of loved ones, children or even pets (besides, all the above categories will be very pleased);
- topiary - a cute craft in the shape of a tree or bush will fit perfectly into the overall outline of the refrigerator;
- notepad - will help you take various notes or leave messages at home, and you can also write down the names of products that you need to buy;
- Christmas tree is a design element inherent to the New Year holiday, which can hang on the refrigerator at any other time.
For many centuries, the dog has been a faithful friend and travel companion of man on his life path. Therefore, a magnet with a picture of a dog placed on the surface of the refrigerator (or any other) will become a wonderful aesthetic decoration. You will find templates for making a dog below.
Regarding materials: the dog’s fur can be made from felt, and the ears can be made from nylon tights. In addition, the puppy can be made from papier-mâché. Such a product can be decorated and diversified with various design solutions, which will add realism to the decoration.
Coffee beans have always been excellent material for use in fine arts. They have an attractive appearance and a pleasant smell. Coffee beans can also be used to create magnets, because with their help you can create absolutely extraordinary sculptures. From them you can glue topiary, which will complement the interior favorably. You can also use them to create a sculpture of a dog. In addition, you can create coffee heart, which will look perfect as design solution for the kitchen.
We will show you how to make a cat magnet with your own hands.
For this craft you will need:
- coffee beans;
- thick cardboard;
- brush:
- scissors;
- PVA glue;
- jute twine;
- glue gun
Manufacturing
1. Take the cat template you like and cut it out of paper.
2. Transfer the image to cardboard and cut it out.
3. Cover the top with burlap (from the wrong side of our craft!) and leave under pressure for several hours so that the glue dries thoroughly. The burlap will make our magnet more dense.
4. Trim excess fabric along the contour.

5. Cover the front side of the cat magnet with brown paint so that there are no white spaces in the future.
6. Wait for the paint to dry. Then we glue the end part of the workpiece with twine using hot glue from a glue gun.
7. Glue the cat with coffee beans, also using a glue gun.
8. We fix the magnetic tape on the back side.
9. Make antennae from twine. You can take the eyes from an old toy or use small buttons. You can tie a bow around the cat's neck.

How to make a search magnet with your own hands?
It is quite easy to create a search magnet that will always point in a north direction, which coincides with the Earth's magnetic field. To do this you will need a needle, a stopper and a bowl of water. Through all the simple manipulations you will get a device that will involuntarily move parallel to the magnetic field.
You can also create it yourself:
- electric magnet. It is created by passing current through a piece of metal. This is done to create a magnetic field. To do this you will need a nail, wire, adhesive tape and battery;
- neodymium magnet. Creating it at home is problematic, because you will need a lot complex units, but it’s worth a try anyway;
- a levitating magnet is a spectacular design that can decorate any interior with its mystery;
- magnet for needles on canvas - extremely convenient thing, which will save you from having to look for needles, since they will all be collected in one visible place;
- A magnet for non-ferrous metals is a thing that will significantly help in finding non-ferrous metals, regardless of the location of the search.
How to make a magnet for welding with your own hands?
Magnetic corner is one of the the most important conditions quality welding, because it allows welding work as accurately and efficiently as possible. This complex process itself with such a part is simplified, because a welding magnet allows you to fix the parts to be welded in the desired way. When creating such a welding device yourself, it is necessary that it does not need to be literally torn from the object. It is desirable that it be “switchable”, that is, it comes unstuck without external influence. For greater clarity, when creating such a device, you should prepare drawings in advance that will take into account all proportions.
How to make magnets for curtains with your own hands?
Magnetic curtain ties are a device that can make your life much easier. Using magnetic surfaces in your home simplifies many things that you never thought could become even simpler. For example, a magnetic surface for knives on the wall will save you from the need to constantly reach into a desk drawer; you just need to remove the right knife from a magnetic board. The main thing is to properly calibrate the magnetic field of this device so that it holds the knives vertically, but not strong enough to tear them off.
Making New Year's magnets with your own hands
Decorating the apartment for New Year(on NG), you can also use magnets. The symbol of 2018 is a yellow dog, which, as we know from one of the previous paragraphs, can be depicted from papier-mâché, as well as felt and nylon. This way you will have interesting craft for decoration that can hang all year for obvious symbolism. In addition, using magnets you can make New Year decorations from satin ribbons, which do not need additional fastening, because the magnetic field itself will hold them in the place you need. Such a designer find will look extremely impressive and will be appreciated by your guests and family.
Making your own salt dough magnets
Salt dough is an extremely cheap, accessible and extremely flexible material.
To prepare the test you will need:
- 2 tbsp. l. flour;
- 1 tbsp. l. salt;
- a little water and PVA glue.
1. Mix all the ingredients, knead thoroughly with your hands until it stops sticking to your hands.
2. Cover a baking sheet with foil or parchment and place directly on it. Using the stacks we sculpt the necessary figure (for us it will be a heart).
3. Smooth out any unevenness with a wet brush. Place in a cold oven, gradually raising the temperature to 130 degrees. The product must dry completely.
4. Turn off the oven and let the product cool. We paint it in any color. You can use watercolor or gouache. Reverse side paint it black and glue it with magnetic tape. The magnet is ready!

A here from What other materials can magnets be made from?
- from polymer clay. An extremely effective material for modeling, which is ideal for realizing your wildest creative fantasies;
- made of plaster - perfect for creating small objects;
- made of felt - patterns can be found in the public domain;
- from beads. This material has enough options to realize creative potential;
- from foamiran. Plastic suede is gaining popularity in craft circles, and this material is also extremely easy to use;
- from a battery - discharged batteries can be given a second life in this interesting way;
- made of clay - a classic material for needlework. Perfect for creating magnets.
How to make a strong magnet at home?
Like other types of magnets, creating a powerful magnet at home requires a little more effort. As you know, objects are magnetized by friction against other magnets to produce a magnetic field, so in order to create something more powerful, you should simply apply friction more once.
To understand how to increase the strength of a magnet, you need to understand the process of magnetization. This will happen if the magnet is placed in an external magnetic field opposite side to the original one. An increase in the power of the electromagnet occurs when the current supply increases or the turns of the winding are multiplied.
You can increase the strength of a magnet using a standard set necessary equipment: glue, a set of magnets (you need permanent ones), a current source and insulated wire. They will be needed to implement the methods of increasing the strength of a magnet, which are presented below.
Reinforcement with a more powerful magnet
This method involves using a more powerful magnet to strengthen the original one. To implement this, you need to place one magnet in the external magnetic field of another, which has greater power. Electromagnets are also used for the same purpose. After holding a magnet in the field of another, amplification will occur, but the specificity lies in the unpredictability of the results, since for each element such a procedure will work individually.

Strengthening by adding other magnets
It is known that each magnet has two poles, and each attracts the opposite sign of other magnets, and the corresponding one does not attract, only repels. How to increase the power of a magnet using glue and additional magnets. This involves adding other magnets to increase the final power. After all, the more magnets, the correspondingly greater the force. The only thing that needs to be taken into account is the connection of magnets with like poles. In the process, they will repel each other, according to the laws of physics. But the challenge is gluing, despite the physical difficulties. It is better to use glue that is designed for gluing metals.
Curie Point Enhancement Method
In science there is the concept of the Curie point. Strengthening or weakening of a magnet can be done by heating or cooling it relative to this point itself. Thus, heating above the Curie point or strong cooling (much below it) will lead to demagnetization.
It should be noted that the properties of a magnet when heated and cooled relative to the Curie point have an abrupt property, that is, having achieved the correct temperature, its power can be increased.
Method No. 1
If the question arises, how to make a magnet stronger if its strength is adjustable electric shock, then this can be done by increasing the current supplied to the winding. Here there is a proportional increase in the power of the electromagnet and the current supply. The main thing is ⸺ gradual feeding to prevent burnout.
Method No. 2
To implement this method, the number of turns must be increased, but the length must remain the same. That is, you can do one or two additional row wires so that the total number of turns becomes greater.
This section discusses ways to increase the strength of a magnet at home; experiments can be ordered on the MirMagnitov website.
Strengthening a regular magnet
Many questions arise when ordinary magnets cease to perform their direct functions. This often happens due to the fact that household magnets are not such magnets, because, in fact, they are magnetized metal parts that lose their properties over time. It is impossible to enhance the power of such parts or return them to their original properties.
It should be noted that it makes no sense to attach magnets to them, even more powerful ones, since when they are connected with reverse poles, the external field becomes much weaker or is completely neutralized.
This can be checked using an ordinary household mosquito curtain, which should be closed in the middle using magnets. If you attach more powerful magnets on top of weak initial magnets, then as a result the curtain will generally lose its connection properties through attraction, because the opposite poles neutralize each other’s external fields on each side.
Experiments with neodymium magnets
Neomagnet is quite popular, its composition: neodymium, boron, iron. Such a magnet has high power and is resistant to demagnetization.
How to strengthen neodymium? Neodymium is very susceptible to corrosion, that is, it rusts quickly, so neodymium magnets are coated with nickel to increase service life. They also resemble ceramics and are easy to break or crack.
But try to increase its power artificially there is no point, because it is a permanent magnet, it has a certain level of strength for itself. Therefore, if you need to have a more powerful neodymium, it is better to purchase it, taking into account the required strength of the new one.
Conclusion: the article discusses the topic of how to increase the strength of a magnet, including how to increase the power of a neodymium magnet. It turns out that there are several ways to increase the properties of a magnet. Because there is simply magnetized metal, the strength of which cannot be increased.
Most simple ways: using glue and other magnets (they must be glued with identical poles), as well as a more powerful one, in the external field of which the original magnet must be located.
Methods for increasing the strength of an electromagnet are considered, which consist of additional winding with wires or increasing the flow of current. The only thing that needs to be taken into account is the strength of the current flow for the safety and security of the device.
Conventional and neodymium magnets are not capable of increasing their own power.
What is a neodymium magnet? This is a high-tech development of modern scientists. More than 20 years of hard scientific and practical work. As a result, a magnet was obtained that surpasses all other known magnets in its characteristics. It is made using rare earth alloys, so interest in such materials has always been and remains high. The task before the scientist and experts was to create a powerful and strong magnet, which at the same time for a long time maintains its basic physical properties. These are the properties that a neodymium magnet has, the strength of which has not weakened for many decades, and its scope of application is quite wide. Their use is described.
Is it possible to create a neodymium magnet yourself?
Many have wondered about creating such a magnet at home, but, unfortunately, it will not be possible to create such a device at home. The most advanced technologies, equipment and tools are used to produce such magnets. Therefore, without special means It will definitely not be possible to create such a device. The magnet itself is made in an interesting way, the material for manufacturing is crushed, then sintered in special furnaces and then it is given the power of a magnet. Therefore, it will not be possible to repeat this at home. But many people don’t even realize that neodymium magnets are found in household devices and various devices, and after the device fails, the magnet can be removed and used for various purposes.

Neodymium magnets in the house
So, where can you get a neodymium magnet at home? Many people don’t even realize that there are many places around us where you can find products made from this rare alloy. There are several places and devices where such magnets are most often used.
Hard drives. Hard drives can be identified as the first place among all devices where you can find such a magnet. Moreover, such a data storage device can be found in any home. Of course, no one will disassemble a work computer or laptop in order to remove a magnet from it. In addition, a hard drive is a high-tech device that is quite difficult to open and disassemble. It is also worth noting that hard drives contain quite powerful magnets, which are not inferior in strength to those that can be bought in a specialized store. Also important point is that in modern hard drives the magnets are much weaker, due to new standards and production technologies, so it is better to look for an old drive.
Furniture latches. No one would probably have guessed that you could look for a powerful magnet in ordinary furniture latches that hold the door closed. But a neodymium magnet is very often located inside the latch. This is due to the fact that the surface area of the latch is relatively small, so ordinary magnets will not give the required effect. Also, the latches themselves quite often break and after that you can disassemble them and remove the magnets, or old furniture, which is often simply thrown into a landfill. But it is worth noting that the power of such magnets is low, so they are not suitable for all purposes.
Engines and generators. Quite often powerful neodymium magnets can be found in modern electric motors. The power and size of the magnets in the motors are quite large. An important nuance is that the engine or generator itself should not be very old. Because the production of neodymium magnets began relatively recently. Therefore, they most likely will not be found in old Soviet engines.

Magnets on sale
In fact, magnets can be found in the most unpredictable places. These could be knife holders in the kitchen, wall clock, various figurines, jewelry, decorative items. In general, any objects that have magnetic properties can contain neodymium. The question is whether a magnet found at home in household appliance or hard drive in terms of power and size... Industrial magnets are also made with a thread or hole of the required shape and diameter. If a neodymium magnet is needed for business, then it is better to think about buying a real large magnet.
In this article I want to tell you how you can make a cute magnet with a photo for your refrigerator. And not only produce it, but also sell it profitably.
My site was originally dedicated to sublimation printing. But this does not mean at all that you can make money only by selling mugs, plates, puzzles and other sublimation products. There are a lot of ideas! This includes thermal transfer and the production of watches with a photographic portrait and the printing of various calendars and much, much more.
The first article is about magnets.
What attracts me most about making vinyl magnets is the simplicity (no equipment needed) and the amazing price tag. Judge for yourself - a magnet measuring 65 x 90 mm costs me less than 5 rubles. I sell it in kindergartens for 120 rubles!
There are different magnets - plastic, metal, sunset ones. We will make a magnet based on magnetic vinyl. It looks like this:

In a nutshell, this is the most ordinary photograph pasted onto magnetic vinyl.
Choose any photo frame and insert a photo of the child. You can draw a photo frame yourself or download it from the Internet. Just don't forget about copyrights. Not all authors allow you to make money from their frameworks and templates.
To make a magnet we need the simplest tools:
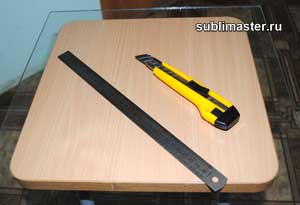
This is a small piece of glass, a stationery knife and a metal ruler. Is that all? - you ask! Yes, this is enough to make good money. You don't even have to have your own printer. You can always order photo printing on the side. And your magnets will not become much more expensive. We'll calculate everything later.
A few words about magnetic vinyl. It is sold in rolls, usually 30 meters. Such a roll is not only quite expensive, but also very heavy. And this increases the cost of delivery for those who order vinyl by mail or through transport company. Those who have the Zenon company nearby are luckier - they will sell at least half a meter of magnetic vinyl. Agree, this is very convenient.
Magnetic vinyl comes in different thicknesses. I recommend purchasing vinyl no thinner than 0.7 mm to make magnets. Magnets made from thinner vinyl look cheap and not solid.
Magnetic vinyl also comes with an adhesive layer and without an adhesive layer. Has an adhesive layer protective film and with equal thickness it costs a little more.

All you have to do is choose a link:
Magnetic vinyl with adhesive layer + regular photo on paper
Magnetic vinyl without adhesive layer + photo on self-adhesive photo paper.
I'll use the second option. I have 0.75mm glueless and inkjet vinyl on hand from Privision.
So, let's start making our magnets.
I think finding a cute photo frame won't be too difficult for you. We will assume that you already have it. Adjust the photo frame to the size you need - mine is 65 x 90 mm. With this size, 9 magnets fit on an A4 sheet. Of course, you can choose absolutely any size.
You also photographed the children. All that remains is to insert the photos into the frame. This can be easily done using or.
By the way, a large section will soon appear on the site about how to photograph children in kindergartens and schools and process photographs. Don't forget to not miss the announcement.
The photos have been inserted, now they need to be placed on a sheet of paper and printed. You can use Photoshop for this, but I like CorelDraw. I import one photo frame at a time and place it on A4 sheet. If you order more than one magnet, I duplicate it required quantity once.

All photo frames are placed, self-adhesive photo paper is inserted into the printer. We send the sheet for printing! We print with regular water-based ink.

Now we will stick the photo paper onto the magnetic vinyl. I first cut it into A4 sheets. More precisely, they turn out to be a little smaller - 20.5 x 29 cm. The width of the magnetic vinyl roll is 61.5 cm. I cut it equally into three parts. And I deliberately reduce the length a little; with my size of magnets this is quite enough. You also try to calculate everything so that there is less waste.
To ensure that the photo paper lays flat on the vinyl without bubbles or creases, just watch me do it and repeat.
First, turn the sheet face down and bend the backing paper about 15mm along the short edge of the self-adhesive.
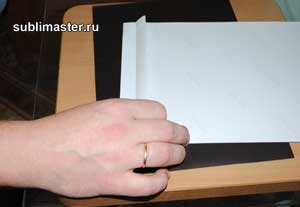
Now we turn the sheet over and, holding the edge with the folded paper (not letting it stick), place the sheet exactly on the magnetic vinyl.

Having positioned the sheet as needed, carefully glue the edge of the sheet to the vinyl and iron it well with a dry soft cloth.

Now our sheet is securely attached to the magnetic vinyl and will not move anywhere. Left hand place it under the sheet, grab the edge of the protective paper and begin to smoothly pull it to the side, exposing the adhesive layer, and right hand Using a rag, smooth the sheet onto the vinyl with upward and downward movements.

So we smooth it to the end.

Set the resulting sandwich aside for 15 - 20 minutes so that the adhesive layer sets well. Now the magnets can be cut. A reciprocating cutter is ideal for this purpose, but you can do just fine without it.
A metal ruler and a utility knife are what you need. To ensure that the knife cuts rather than tears the vinyl paper, keep the angle of the knife as small as possible to the surface.

Renew the knife blade by breaking off the dull part. I usually do this after cutting the next A4 sheet.
Here are the first nine magnets ready.

I put each magnet in a separate bag. I have them 75 x 120 mm. This bag costs pennies, and parents really like the individual packaging.

That's the whole process. As you can see, nothing complicated. Now let's do some math.
I bought magnetic vinyl without glue 0.75 mm thick for 310 rubles for linear meter(width 0.61 cm), which is 504 rubles per square meter or 30.3 rubles per A4 sheet (rounded to 31 rubles).
I bought self-adhesive for 100 rubles for 20 A4 sheets. This means one sheet costs 5 rubles.
31 + 5 = 36 rubles.
36 rubles: 9 magnets = 4 rubles per piece!
Let me remind you that I sell them for 120 rubles. I know that some people sell similar magnets for 150 rubles.
Now a few words about quality. Water-based inks have a serious drawback - they fade quite quickly. Particularly compatible inks. If your customers' refrigerator is located near a window, the magnet on its door may fade within a year. In this case, I will advise you to print the photos in a darkroom and glue them onto vinyl with an adhesive layer. In this situation, the cost of your magnet will increase by 2 - 3 rubles, but it will not fade over the years.
Alternatively, the magnet can be covered with a thin cold laminate (laminating film). This makes the process a little more complicated, but the magnet looks great!
You can also purchase an inexpensive corner cutter and beautifully trim the corners of your magnets.
In a word, I gave you an idea. How you put it into practice is entirely up to you. Now you know how to make a magnet with a photo. Take my word for it, such magnets are in constant demand in kindergartens and schools!


