Coffee table with LED lighting. Unique DIY infinity table Procedure for assembling the tabletop
Conventional vanities generally need to be installed in a well-lit area. Models with external and built-in lighting from the Heggi catalog remove this limitation. Now furniture can be placed even in a corner, and at the same time uniform, comfortable lighting for cosmetic procedures will be quite enough.
Model range of dressing tables with mirror and lighting
The collection includes several modifications of furniture:
- traditional dressing tables with lighting and mirror (one or three panels). Equipped with open and closed shelves, drawers, pouf. Materials: solid wood, veneered MDF, metal;
- chests of drawers with several drawers at the bottom. Convenient if the room requires additional storage space. A mirror and a niche for cosmetic accessories are installed under the hinged lid;
- designs that combine the functions of a dressing table and a desk. The mirror and compartments for cosmetics are hidden under the mobile tabletop. When folded, the furniture turns into a comfortable workplace.
Each model belongs to one of the furniture series for the bedroom and living room. Buy dressing table with lighting can be used separately or in a set with a wardrobe, chest of drawers, bed, nightstands. Goods are delivered throughout Russia (check with managers for terms and costs). In Moscow, there is the possibility of pickup from the store’s warehouse.
Table with lighting - very interesting and eye-catching element decor rooms.
Thanks to the use of a translucent mirror and multiple sources light is created amazing effect shining tunnel.
This unusual piece of furniture is also called an infinity table, 3D table and a glowing table.
Classmates
LED strips

The most convenient are self-adhesive tapes.
Operating principle
The LED strip consists of two diodes - single-chip, having one color spectrum, and three-crystal, consisting of three color spectra (green, blue, red).
Radiation crystals mix to form a wide range of colors gamma.
Specifications

- LED type - The main difference between all LED strips is from each other. The most common LEDs are SMD 3028 and SMD 5050.
The abbreviation stands for “surface-mounted device”, and the numbers indicate the dimensions LED lamps: 3.0 x 2.8 mm and 5.0 x 5.0 mm. - Density. The more LEDs per one linear meter, the brighter the glow from the tape.
- Glow color LEDs can be anything. The most popular are white, yellow colors, cold and warm tones.
- Moisture protection. IP 20 - open, IP 65 - moisture resistant, IP 68 - the highest degree of moisture protection.
Advantages
- Large light recoil;
- High strength and vibration resistance of tapes;
- Long service life use (about 100 thousand hours);
- Various tones and shades glow of lamps;
- Inertia the tapes are small, which allows you to use the most high brightness from the very moment you turn it on;
- Quantity cycles turning on/off does not in any way affect the service life of LED strips;
- Environmental friendliness;
- Safety;
- Budget price;
- Not susceptible to breakage due to low temperatures temperatures
Pay attention! High temperatures are strictly contraindicated for LED strips.
How to make a backlight computer desk using LED strip, see video:
DIY 3D table
Let's consider making more complex, but the safest and beautiful LED table.
Materials

- Mirror(diameter 60 cm);
- Mirror translucent self-adhesive film;
- Expanded polystyrene(for the body);
- Glass or plexiglass (thickness 4 mm, 65 x 65 cm);
- Metal strip on a roll (for windows);
- Wires;
- Instantaneous superglue;
- Bilateral scotch;
- power unit 5/5.5V 200/300mA with USB output;
- Self-adhesive tape LED(not less than 1.5 - 2 meters);
- Arduino Uno;
- Programmer for Arduino (for projects);
- USB for powering the microcontroller.
Pay attention! The mirror can be of absolutely any shape: square, circle, oval, D-shaped bar counter, etc.
Tools

- milling cutter(a nozzle is required for making round parts);
- regular or
- soldering iron(you definitely need solder for a soldering iron);
- Dremel;
- scissors;
- knife(for cutting metal and plexiglass);
- pencil, pen, thin marker;
- square(ruler).
Stages of work
Step 1. Cut from a piece of plexiglass circle according to the diameter of our mirror. edges we clean up we remove the shavings. 
Pay attention! When cutting a circle from plexiglass, you should move the milling machine quickly so that the edge does not melt.
Step 2. Carefully glue the self-adhesive tape onto the plexiglass. film. We glue the plexiglass to the table with tape. We remove the film that is applied to plexiglass, and film with mirror film. Spraying plexiglass water, and even better - soapy solution. We place the mirror film on the glass and expel all the formed bubbles.
Step 3. Protruding edges of the mirror film cut off scissors. We leave the entire structure to dry (at least 12 o'clock).
Step 4. Carefully attach to the dried mirror plexiglass metal strip using transparent superglue.
Step 5. We glue the LED strip on internal side of the metal strip.
Step 6. We drill holes in the metal strip for wires
Step 7 We polish the received holes.
Step 8 The connection code can be write yourself, or you can use a ready-made one. Scheme connecting the Arduino Uno controller: 
Step 9 From plexiglass you need to cut 10 - 15 small rectangles. Using clear instant adhesive, attach them to facial side of the mirror. They will serve as supports for designs made of glass and metal. Size The rectangles should be such that the strip together with the plexiglass overlaps our mirror.

Step 10 To rectangles install top structure with glass. The glue must be completely dry out. It is advisable to put something heavy on top for the best bonding surfaces.
Step 11 Second (external) film remove from the plexiglass. This design can be used as mirror. We install the structure on a table with a tabletop of the same or smaller diameter

For nutrition tapes can be used electrical networks or build a small battery. When powered by a battery, the table will become even more safe and will not depend on the power grid. It can also be installed in suburban home where there is no power supply.
LED strips are safe and durable. To illuminate the table you can use plain or multi-colored LED strip (they differ only in price). Luminous the table will delight the owners and their guests with an unusual design.
How to install lamps to illuminate the desktop in the kitchen, see the following video:
See inaccuracies, incomplete or incorrect information? Do you know how to make an article better?
Would you like to suggest photos on the topic for publication?
Please help us make the site better! Leave a message and your contacts in the comments - we will contact you and together we will make the publication better!
Reading time ≈ 6 minutes
You can make your interior unique and original with the help of unusual pieces of furniture, for example, a table with an infinity effect. Making such a thing yourself will not be difficult if you use simple instructions. The finished product will organically complement any modern interior and will cause genuine delight among household members and guests!
Table with LED lighting.
Feature of the table
Externally, the table is not much different from any ordinary one. coffee table. However, as soon as you turn on the backlight, the tabletop of the product begins to flicker and glow with hundreds of lights, creating the illusion of infinity. I want to admire such magic all the time, but those who are indifferent to unusual table will not be found either among adults or among children.
coffee table with lighting it looks especially impressive when the lights are off in the evening.
The infinity effect is achieved thanks to the special design of the tabletop - its box consists of two mirrors, and a diode strip is installed on the sides. In this case, a translucent mirror is selected for the top cover so that the light pattern is more noticeable and pronounced.
The design of the product is shown in more detail in the photo below:

Design.
You can turn on the product using remote control or a special switch on the box.
To illuminate the tabletop, you can choose diodes of any desired shade or combine several colors. But experts especially recommend taking a closer look at red diodes - due to their slight dispersion endless tunnel gains more depth.
This unusual piece of furniture is perfect for both home use, and for placement in the office. It can be made in absolutely any size and from any materials.

Table with lilac lighting.
Materials and tools
You can make an exclusive piece of furniture with your own hands. To do this, prepare necessary materials, tools and follow the step-by-step instructions.
To make a table you will need:
- boards for the frame (wood or particle board);
- mirror according to tabletop parameters;
- translucent mirror. The dimensions should be 10 cm larger than the bottom mirror;
- self-adhesive diode tape, length depending on the size of the table, but not less than 1.5 m;
- materials for connecting the tape: controller, programmer, wires, power supply with USB;
- consumables: sandpaper, glue, screws, metal corners.
Instead of a translucent mirror for the top cover, you can take regular glass and cover it with tinting film yourself.
Idea: to reduce work, you can purchase the simplest table in any furniture store and use it as a ready-made base.
Why choose LEDs:
- They give a rich, beautiful, deep shade.
- Longer service life without burnout (the number of on/off switches does not affect the service life).
- No heating.
- High efficiency.
- Various colors.
- Reasonable price.
- Light bulb safety.
Assembly
Before assembly, it is necessary to develop a drawing of the table, calculate the distance between the mirrors, the number of diodes, and think about the location of the electrical elements.
To get an idea of what the twinkling lights will look like in finished product, just place any light source between the bottom and top of the table and look at the result.
Regarding the distance between the mirrors, everything is individual and depends on your wishes. But often the average value is chosen - 8 cm. To calculate the depth of infinity, the distance between the covers must be multiplied by 16. Also keep in mind that the depth of the tunnel will depend on the light transmittance of the top cover. After all the calculations, you can proceed directly to assembly.
Step-by-step instructions for making a table with an infinity effect with your own hands - making the base:
- From bars with a cross section of 5*5 cm and metal corners you need to make the frame of the future table. For fastening, use screws and a screwdriver.
- Using sandpaper, carefully sand all edges and corners to make them smooth and remove burrs.
- Drill holes for electrical elements using a drill, follow the drawing. The holes need to be sanded tighter.
- For additional fastening of the structure, you can treat the joints with glue. After this, the frame must dry for at least 24 hours.

Frame assembly.
Assembling the tabletop step by step:
- To a sheet of plywood the right size attach boards (section 5*1 cm) along the outer perimeter, and at a distance of 5-6 cm along the inner perimeter. There should be a kind of gutter between the boards - this is where the wiring and electrical elements(see photo above).
- Place a mirror on the bottom of the tabletop with the reflective side facing up.
- TO inside For a smaller frame, you need to attach the LED strip using double-sided tape.
- Wiring is installed in the space between the frames.
- Attach the top mirror cover to the tabletop.
- The entire structure is held together with screws.

Assembling the tabletop.
At the end of all the work, you should end up with something like this table with a mirror surface:
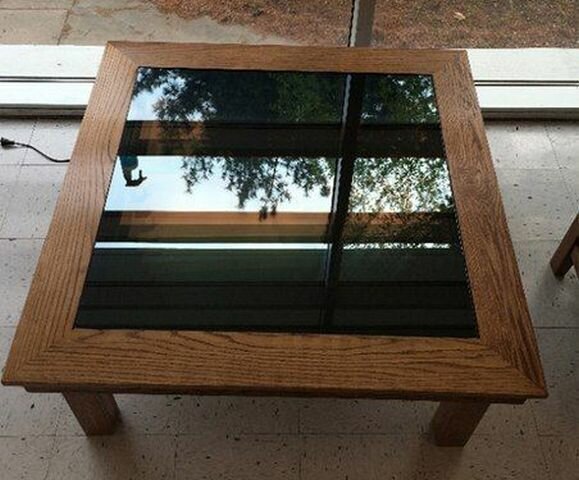
Finished product with the backlight turned off.
However, it is worth understanding that you can make a table with an infinity effect from any material that you know how to handle - for example, plexiglass, plastic, metal.
- When working with mirrors and glass protective film remove only after all processes are completed.
- Be sure to thoroughly study the diode connection diagram to avoid short circuit, or even worse - fire.
- For fastening, use moisture-resistant glue.
- In the event of a breakdown of electronic parts, it will be convenient to have free access to them, so it is better to place the controller and programmer not inside the table, but outside - placing it in a neat box and securing it under the tabletop.
Reading time ≈ 6 minutes
You can make your interior unique and original with the help of unusual pieces of furniture, for example, a table with an infinity effect. Making such a thing yourself will not be difficult if you use simple instructions. The finished product will organically complement any modern interior and will cause genuine delight among household members and guests!
Table with LED lighting.
Feature of the table
Externally, the table is not much different from any ordinary coffee table. However, as soon as you turn on the backlight, the tabletop of the product begins to flicker and glow with hundreds of lights, creating the illusion of infinity. You want to admire such magic all the time, and there are no adults or children who are indifferent to the unusual table.
A backlit coffee table looks especially impressive when the lights are off in the evening.
The infinity effect is achieved thanks to the special design of the tabletop - its box consists of two mirrors, and a diode strip is installed on the sides. In this case, a translucent mirror is selected for the top cover so that the light pattern is more noticeable and pronounced.
The design of the product is shown in more detail in the photo below:
Design.
You can turn on the product using a remote control or a special switch on the box.
To illuminate the tabletop, you can choose diodes of any desired shade or combine several colors. But experts especially recommend taking a closer look at the red diodes - due to slight dispersion, the endless tunnel acquires more depth.
This unusual piece of furniture is perfect for both home use and office use. It can be made in absolutely any size and from any materials.
Table with lilac lighting.
Materials and tools
You can make an exclusive piece of furniture with your own hands. To do this, prepare the necessary materials, tools and follow the step-by-step instructions.
To make a table you will need:
- boards for the frame (wood or particle board);
- mirror according to tabletop parameters;
- translucent mirror. The dimensions should be 10 cm larger than the bottom mirror;
- self-adhesive diode tape, length depending on the size of the table, but not less than 1.5 m;
- materials for connecting the tape: controller, programmer, wires, power supply with USB;
- consumables: sandpaper, glue, screws, metal corners.
Instead of a translucent mirror for the top cover, you can take regular glass and cover it with tinting film yourself.
Idea: to reduce work, you can purchase the simplest table in any furniture store and use it as a ready-made base.
Why choose LEDs:
- They give a rich, beautiful, deep shade.
- Longer service life without burnout (the number of on/off switches does not affect the service life).
- No heating.
- High efficiency.
- Various colors.
- Reasonable price.
- Light bulb safety.
Assembly
Before assembly, it is necessary to develop a drawing of the table, calculate the distance between the mirrors, the number of diodes, and think about the location of the electrical elements.
To get an idea of how the twinkling lights will look in the finished product, simply place any light source between the bottom and top of the table and look at the result.
Regarding the distance between the mirrors, everything is individual and depends on your wishes. But often the average value is chosen - 8 cm. To calculate the depth of infinity, the distance between the covers must be multiplied by 16. Also keep in mind that the depth of the tunnel will depend on the light transmittance of the top cover. After all the calculations, you can proceed directly to assembly.
Step-by-step instructions for making a table with an infinity effect with your own hands - making the base:
- From bars with a cross section of 5*5 cm and metal corners you need to make the frame of the future table. For fastening, use screws and a screwdriver.
- Using sandpaper, carefully sand all edges and corners to make them smooth and remove burrs.
- Drill holes for electrical elements using a drill, follow the drawing. The holes need to be sanded tighter.
- For additional fastening of the structure, you can treat the joints with glue. After this, the frame must dry for at least 24 hours.
Frame assembly.
Assembling the tabletop step by step:
- Attach boards (section 5*1 cm) to a sheet of plywood of the required size along the outer perimeter, and at a distance of 5-6 cm along the inner perimeter. There should be a kind of gutter between the boards - this is where the wiring and electrical elements will be placed (see photo above).
- Place a mirror on the bottom of the tabletop with the reflective side facing up.
- You need to attach the LED strip to the inside of the smaller frame using double-sided tape.
- Wiring is installed in the space between the frames.
- Attach the top mirror cover to the tabletop.
- The entire structure is held together with screws.
Assembling the tabletop.
At the end of all the work, you should end up with something like this table with a mirror surface:
Finished product with the backlight turned off.
However, it is worth understanding that you can make a table with an infinity effect from any material that you know how to handle - for example, plexiglass, plastic, metal.
- When working with mirrors and glass, remove the protective film only after completing all processes.
- Be sure to thoroughly study the diode connection diagram to avoid a short circuit, or worse, a fire.
- For fastening, use moisture-resistant glue.
- In the event of a breakdown of electronic parts, it will be convenient to have free access to them, so it is better to place the controller and programmer not inside the table, but outside - placing it in a neat box and securing it under the tabletop.
I decided to make my own coffee table with LED backlight, the decoration of which resembles infinity. For a long time After the renovation, something was missing in the room, everything seemed to be in place, but still something was wrong. I accidentally came across a photo of such a table on the Internet and realized exactly what I wanted. I went shopping and couldn’t find it, so I decided to make it myself. Such a table will add creativity, modernity to the room and attract more than one curious glance.
Let me lift the veil, the secret of this infinity is the use of LED backlighting, the color range of which can be varied. This tape is installed in the middle between the reflective coatings. Basically, a mirror is used (for this purpose they take one translucent one, the other a regular one), thanks to this, the radiation from the backlight is clearly visible to everyone.
To make such a coffee table with LED lighting with your own hands we will need:
- wooden boards or MDF;
- glass or translucent mirror and an ordinary mirror;
- LED strip;
- screws and screwdriver.
The first thing we will do is a drawing of the future table, taking into account all dimensions. Then, following our calculations, we make blanks from MDF sheets (or boards) and mirrors.
Next we make three templates with internal space. We make the blank where we plan to mount the LED strip with an internal diameter one centimeter larger (when making a table from chipboard). We glue all three blanks together and at the same time insert a mirror at the bottom. We smooth out all the corners and sides, being very meticulous about this.
So that we have the opportunity to somehow get to the tape, in the event of a breakdown, we install the table cover so that it can be removed.
We now cover our entire structure with a translucent mirror.
We make the legs for the table with a wide cross-section and small round holes right through, since it is through them that we will route the wires.
It turned out very interesting and beautiful.
This is how you can decorate doors and much more in the house. A DIY coffee table with LED lighting will be just the beginning of your experiments.
Step-by-step DIY master class. Photo report.


