Homemade quick-assembly inflatable raft stingray. How to build a raft: personal experience. What can a raft be made from?
/ How to build a raft
When the idea itself settled in my head and the first wave of euphoria subsided, it became clear that there was a lot of work to be done before the raft safely set sail on its first voyage. There were no professional raft designers or even carpenters among us. We had never really been involved in the construction of rafts or boats before. But amateurs with a broad outlook can do a lot. The main thing is to have a desire. In addition, as you know, Noah’s Ark was also built by amateurs, and the Titanic was the work of professionals. And we got down to business.
About how to make a raft we could talk for hours. There were a million ideas that, of course, contradicted each other. We had to choose the only solution that suited us best.
The all-wooden raft was immediately abandoned. A log raft is common on northern rivers. But in the south there is not enough dry, suitable forest to make a big one normally. wooden raft. Considering the experience of other homemade raft builders, we thought about the following options:
- Foam raft. You can make two “skis” out of boards and fill them with dense foam. One of best designs for a motor raft, as it handles well.
- A raft of chambers. Large car cameras The stronger the better. If the camera bursts, it is easy to seal it in the field rafting conditions.
- Bottle raft. This is perhaps the most popular raft design, and the cheapest of all. First you need to collect many hundreds and thousands of empty plastic bottles. The bottles are then stuffed into plastic bags (rotproof). Next, the bags with bottles are secured under the raft.
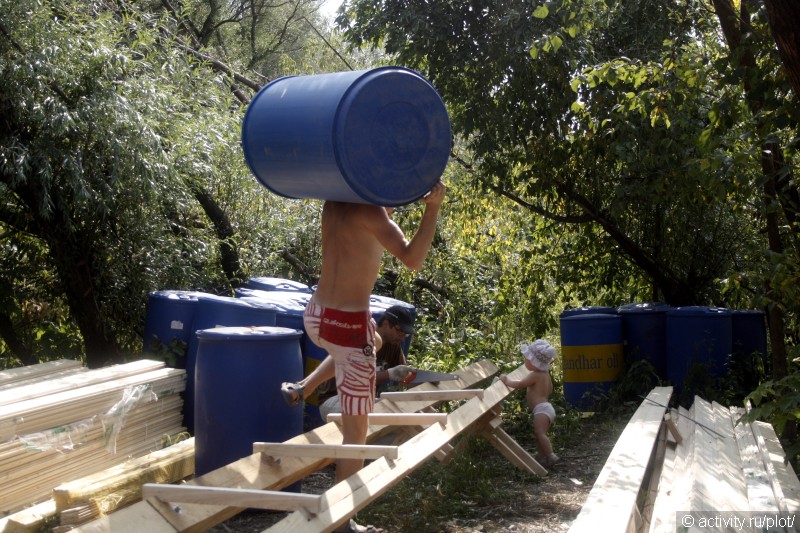
- A raft made of barrels (or other plastic sealed containers). Plastic cubes, canisters and so on. It is more difficult to secure, but you can achieve a high landing of the raft above the water. You can also make a raft from metal barrels.
- Rare and exotic types of rafts. For example, a raft made of plastic unsealed boxes filled with polystyrene foam and polyurethane foam.
There are also special “pontoons” on sale, that is, composite plastic containers for pontoon structures. It is easy to assemble a plastic raft from such cube pontoons, but such pontoons are unreasonably expensive.
We thought and argued and decided make a raft on barrels. Empty plastic “Euro-barrels” of 227 liters were selected. They are sealed, with two holes with screw-on plugs. Moderately rigid to keep its shape under load, and moderately flexible so as not to make holes when the raft hits a stone or snag.
The lower deck was raised above the water by half a meter so that the waves would not overwhelm us, but would peacefully break against the barrels below the deck of the raft, without creating discomfort. In general, when designing and drawing drawings of the raft, the words “comfort” and “reliability” were heard often. After all, we wanted to live on the raft, not survive, and there was a small child among us.
The incredible had to happen for the raft to “throw” or go to the bottom. The reserve of stability was such that even if everyone crowded together on one edge, collecting all their belongings nearby and adding a ton of something else to them, the raft would not be able to capsize spontaneously. Even in strong winds and waves. The buoyancy reserve also suggested a calm continuation of the rafting along the Don under a terrible set of circumstances. The barrels could become leaky and fill with water, become loose and jump out from under the raft, or the barrels could simply flatten. Of course, several pieces at a time and, as luck would have it, one side at a time. Of course, it’s easy to flaunt now, but the facts are as follows: there was no overkill, they didn’t go down.
How to make a small raft
We had just decided on the design and materials when the first beta version was suddenly released. About six barrels, single-deck floating jetty. The only difference between such a pier and a raft is that the raft is made for rafting on rivers, and the pier must remain in place. By the way, this didn’t stop us from swimming on it a little...
Main characteristics of the pier:
- working title: " Youth",
- own weight of the structure: 480 kg,
- maximum load capacity: 1,543 kg,
- deck area: 8 m².
The prototype of the future “big” raft was made on occasion: one of the participants wished to sponsor the construction of a pontoon raft-pier on the river near his country plot.
They built it vigorously, with the help of a certified architect and her husband, a generalist. They started at noon, and by the evening of the same day they were nailing down the last board of the deck. And they got pleasure from the fact that the calculations turned out to be correct: the pontoon behaved as planned. And the next day we took the oars from the boat and tried to float on a raft along the river. There is almost no current in this place, we just crossed the river on a raft and came back, jumping a little into the water along the way - we liked everything! If you built a raft with your own hands, you can have some fun, because everything turned out as planned!
This circumstance completely freed our hands, and we continued to create. But for now only mentally.
How to make a big raft
For a large raft, 22 barrels were already required. The barrels were attached to the raft in two rows, 11 pieces in each. To get something like a catamaran with two skis, which is good both in terms of handling and weight distribution. By the way, as experience has shown, such a structure is easy to refloat, and for the middle reaches of the Don this is important.
Each barrel was in its own compartment, delimited by two beams and two crossbars. The weight of the raft pressed on the barrels from above, and the water pushed up from below. In addition, the barrels were pulled with slings to the frame bars.
The basis of the structure of a raft made of barrels is a frame made of beams and boards on which the lower deck is laid. The upper deck (a la Sun Deck) also rests on the frame with its posts.
The structure is largely supported by its own weight. The individual elements are connected to each other through grooves.
Or “grooves”, as we now affectionately call them. The fact is that during the construction of the raft, when a whole hundred grooves had already been sawed, cut, hollowed out, and they still did not end, the stock of abusive words addressed to the grooves dried up. And from that moment we began to love them dearly.
In the drawings the raft looks like this:

One barrel has been removed - this makes the details of the raft look clearer in the drawing.
Nails are also widely used in making a raft, and we also practiced a lot in hammering them. Nails are generally indispensable in many endeavors. They played the role of hooks in the kitchen of the raft during the trip, and were nailed to the deck of the tent with the same nails.
It’s good that we managed to build the raft without using screws or self-tapping screws. It takes a very long time to tighten hundreds of screws with your own hands, but taking a screwdriver or drill with you is difficult. extra hassle with electricity. Plus, nails are simply cheaper.
How to control a raft when rafting
For a long time we could not decide how the raft would be propelled and how it would be controlled. The options of having some kind of mover constantly making noise nearby were not suitable. The classic version with ridges somehow didn’t work (although another traditional version control the raft - poles - we used). As a result, we agreed that we would simply float downstream on a raft how it floats. And if necessary, pull the raft with a motor boat. At the same time, we were not sure that a light boat would be able to tow a multi-ton raft, the size of which would be comparable to a two- or three-room apartment.
It's a pity, but many beautiful and almost unrealistic propulsion options were left overboard. One such option is a giant fishtail. In miniature it looks like this:
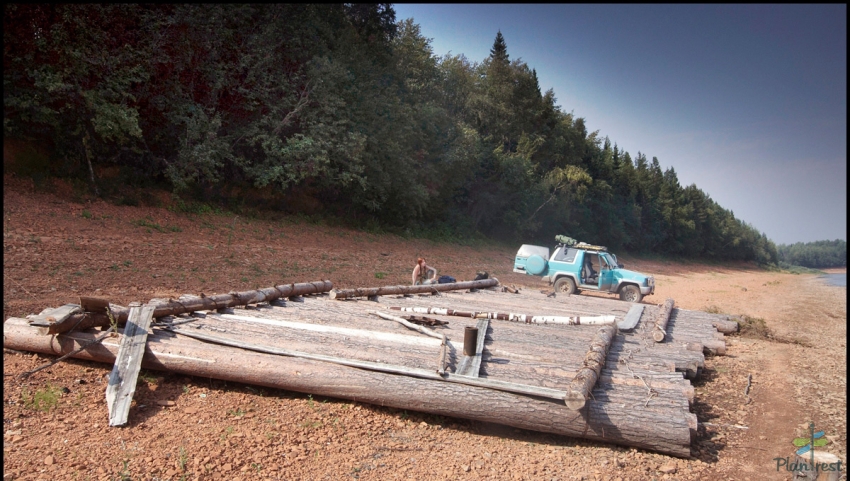
But what are we all about theory! Finally the day came when we left for the place building a raft, that is, a slipway. Practice has begun. Construction materials arrived, their piles grew and grew. We began to “recycle” them, and the piles began, albeit slowly, to decrease.
There was a lot of work. The first days we lived on the shore. They marked, sawed timber and boards, made grooves, sealed the plugs of the barrels. It was not intended to launch the raft at once, as with a pontoon. The structure was too massive, several tons - You can’t lift the raft with your own hands. Parts of the future raft were carried by hand into the water, where the installation of the huge structure continued. It was even easier to work in water: remember how hot this summer was?

On the third day of making the raft, the flooring of the lower deck finally began to appear. And ours active life began to gradually move from the shore to the raft. I already wanted to spend the night on it, drink tea, fish and just sit, dangling my legs in the water.
The incident stuck in my head. We built the raft not in a remote place, but not far from the village. Of course, the locals were very interested in what kind of raft we were making here. We even had regular spectators who tracked the progress of the work almost every day and made constructive suggestions to the raft project. There were also local boys constantly hanging around, who didn’t ask questions, but were simply happy and, probably, envied us in some way. One day, when we had already covered part of the deck, one of the boys suddenly asked: “Can I jump from your raft?”
It was probably at that moment that it became clear to me that the idea with the raft was not in vain. Not one, but several boys jumped into the water from the raft, actively exploiting our creation. What a thrill it was just to see their sparkling eyes!
After another couple of days of work, a second deck and a staircase leading to it grew above the water.

It became clear that raft trip- not far away. The next day they finished laying the lower deck, built part of the partitions and prepared to set sail the next day. The tents began to crawl from the shore to the raft in the evening.
The next morning, having laid the second deck, we began to load. All things, tents, as well as tools and remaining building materials were moved onto the raft. It took a long time to collect the accumulated construction garbage, intending to use it for firewood for the samovar and barbecue. The shore was empty, we pushed off, and the Don slowly carried us south...
Rafting days
Now our main occupation has become, as someone accurately noted, “drinking the beauty of the Don.” Sailing sedately on a raft along the river. Enjoy the tranquility of the river, gaze at the slowly changing landscapes of the Don, smile in response to the horns of larger boats and ships passing by. Rafting down the Don is not uncommon; we also came across homemade rafts quietly floating along the river. Sometimes it is very important not to rush anywhere. Swim, fish, sunbathe, talk about the most important things and nothing else...
But the work didn't end there. It’s just that further arrangement of the raft took place “on the fly.” It's like renovating an apartment - it's impossible to finish. Now the pace has become completely different. We were no longer in a hurry, but worked for our own pleasure, in our free time. So, during rafting, several more partitions appeared on the raft to visually separate the space and as protection from the wind. The kitchen (that is, the galley) was equipped, and an almost unshakable table was built for the wardroom. A hammock is hung, protected from the sun and “with a view.” A semi-automatic ladder was created to climb onto the raft from the water after swimming. On the second deck, rails were stretched and a flag was hoisted...
Enough with the arrangement, it’s time to look at the results of your labor!

The story about construction could end here (we will admire the photo of the raft in other chapters). But some will be interested in the dry numbers of the project. So, the characteristics of the raft with the working title " Four and a half tons".
- Gross design weight: 4,500 kg, including
- dead weight of the raft: 3,711 kg, .
Side height (distance from the top of the deck to the surface of the water) at the design payload: 0.39 m.
Landing at design payload: 0.46 m.
Maximum raft carrying capacity (maximum payload): 5,382 kg. Wherein gross weight of the raft would become terrifying: more than 9 tons!
- Raft dimensions
Dmitry Chuverin.
It often happens that you have to fish somewhere in a remote body of water. But there are no watercraft there. Or they are too bulky to be delivered there. The way out of this situation can be simple in design, very compact and quite lightweight homemade raft IR. For example: from balloons...
Early in the morning I went to the forest lake, where the day before I had set up the girders and scattered the mugs around the water area. While approaching the lake, I heard people talking somewhere very nearby. “Who brought this here so early?” I thought anxiously. After all, it was precisely in the place where the voices were heard that my homemade raft from car inner tubes was hidden. He quickened his pace and, rounding a pile of massive rocks, saw on the shore two guys and a girl sitting by a dying fire.
Approaching them, I greeted them and asked in surprise what brought them to this wilderness?
The word “raft” had a magical effect on me... I am very interested in any kind of watercraft, I have seen a great variety of them. I am especially attracted by the originality of the design and the method of movement on water. “What are they going to make the raft out of?” – I thought, looking around. But I didn’t see anything special... Two large backpacks, about a dozen different sticks and poles, several thin planks. That's probably all they had.
Meanwhile, the second guy, tall in jeans, a baseball cap, and the girl in shorts pulled out of their backpacks two plastic and one rubberized bags, a coil of thick rope and a small tightly stuffed bag. When they unwrapped the packages, they turned into bags, and in the bag there were... ordinary air balloons. Having poured the balloons onto the ground, the three of them began to inflate them. Moreover, they filled it with air a little more than half.
Why bother if I have a car pump? – I suggested.
“No need,” the tall guy answered, and after inflating another balloon, he explained: “We have everything checked, it’s faster.”
Picture 1.
After inflating the balloons, they immediately stuffed them into bags and as a result they got three unique pontoons. Each of them is 60-70 centimeters in diameter and about two and a half meters long. Having finished filling the bags, the guys tied them and pulled them together with a piece of rope. (see Figure 1) Moreover, the rubberized bag ended up in the middle.
Then they laid five poles across the pontoons, securing the entire structure with rope in a circle. After carefully checking all the components, we dragged the structure to the water. At the very edge, the tall guy tripped and fell to the ground along with the pontoon. And immediately a loud hissing of the pierced balls was heard.
The guys, not paying attention to the hissing, laughingly lowered the pontoons into the water, sat down on them and began to rock them. But the structure behaved like a cork and was submerged in water by less than a quarter. Having clearly demonstrated the reliability of their craft, the company tied planks to the pontoons, and when fully assembled their raft looked like in Figure 2.
 Figure 2
1. Pontoon made of balls.
2. Crossbars.
3. Flooring boards.
4.Tightening rope
While they were getting settled and putting their belongings on the raft, I quickly brought my raft of two car tires, pumped it up, hoping they would appreciate it. However, this did not happen...
In your raft, it’s enough to pierce at least one chamber - and the seams are done,” the guy in a bright orange T-shirt concluded, looking skeptically at my raft. “But this will never happen to us.” Not only do we have a lot of balloons, but we also inflate them slightly, which gives additional plasticity. And the carrying capacity is much higher...
Oh, oh! – I couldn’t resist.
“Sit down with us and see for yourself,” the girl suggested.
I followed her advice... Under the weight of four people, the raft sank no more than a third of its height. My raft had great difficulty supporting two people. Moreover, he was very unstable. With that we said goodbye. Looking at the sailing raft, I thought that in addition to fishing itself, it could well be used for fishermen to spend the night on cold land.
This raft design shows how inexhaustible the imagination of tourists and fishermen is. Each of them is able to build their own watercraft, which can easily replace a bulky standard boat.
Homemade anchor
Anglers who prefer to fish from a boat need an anchor. Usually for this purpose they use a stone, some suitable piece of iron, or simply stick a stake into the bottom.
However, there is a more “civilized” way of making an anchor. All you need for this is an old, not very deep, aluminum bowl. It is necessary to drill or punch (with a core, a thick nail) a hole for the bolt and secure it on both sides with nuts (see Figure 3).
 Figure 3 - homemade anchor
The result is a collapsible anchor that fits well into soft soil and reliably clings to uneven bottoms. And at the same time it is easily removed from the most stubborn places.
Let me clarify: the bowl should be selected as large in diameter as possible.
Alexander Nosov
Published: 18.08.2017 Category: Author's essayDo you prefer shallow bodies of water? When thinking about a river trip or something, consider one possibility. You don't have to stand near the water. It is better to move along the “water artery”. When trying to "ride" the river, don't look for a boat. Agree - there is not enough space in it if you are going with cheerful company. Raft? You can’t leave expensive equipment at your destination. We need a car at the finish line. Who will be waiting for you there?
Check out tips on how to make your own raft. Find the “pirates” – the optimists. With them you can build a floating craft out of nothing.
How to make a raft with your own hands. Tree
We offer to save both time and effort, as well as money. Having learned in practice how to make a raft with your own hands, you will understand that you spent no more than 5 hours preparing for the rafting, and having reached the goal of your tour, you simply took your things and went home.
The most ancient method of building such transport is associated with wood. How to make a raft out of wood with your own hands? You need to tie together thick logs with dense twine, and then connect them by nailing on top a cage of boards that you “purchased” for free (from containers, at a construction site, at the dacha, while re-flooring...).

Unfortunately, for those who live in steppe or semi-desert areas, tree trunks will become a very expensive component. You can always collect dead wood. And yet it will not be suitable as a “retaining” (bottom) layer of the miracle ship. A bunch of thick trunks of dry trees (or branches) will quickly be “torn” by the current or by hitting the shore. In addition, they can only support one passenger.
How to make a raft with your own hands. Available materials

Continuing to think about how to make a raft with your own hands in a different way, inventive representatives of humanity drew attention to a bunch of objects capable of holding large volumes of air. The main “specialists” in such cases are car cameras. Just two of these round pieces (taken from the wheels of a medium-sized truck) can easily hold 800 kilograms afloat!
Making a raft from inner tubes is much easier than you think. Someone you know will always have them in their garage... All that remains is to lay them out in such a way that the cage of boards is evenly supported from below (the chambers should be located at all angles).
Having firmly decided to make a raft from chambers, you need to think about how to attach the “top” assembled from scrap materials to the rubber “bottom”. The cage with the flooring (it can really be riveted from any debris) must be firmly mounted to the “lifebuoys” with a strong rope, wide construction tape, nylon belts (all at once).

Do you have a crowd of fellow adventurers and “tons” of things? We need to find a way not to drown all THIS. In this case, making a raft from barrels is the most correct alternative. Tin barrels for fuel, lubricants or other materials are lying around in large quantities in your friends’ garages, in landfills, in store warehouses and wholesale warehouses. The main thing is to thoroughly rinse such containers, neutralizing environmentally harmful substances. Then screw on the lids. This “water cushion” is placed in a wooden frame - in a spacer. The flooring is mounted with such frames in different ways.
You can take hundreds of kilograms on such a board. Using six 25-liter barrels, it is possible to transport on a raft from 8 adult tourists with tents set up. There should be more barrels at the end where your “tent city” with all your things is located.

There may be a situation when none of the above is at hand. Well, no problem. In every home (in a barn, in a country house, in a separate container at the “garbage dump”), a modern city dweller will find dozens of PET bottles.
A plastic raft is the cheapest. It makes sense to make rows of bottles, inserting them into each other.
But this takes a long time - the top of each vessel will have to be cut... And the time required to attach such “pipes” to the “deck” is long.
It is easier to create a plastic raft by evenly filling 25 or 50 kg sugar bags with closed bottles. And these bags themselves must be tied evenly in different angles wooden cage, tightly tightening it with everything possible.
How to make a raft with your own hands. Underwater sail

Have you already made an “ark” of the size you need, stocked up on oars and are you going to launch it into the water? Do not hurry. We haven't revealed all the secrets to you yet. Remember - there are rivers with such strong currents that it would be criminal not to use this element! Having understood how to make a raft with your own hands, you should add luck by studying the benefits of such an invention as an underwater sail. When it is ready, all you have to do is row it to the middle of the river and off you go - your happy team will catch up with all the “motorboats”.
An underwater sail is just a tapering sheet of no more than a meter in height. It should be made of thick tarpaulin or durable artificial fiber (fabric made from natural material will break on the first snag). It is also advisable to trim it around the edges - after all, it has so much to experience.
The underwater sail should be tied to a firmly screwed rear rail. It should sag in the water. At the very bottom, attach a pocket (sew around the folds formed during the narrowing process). It is necessary for cobblestone. The load will straighten your underwater “gadget,” increasing its speed significantly. By the way, if you exchange a cobblestone for a heavy brick (or 2 bricks - depending on the depth, wind and speed of the river flow), you will also get an anchor.
A raft is an extremely common construction of water transport, and it is much easier to make than a canoe or boat. There are various techniques for constructing rafts, you can do conventional design from boards or logs, using barrels or PVC pipes that will keep it afloat. In addition, you can build a raft entirely from empty bottles of soft drinks - this is true, tested in practice! Take a wide one adhesive tape, with the help of which all the bottles are fastened together.
What can a raft be made from?
One of the popular types of rafts is wood. To make such a craft, you need to choose quality logs and planks of strong wood. Many craftsmen are thinking about building a wooden raft, since this type of water transport is excellent for fishing and long hiking trips.
But besides this, there are other types of rafts. This can be polystyrene foam, inner tubes from cars, plastic and iron barrels, as well as canisters or plastic bottles, and you will learn below how to make a raft from plastic bottles. Special pontoons are also sold for making rafts, but they are quite expensive. The most affordable and simple option is a water structure made from plastic bottles.
How to make a raft
Don't know how to make a raft out of bottles? You can make a watercraft with my own hands, for this you will need:
- 20-25 plastic bottles with a volume of 2 liters.
- The tape is waterproof.
The number of bottles can be changed at your own discretion, depending on the size of the raft and the number of people who will be on it.

Raft construction process
How to make a raft with your own hands from bottles and where to start?
- Cool opened empty bottles in refrigeration chamber, then screw the lids tightly to stiffen the containers.
- Glue the prepared containers into a single sheet. Using moisture-resistant tape, connect 4 bottles one by one, laid out in 2 rows. A two-layer raft is much more stable and durable. Make sure that the bottle caps are located on one side. For a full-fledged raft you will need approximately 5-6 double-row blocks.
- Glue rows of ready-made blocks. To ensure the strength of the system, bottles should be laid in the following way: 2 pieces horizontally and 3 vertically. As a result, a standard rectangular “pillow” is formed.
- Combine bottles. Adjacent rows must be laid one after another according to the plug-bottom pattern. The side of the raft should be additionally reinforced with tape. This structure is designed for 1 passenger!
How to make a raft from bottles with your own hands for two or three people? It’s very simple - the number of plastic containers is increasing two and three times. If you don’t have enough 2-liter bottles, you can take other sizes (5, 1.5 and even 1 liter). It is recommended to lay a thin plywood sheet or plastic on top of the glued bottles so that the raft does not press under the influence of a person’s weight.
Don’t be afraid to experiment and fantasize, but don’t forget about safety rules!
log raft
Don't know how to make a raft from wood with your own hands? In order to make a structure from logs, you will need dry pine or spruce wood, that is, when you tap it with an ax, the sound should be clear. But you need to take into account that dry material with old wood is not at all suitable for the construction of a swimming structure. Such a tree will become damp very quickly, and the raft itself will sink. To determine the specific gravity, you need to saw off a small piece of about 10-11 cm from the end of the log with a tool. Then throw it flat into the water. If the stump goes 5-6 cm down, then this wood is well suited for building a raft. So, how to make a raft from planks?

You will need:
- Logs 8-9 cm wide and 1.5 m long - 2 pieces.
- Wooden planks approximately 2.5 cm thick, 13 cm wide and 91 cm long - 11 pieces.
- Thin planks 5 mm thick, 13 cm wide and 91 cm long - 5 pieces.
Manufacturing process
Don't know how to make a raft? The assembly process consists of the following steps:
- Place two logs parallel to each other at a distance of 85 cm.
- Place eleven planks across the logs to form a deck. The boards need to be laid in such a way that they slightly extend beyond the line of the logs, which, in turn, should protrude slightly from all sides from under the deck.
- Hammer it all in with nails.
- Turn the raft upside down.
- Insert foam between the logs. Try to choose a piece that is the same size as the raft. If found right size If it didn’t work out, then you can use separate pieces, the main thing is to arrange them carefully.
- Place 5 thin boards across the logs to secure the foam.
- Nail them down.
- Turn the raft over and lower it into the water. This design is designed for one adult passenger of average build.

Important! When using a raft on a lake, you must wear a life jacket. This structure should not be taken onto a river as it is unstable and can be dangerous in moving water. For such movements, only an inflatable raft is suitable, which is used in sports such as rafting, but it is quite expensive. The structure made from logs, made with one’s own hands, is perfect for a lake; you can fish or sunbathe on it.
Structural features
You already know how to make a raft from wood; it’s time to figure out how to choose the right material.
- The largest diameter of the log is 25-30 cm.
- Minimum - 10 cm.
- To ensure that the future raft made of logs has good durability, thin logs are placed in the middle, and thicker ones along the side. If the logs are slightly crooked, then these parts are placed in the lower part.
- Allowable gaps between logs are 2-3 centimeters. Otherwise, the water structure will be unreliable and inert, and besides, it simply won’t be possible to build a raft according to all the rules.
- The logs are stacked on a slipway, after which they are rolled out to the sides and their upper parts are marked.

Raft grooves
At a short distance of 80 cm from the end, grooves are formed on the main log (sawed or cut down). An indispensable condition- location of the lower grooves at the same level. In depth they should approach the center of the log - this is very important. If this condition is not met, when hammering in a wedge, you risk damaging the sawn wood. As a sample, a special end is used, which is hewn out of damp birch. It is placed on the designated log with the central part.
Don't know how to make a raft out of wood? Next, in a groove prepared in advance on it, it is freely located on top, and the lower part fills the top of the groove. A wedge is driven between the groove wall and the slope side. It should be woody and dry, the ronjins should be placed in one plane.
Having worked out the technique on the sample, you can move on to the rest of the logs and make the same grooves. They are sequentially secured with wedges to the main log. Before laying the last logs, a different type of groove is formed in them, suitable for vags. In addition, 3 special stands are cut out, approximately 11 cm wide and approximately 70 cm high.
After this, the main rope is pulled over them, instead of which you can use wire twists or rope ties.

Design selection
Don't know how to make a raft? If you are going to use the raft on calm lakes, then it is better to use the “P” scheme. 2 racks are pre-cut into the logs, onto which the deck is subsequently placed. It needs to be wedged out and a paddling area cut out. To avoid spalling of the racks, the rows should be placed at a distance of 50 cm from the stern and bow.
On fast-flowing and impassable rivers it is necessary to use structures with iron frame, for the construction of which modules and couplings are used. Modules can be taken of different lengths, but the coupling must be shaped. In order to build such a raft, a lot of effort will be required. There will be a lot of drilling involved and the help of a turner will also be required.
But despite all of the above, the resulting raft will be quite easy to assemble and disassemble. To pack the structure you will need two kayak covers and a separate case for storing oars.
The attractive thing is that the resulting frame can, if desired, be divided into two small rafts or even assembled into a catamaran.
Raft made of inner tubes
Have you decided to spend your summer days on the banks of a river or lake and the problem of lack of swimming transport has arisen? In this case, you can use the system of a shallow-draft tourist raft, which can support up to 6 people with backpacks; in addition, the design has decent stability, including on a fast-flowing river. Next you will learn how to make a raft, this process is as simple as possible.
You will need:
- Cameras from a car with a diameter of up to one and a half meters - 6-10 pieces.
- Wooden poles with a diameter of at least 6 cm and a length of 5 m - 3 pieces, with a length of 1.7 m - 4 pieces.
- Pieces of duralumin pipes.
- Iron or duralumin strips about 10 mm wide.

Manufacturing
Don't know how to make a raft with your own hands? Follow these steps:
- Place wooden poles 5 meters long lengthwise, the shorter ones across them at the same distance from each other.
- Next, the manufacturing of the main deck and the “captain’s” bridge begins. They are 3 shields made from assembled poles. First of all, the main deck is made. On two hewn poles 1.7 m long, poles or pieces of two-meter planks 20 mm wide (this is even better) are laid out and driven in with nails. “Commander’s” bridges are constructed in a similar way.
- The supports for the canopy are willow twigs. You should proceed to making the raft only after they have been installed. First of all, the car cameras are tied to the base with ropes, then the main deck and “captain’s” bridges are installed. The sides are made from 4 hewn poles, and the canopy is made from a piece of cellophane.
- The rowing (control oar) supports are located diagonally on the bridges: on the front part - on the right, and on the rear - on the left side. The supports are bent from three duralumin pipes and reinforced with two steel or duralumin strips. The rowing itself is made of long poles (250 cm), and the blades are made of duralumin or plywood sheets(sizes are selected individually).
- The frame is formed using a cable with a diameter of 6 mm and modules 200 cm long, their connecting parts are hinges. A 20 degree bend is formed at this point. The frame weighs approximately 80 kg. On solid shafts, cable breaks are possible.
Conclusion
Now you know how to make a raft, so if you are thinking about an upcoming vacation on a lake or river, thinking about leisure time on the shore and leisurely boat trips, you need to build a shallow-draft watercraft for 5-6 people. The diagram presented above also includes their backpacks. For fishing on a calm lake alone, a raft made from plastic bottles is quite suitable.
Probably every person made in USSR had a childhood dream of making a raft and sailing to distant places. Dreams Come True! We tried it and it worked!
There were many projects on exactly how to build a raft, what size it was and what it was made of. After much discussion, it was decided that the base of the raft would be large-radius car cameras, the number of which depended on the size.
In fact, it turned out that buying inexpensive cameras is not an easy task, the most profitable and quick option there were much smaller cameras than expected R16. The cameras turned out to be Chinese and the seller honestly warned us that they would not stick properly. But we decided to take a risk.
Considering that 8 people were going to sail on the raft (in fact it turned out to be 6) + things + food + the weight of the wooden flooring, the carrying capacity of the cylinders should have been at least 800 kg, but we took it with a reserve - 43 cameras, which corresponded to a carrying capacity of 1200 kg.
The cameras were supposed to be covered wooden shield, assembled from boards, size 4x6 meters. But here, too, circumstances intervened: at the sawmill, we managed to buy boards only 4 meters long. So it was decided to make the raft square 4x4 meters.

This is how the design turned out.
Let's look at the main points in more detail.
The raft was assembled directly on the river bank.

First we use car compressor 43 cameras started downloading.

The compressor did not like this task and refused to work halfway. We had to urgently resuscitate him because... the frog pump, which was supposed to swim with us, could not pump the chambers to the required state, which affected the size. If in case of repair this would be acceptable, then I didn’t want to start the journey with under-inflated inner tubes.

In the end, we won the compressor and, applying wet rags to it to cool it, we pumped up all the chambers.

They brought the purchased boards and beams, the length, as I already said, is 4 meters.

Let's try out how it will be.

The assembled raft frame with the first layer of chambers. For the frame, timber 100x50 and 200x50 was used.
40 cameras were used, 3 were taken as spare parts.

We stuffed 25 mm boards on top. I would like the gaps between the boards to be much smaller, but we didn’t calculate the number of boards when purchasing, so we decided not to bother with the purchase again. They lowered the raft into the water.

Beginning of construction of supports for the awning.

For the supports, 50x50 mm timber was used. The height of the side supports is 2 meters, the central one is 2.5 meters (in the photo they are just making it). Initially, the awning was intended to be used only as a roof, but in the end it was also used as a sail, I will talk about this below.
All wooden structures fastened together with screw nails.

The raft was named “Gena” - as they say in the well-known cartoon about Cheburashka: “Because it is green and flat.” The construction took 1 day (we started early in the morning and hit the road in the evening).
In this photo, it is ready to sail; all that remains is to firmly secure the rubber boat with ropes along one of its sides.
Why the boat was needed is an interesting question, the correct answer would be: it was safer for us. In fact, it turned out to be very useful: they dumped all the shmurdyak into it, which was only needed for spending the night, clothes and tents, in the evening we fished from it, when we needed to be in the village, but it was not possible to properly land on the raft on the shore, messengers were sent by boat .
All things, sleeping bags, first aid kit and other things that were wet were packed in specially sewn hermetic bags. Cereals, salt, sugar, etc. poured into plastic bottles. Documents, phones, cameras and other equipment were stored in a separate hermetic bag, which “if anything” was supposed to be dropped first.
In the center of the raft there were piles of essentials and some food in a large bag. It didn’t look aesthetically pleasing at all, but overall it turned out to be comfortable.
Foam was spread on the boards i.e. At night we slept on them in tents, during the day they moved to the raft.

Spare tubes turned out to be successful seats, although one of them was soon used for its intended purpose - it went under the corner of the raft, on which both (2 layers) of the tubes burst.
At night we landed on the shore and set up camp there, but in the morning you won’t have enough tea for the whole day and you won’t be able to go to the toilet.

Everything was simple with the kitchen: a barbecue was rigidly fixed on two elongated boards above the water. Firewood was collected on the shore, sawed and chopped while moving. For ignition, so as not to fool around, we used dry fuel tablets.

The toilet is more difficult: under the oar you can see two shortened boards - this is the coveted point.
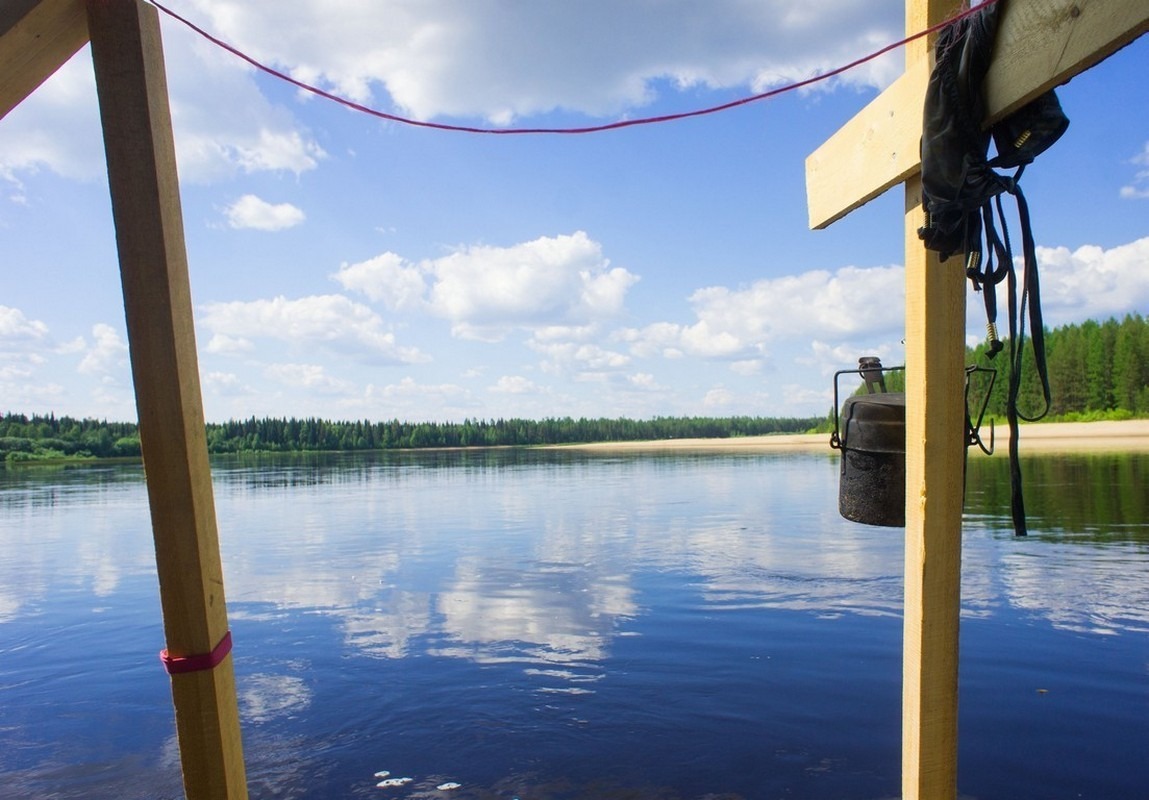
There are beams on both sides that you can hold on to. An opaque reinforced film was thrown over the rope, behind which the man did his business. Initially, the idea was to make something like a permanent screen out of film, but it did not always create the necessary windage, then they wanted to attach it to the rope with clothespins, but in the end they simply held it with their hands.
During the voyage, many things had their regular places. So the ax was drowned on the very first evening, and the new one they got was tied and left to live near the firewood. A pot with bowls and spoons was hung on a nail near the barbecue, and dishwashing liquid along with a sponge was inserted into a tape pocket near the food.

Regular place for fishing rods.

Solar battery. It was supposed to be used to charge phones and camera batteries, but in reality there was no connection, we only took a few pictures, and it wasn’t really needed.

Cooling of liquids.

On the central support on a nail hung all sorts of necessities that I didn’t want to get wet and drown, but they were needed during the sailing process. The main thing is Garmin, which runs on batteries; we used it to find out where we were, how fast we were moving and what to expect ahead.
All that remains to be said is about handling.
In general, everything affects the raft: wind, current, how many people are crowded on one side, which side the raft is turned, etc. and so on.
At first there were 2 controls: an oar and a cue.

The oars were boat oars and there were only 2 of them; if they knew that they would be the most effective during maneuvers, they would have taken 4. The rowing process is not the easiest task.
A cue is a long pole (we had about 2 meters) with which you can push off from the bottom in shallow water. At first we had 4 of them, then one was sunk, another was used for a sail. Unfortunately, not a single photo of the cue was preserved—everyone was busy at those moments.
On the third day of the journey, a fair wind blew and another way to control the raft was revealed to us - a sail.

The length of the awning was enough not only to serve as a roof, but also to cover one of the sides. By long games A movement strategy was developed using ropes, sticks and an awning. The sail was turned with its feet, pulled up with ropes, and when unnecessary, it was rolled up and tied to the supports. If the wind was headwind, it was necessary to fold not only the sail, but also the “roof”.
Thanks to the sail, the raft acquired an additional letter in the name “Gena-M” (which means Gena - modified) and developed a speed of just over 6 km/h with a river flow speed of 2.3 km/h, although this happened infrequently. Mostly we moved at a speed of 3-4 km/h.
The Mezen River along which we sailed is replete with sandbanks. At first, we thought that we would constantly fly into them and pull off the raft, tearing the cameras. As a result, we ran aground literally a couple of times.

When the bottom was very close, they jumped off the raft and pushed or pulled it to the depth on a rope.
Gena-M served us faithfully for 6 days and 130 kilometers, during this period the edges of 2 boards broke off, the tent-sail structure became a little loose and for various reasons about 10 inner tubes ran out (more precisely, they didn’t count). All this had no effect on buoyancy.
How the design could be improved:
- The possibility of putting reinforced film under the cylinders was discussed in order to protect the cylinders from snags and abrasion on the shallows; in fact, this turned out to be not necessary, but putting the same film between wooden flooring and some cylinders wouldn't hurt. This would protect the cylinders from friction on the boards, save a number of small objects from drowning, and protect the cylinders from sharp objects and sparks from the grill.
- Our assumption that in the middle of a wide river there would be no mosquitoes, horse flies and midges turned out to be incorrect. As soon as we approached the shore, the insects happily attacked us, and then we floated on the raft together. This problem could be partially solved by placing a large mosquito tent in the center of the raft. How much windage such a tent would create is an open question.


