Homemade plywood boats: easy to do! How to make a boat with your own hands: wood and plywood are a fisherman’s best friends Do-it-yourself punt from boards
Views: 1880A flat-bottomed boat, or as it is often abbreviated as “punt”, is a type of boat with flat bottom, which has been used for hundreds of years to transport people and goods along small rivers. Modern flat-bottomed boats are used primarily for water recreation, although in some countries they are still used for transporting goods. Among the many places on earth, those most famous for their flat-bottomed boats are the English university cities of Cambridge and Oxford, where punting has been a popular water activity among students since the early 19th century.
The appearance of flat-bottomed boats is quite unique and very different from other boats in the small-tonnage shipbuilding industry. Unlike other watercraft, punts do not have a keel, the strong central structure that most boats use as the base. On the contrary, the bottom of the boat is absolutely flat, and the connecting supporting part are several lamellas successively located at its base. The sides of the punt are relatively low, and the stern on both sides is equally wide and square in shape, which allows the boat to sail in any direction without turning around.
Traditionally, flat-bottomed boats are steered using a long pole. The manager usually stands on the front stern of the boat, rests his pole on the bottom and pushes off from it. As the boat moves, the manager moves from the front stern to the rear, continuing to exert force on the pole. Then, it returns to the forward stern and the cycle repeats. When sailing on modern, lightweight punts, pushing off from the bottom, the operator does not have to move along the entire length of the boat, and he can remain in one place. Although steering a flat-bottomed boat may seem like a relatively easy task from the outside, it is actually quite a complex and time-consuming job. IN different countries are used various ways punt control.
Flat-bottomed boats have a very shallow draft, which makes them an ideal means of transportation in shallow waters, coastal waters, and in areas heavily overgrown with emergent plants. And if you learn correct technique control, the punts are very good and easy to maneuver. Thanks to the fact that the ends flat-bottomed boat symmetrical, it is much easier to control in limited space than other types of boats. Punts used for transporting goods usually have specially designated areas for stowing and storing cargo.
By the way, the name of the boat comes from the Latin word “ponto”, which means “boat with a flat bottom”. The same word is the root of the word pontoon. Today, punts are often used in sports competitions, as well as by amateurs. active rest and water sports. If you have a desire to sail on a flat-bottomed boat yourself, then the ever-increasing number of flat-boat rental points in populated areas with shallow rivers and calm currents will be happy to provide you with this opportunity. Also, many rental shops offer training in the basics of operating a flat-bottomed boat.
General issues
Outdoor recreation, hunting or fishing in an area surrounded by bodies of water is an activity that is impossible without a floating device, so a boat is not a luxury, but an urgent necessity. Buying your own mini-ship can make a significant dent in your budget, which is why few people are attracted to this option. However, the exorbitant prices of small boats do not become an insurmountable obstacle for enthusiasts, since making a boat with your own hands is much easier than it might seem at first glance. Self-created designing a practical small vessel is an entertaining process, but it requires a serious approach from the author of the future boat.
Selecting materials and type of boat is the first step
This is not to say that the future builder has a lot of options, but there is a choice. A homemade boat can be made from:
- aluminum;
- wood;
- plastic;
- rubber (rubberized fabric);
- become;
- plywood.
There is no ideal material, each of them has its own advantages and is not without its disadvantages, but most often craftsmen choose wood and its “colleagues”, since the advantages of these options are undoubted. This:

- environmental friendliness, light weight;
- buoyancy, reliability, strength;
- noiselessness, maneuverability;
- relatively low cost;
- long service life at correct processing material and storage of the vessel;
- the ability to use oars, install a motor and/or sail.
There are two types of wooden boats:
- keel structures;
- flat-bottomed (round-bottomed) vessels.
The latter are held in greater esteem by fishermen, since punt boats have better stability, allowing them to hunt fish even while standing. These boats are easy to turn around, and there is enough space for everything that fishing fans need: both gear and a very large catch.
Self-made keel mini-vessels are distinguished by better maneuverability in difficult sections, speed, and practicality. However, these boats are more demanding, since passengers and the “driver”-rower first need to learn how to maintain balance, correctly distributing the center of gravity.
Features of wooden “boat work”

The creators of these boats have several requirements that will have to be taken into account. Among them:
- Ability to handle wood, knowledge of all the nuances. This concept includes optimal choice boards, the ability to calculate in advance the future maximum loads on the wood, as well as awareness of how the workpieces bend.
- Correct choice of other materials: in addition to wood, you will need means to protect it from leaks, from the harmful effects of water, elements to hold all the parts of the structure together.
- Availability of space for assembly. Since all the blanks and the vessel itself are quite large in size, and assembly will take a beginner a lot of time, you need a room or area that is reliably protected from rain.
- The need to have all the tools to work with wood.
- At least one assistant will definitely be needed.
This is a minimum list of what is needed, so other conditions may arise as you work.
Correct dimensions and drawing

They are a separate discussion, because the weight, capacity, carrying capacity and stability of a small vessel on the water depend on the size. If we write about recommendations, they are as follows:
- Side height. The optimal value is 500 mm, but no one prohibits a slight change up or down.
- Length. This parameter depends on how many people will be in the boat at the same time. If the craft is designed for one person, then a length of 1800-2500 mm is enough. For a duet of “seafarers”, 3000 mm is needed, for 3-5 people 3500-4000 mm is enough. The latest design can accommodate six people, but in this case the question is different - the comfort of such a large company.
- Width. Here the recommended value is 1000-1500 mm, but it must be taken into account that the maximum figure will significantly reduce maneuverability, but will make the vessel more stable. You need to take into account the weight of people, the potential cargo that will be transported on the boat, and the length of the craft.
Based on the recommended (or chosen by the builder) dimensions, you need to make a drawing. If the master is not good at drawing up such diagrams, it is better to stick to ready-made, proven sketches that are easy to find on the Internet: just enter just two words into the search engine - “boat drawing”, and then switch to “Pictures”.
Preparation: tools, materials
After theory, practice begins - purchasing materials and finding all the necessary tools. The main thing for a boat is the boards. In this case, it is better to buy spruce, larch or pine lumber that does not have cracks or knots that might fall out. Those that hold tight do not pose a threat to the future ship. It’s easy to check their reliability; just hit them with a hammer or sledgehammer. The optimal wood is one that has been stored in a dry place for at least a year and has been lying on a flat surface for the entire period.

The rest list includes:
- wood antiseptic;
- beam for spacers and triangular - for the bow of the boat;
- water-repellent paint - Pentacryl, Progress, Raptor (for cars), brushes (spray gun);
- nails (preferably galvanized self-tapping screws) of different lengths and a hammer for them;
- primer;
- low power drill, screwdriver;
- glue (polyurethane), its replacement is resin, a syringe for application in hard-to-reach places;
- varnish (yacht) - Alpina Yachtlack, Belinka Yacht, Eskaro Marine lakk 90, Premia;
- sheet metal for the bottom and fastening elements of the boat;
- sandpaper (or grinder);
- file;
- tow (sealant);
- paracord (Kevlar, nylon, polypropylene) - to give the sides of the boat the desired shape;
- roulette;
- clamps;
- jigsaw (hacksaw).
Making a wooden punt
How to make a boat with your own hands, reliable, strong, unsinkable? There is only one answer: all stages require precise implementation, since haste, any shortcomings, and the traditional Russian hope “at random” are contraindicated. Attention even to " little things" is a necessary condition.

Manufacturing of boards
- First, according to the drawing, all the blanks are cut out. Parts, including the sides, are processed with a file and then sandpaper. Impregnated with antiseptic.
- On one side of the side boards, a cut is made at an angle of 15-30°, then the ends are chamfered to ensure an ideal fit (without gaps) of the workpieces in the bow.
- The bow of the boat is fixed with a triangular beam, attaching it with nails or self-tapping screws to the junction of the boards with inside after a perfect fit. The edges of the contacting parts are first impregnated with an antiseptic, then lubricated with glue (resin).
- They call an assistant and give the sides of the boat the desired shape using paracord or its replacement. The sides are tied with a cord, having previously installed spacers between them of the same width as the future boat. The rope is then tightened.
- The transom is attached (the rear element of the boat is the flat stern part). It is connected to the sides using glue (resin) and self-tapping screws (nails).
Creating and fixing the bottom

The bottom is made of wood (it is better to find a wide massive board), waterproof plywood (FSF, 12 mm) or sheet metal.
- If used a metal sheet, then the part is cut out so that its dimensions exceed the bottom by several centimeters. They are needed for attachment to the bottom of the sides. Since leaks are the biggest threat here, all joints are generously coated with glue or resin, and tow is used. The edges of the metal are bent using a hammer. Self-tapping screws are planted in increments of 15-20 mm along the entire perimeter of the boat.
- If found wooden plank(plywood), then an element of the desired shape is cut out of the material, and then they act in the same way - they are treated with glue or resin, they use tow and fasteners.
Final processing of the material

Now the elements of the boat are again generously treated with an antiseptic, and all potential gaps are eliminated using tow or sealant. Then they prime twice, apply paint in several layers, each of them is given time to dry.
Then the vessel is coated with varnish, also in 2-3 layers. The last stage is the installation of bench-cans, installation of triangles for the stern, they are processed - primed and painted (varnished) - separately. At this point, the production of the punt boat is considered complete.
Checking the water tightness of the boat
This operation is necessary to ensure the reliability of the vessel before its first long voyage. There are several ways to do this, but it is better to conduct a comprehensive test.

- Inspection at the construction site. In order to ensure the quality of the work, the boat is turned upside down and placed on a long bench or on several stools. Then a large amount of water is poured onto it from a hose. The recommended duration of this test is 5-10 minutes. The boat is turned over and inspected for leaks.
- Mini ship test big water. If a homemade punt has not proven itself to be a leaky trough at the “shipyard,” then it is first sent for free swimming to shallow depths. When the first water tests are successful within 30 minutes, the boat is ready for any body of water.

They can be useful for those who do not like to make mistakes in their work, which always require additional effort to correct them. Therefore, some recommendations can (and should) be “wound up” in advance:
- during production homemade boat It’s better not to skimp on the quality of materials, since best wood- synonymous with the longevity of the future own watercraft;
- It is recommended to cut all blanks with a small margin, because it is much easier to cut off the excess, otherwise you will have to cut out a new element;
- sealant, glue, resin or tow - something that needs to be purchased in large quantities, the joints of the sides with the bottom are especially important;
- in all wooden parts for fastening, you need to pre-drill holes of a slightly smaller diameter than nails or self-tapping screws, the goal is to prevent possible cracking of the material.
Plywood boat

Plywood floating craft has its advantages, which include:
- light weight, since the lightweight version of such a boat weighs only 10-15 kg, and such a vessel is quite easy to carry even with two people;
- maximum capacity is 5 people, but it all depends on the chosen project;
- the durability of the mini-ship, but only if the technology is followed;
- affordable price of all required materials.
If the master has a desire, but can’t find any reason to abandon his plan, then he just needs to allocate free time to create a boat.
Materials, tools

Furniture plywood (FK) is not suitable for the construction of this vessel, so you need to purchase one of the following brands: BK (impregnation - bakelite varnish), BS (bakelite glue) or, if it is not possible to buy BK and BS, FSF (resin formaldehyde glue). It is necessary to pay close attention to the quality of the material: cracks are not allowed at the ends, and there are no knots or other defects on the surface. Thick plywood is not suitable, since the sheet must be able to bend, so the maximum (or optimal) thickness is 6-9 mm. Other necessary materials and tools:
- timber - high-quality, dry;
- larch slats - for the keel and stringers (longitudinal stiffeners);
- fiberglass in rolls;
- waterproof paint;
- primer and putty (also waterproof);
- epoxy adhesive;
- yacht varnish;
- pencil;
- copper wire (paper clips);
- chisel;
- wire cutters;
- hammer;
- pliers;
- plane;
- roulette;
- self-tapping screws;
- clamps;
- Grinder;
- putty knife;
- jigsaw, files (for curved cutting).
Plywood structure drawing
It’s simpler and easier to choose a ready-made sample, which can be found on the Internet without any problems. But before “hunting” for him, you need to think about a few details. These include:
- The appearance of the boat, its shape.
- Capacity of the future vessel and its dimensions.
- Level of design complexity. It is better for newcomers to “shipbuilding” to look towards simple models.
After a drawing you like is found, the master has the right to slightly correct it: for example, change the size or shape of some elements.
The simplest of the drawings is the one in which all the parts are placed on 1 plywood sheet.

- First, the axial (longitudinal) line is marked on it, then those located between the letters A, B, and C. Half of the bottom is transferred to paper, cut out, then the pattern is applied to the second half of the sheet, outlined with a pencil so that the bottom is symmetrical.
- Draw a line separating the transom from it. The bottom is cut out with a jigsaw first, the rear side follows.
- In a similar way, they draw and then cut out the side boards: they mark one element, put it on the second blank, then both are immediately clamped in clamps and cut out. The cut areas of all workpieces are treated with sandpaper.
- The slats for the keel and stiffeners (stringers) are cut out, then they are ground.
If you are not satisfied small sizes watercraft, then two sheets of plywood are glued together before the cutting operation, treating the joints first with a plane and then with a grinding machine. A weight is placed on the resulting seam.
Assembling boat elements
The step-by-step process of connecting parts looks like this:

- Holes are drilled in the lower part and on the sides of the transom, their diameter is 1.5 mm, pitch is 150 mm. Do the same with the bottom from the stern side. Both parts are connected with wire, twists are made from the outside.
- The bottom is laid on 3 stools, and boards or books are placed on the outer chairs to ensure the required deflection. The assistant's name is. Together, holes with the same diameter and pitch are made along the edges of the side and sides of the bottom.
- The side elements are attached with wire to the bottom and transom. After checking the geometry of the boat, the staples are set with a chisel on internal joints. Temporary spacers are inserted between the sides in the places where partitions (frames) and bench seats will be installed. They are temporarily secured with self-tapping screws.
- All joints are glued three times with fiberglass using epoxy glue. The width of the first strip is 25 mm, the second is 40, and the third is 50 mm. All twists of wire on the outside are cut off before gluing from the outside, and the joints are rounded.
- Temporary struts are removed, frames and cans are installed. The holes from the self-tapping screws are “masked” with wooden dowels mounted on epoxy glue.
- The slats intended for the keel and stringers are secured with glue and screws, then placed under a press.

Finishing work
First, sandpaper is used to remove all the irregularities that appeared “thanks” to the epoxy glue. Defects or all surfaces are puttied, then the boat is primed. The last stage is painting and/or varnishing.
How to make a boat with your own hands? Not difficult, but not too basic either. You can verify this if you look at all the stages through the eyes of a master. For example, this video, divided into 9 parts, will help you see the reality of solving the problem:
I have long wanted to create a record marking the main points in the manufacture of a boat, but it never worked out! Dad is getting older every year, but there are still no cheat sheets, although he and I have put together more than one pair of boats... And this year there was a need to expand our fleet, because the children are growing up and boats are required that are more stable and load-bearing, for reliability movement. I myself used to swim to the surface, but with my sons I have to be careful about this! The time has come to take out the previously stored boards, edge them, plan them, prepare nails, and one weekend we get down to business! (It’s better to use spruce boards, without knots, but you don’t always have what you need)
First of all, Dad sketched out a small drawing with dimensions, based on the requirements and previous construction projects
Then they laid out the boards for the bottom, drew a contour on them according to the dimensions, cut out the main parts with a jigsaw, leaving only the edges, this can be seen in the photographs.
When adjusting the boards to one another, we leave gaps in the stern and in the bow, but in the middle we fit them more or less tightly
When all the parts are prepared, we begin assembling the bottom, first tightly assembling the boards, sewing them with nails in the middle with a cross member, then using a rope and two crowbars we pull together the stern, sew them together with nails, and do the same with the bow
Due to the fact that the crossbars are rounded, and gaps were left between the boards in the bow and stern, when screeding and assembling, the bottom turns out to be a bit of a sphere both across and along its length. In the future, this gives the boat stability on the water. It is not necessary to adjust and tighten the bottom boards to microns, small cracks are quite acceptable, this will make it easier to caulk the bottom.
When the bottom is assembled, we line out the edges according to the planned dimensions and markings so that the edges are smooth, otherwise it will not be possible to bend the side boards clearly
The most interesting thing is ahead, you need to bend the sides at the same time on both sides, if bending one by one can warp and the boat will turn out to be skewed. We apply the side board to the bow on one side and sew it on, then do the same on the other side, then one presses it, bending the boards, the second pierces it with nails towards the stern.
The boards were tied together in the same way as the bottom - with a rope. As a result, some kind of shape was drawn, then it’s easier. We bend the second row of side boards in the same way. We don’t hit a lot of nails when stitching because we still have to caulk! Next, we saw off the excess ends of the boards, both the side boards and the bow and stern. Then you adjust the front bow board.
After completing the assembly, you work with a plane, rounding where necessary, leveling it, going through the entire longboat, cutting out the frames beautifully. After making it beautiful, we caulk it, add nails in places, screw the rowlocks, resin the bottom, nail the strips to the bottom, resin them, then paint. We also make seats and paint them as you like. Our oars are transferable, we change boats, but the oars are the same. The oarlocks on all our boats are the same, so there are no problems.
In principle, I tried to take into account all the stages and subtleties in the photograph, so that it would be clear. Two boats have now been put together, one for the opening, the second just recently. The boats were made identically, one was tested, the second was at the stage of completion of work.
If anyone has any questions, please ask, I’ll be sure to clarify! Truth questions usually arise when self-production, suddenly someone will take it and make a piece of wood. For those who live near the lake, a piece of wood is irreplaceable!
Thank you for your attention!
Drawings and photos


We are building a plywood boat from seven parts.

A small article about the Jack Sprat, (), attracted the attention of our team of yachtsmen. I really liked the boat for its compactness (2.3x1.3 m), fairly large capacity - in the photograph there were four adults and two children in it, and simplicity of manufacturing technology.
We took as a basis those given in the article dimensions tuzik and within a week they made a similar one plywood boat.
For the construction of the boat, sheets of ordinary construction plywood 4 mm thick were used, glued together (a miter joint was used) to a length of 2400 mm. From these, in accordance with the sketches provided, sheathing blanks were cut out.
General view of the boat (a), cutting of the transoms (b), section along the midship frame (c) and sketch of the oar (d)

Cut out the outer sheathing sheets.

enlarge, 1303x993, 120 KB
The body assembly looked like this. Having laid the bottom blank on the floor and the corresponding edges to it - the blanks of the zygomatic girdles, we connected them together. First, the blanks are connected approximately in the middle of the length of the boat using paper clips copper wire with a diameter of 1.5 mm. Then, gradually bringing the edges together, the same clips are sequentially placed in the bow and stern along the entire length of the cheekbone. At the extremities, the shape of the hull is determined by the bow and stern transoms.
Holes with a diameter of 2 mm for paper clips must be drilled in advance in increments of 100-120 mm along a line knocked out at a distance of 8-10 mm from the edge of the workpiece processed to a clean size. It is better to twist the ends of the wire with outside housing as shown in the sketch.
The sequence of making connections along the grooves of the casing:
a - placing wire clips and crimping them; b - the groove is ready for laying internal fiberglass tapes; c - diagram of the arrangement of tapes in the connection

In the same way, the side blanks were attached to the zygomatic belts of the skin. Staples were also used to connect the skin to the transoms.
Then all connections were glued from the inside in two or three layers with fiberglass tapes. After the epoxy resin had cured and the ends of the staples had been removed, the same strips of fiberglass were placed on the grooves on the outside of the housing. When the transverse cans and bow book (120X120) were inserted, and the fenders were glued along the upper edges of the sides, the hull acquired the necessary rigidity. The bottom was reinforced with thin pine strips glued to the plywood from the inside.
As it turned out, for the convenience of assembling the body using this method, it is best to use plywood of the same thickness everywhere, as provided by Jack Holt, the author of the tuzik. To increase the moisture resistance and durability of the plywood body, we pasted it on the outside with two layers of thin fiberglass on epoxy resin. A “false keel” with a section of 50x6 was glued to the bottom. A small fin was installed in the stern to increase stability on course. Styrofoam blocks were secured under the cans. The total weight of the boat turned out to be 35 kg.
Four years of operation of the boat as an onboard tug on the yacht “Vityaz” confirmed its high performance. It was also used quite successfully under the Salyut engine.
We think that by slightly reducing the side height, and, consequently, reducing the weight (this will be especially noticeable if waterproof plywood is used), a boat of this type can also be recommended to motorists for transportation on the top trunk of a minicar.
A.K. Kartsev, “Boats and yachts”, 1979, No. 01(077).
======================================================================
Sail on the Chizhik.

A mast with a sail installed on a regular rowing boat does not yet turn it into a real sailboat. In addition to the sail and spar with rigging, allowing you to set the sail and control it, you need a rudder with an increased area of the feather and, necessarily, a centerboard or centerboards that keep the boat from excessive lateral drift (drift) during lateral and, especially, courses steep to the wind - at an angle of up to 40-50° towards the wind.
The placement of the crew, and therefore the arrangement of the cans, on a sailing boat is always different from that on a rowing or motor boat: the crew must tilt the boat, counteracting the heeling pressure of the wind, and for this people need to be placed along the side. In addition, the dimensions and shape of the boat's hull must correspond to sailing conditions, i.e., be designed for movement at a relatively low speed.
“Chizhik” (see “KYa” No. 24) was designed as a rowing boat with the possibility of using a low-power outboard motor: naturally, the design of the boat was designed specifically for these use cases. So, on the “Chizhik” a longitudinal middle bank for the rower was arranged; thanks to this, it is possible to give the boat an optimal trim depending on the number of passengers, there remains free space for passage along the boat, on the sides of this can you can sleep on the elan. However, this same can is not at all needed on the “Chizhik” - a dinghy.
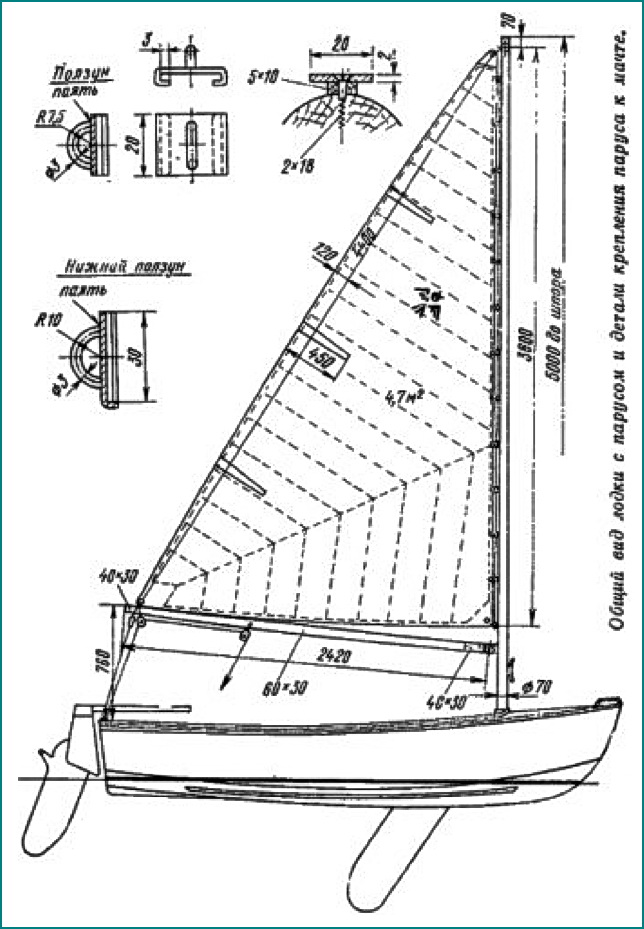
Basic data of the Chizhik boat
Maximum length 3.47m
Maximum width 1.47 m
Side height 0.5m
Load capacity 300kg
Power up to 5 PM, l. With.
To transform the “Chizhik” into a sailing boat, corresponding changes in the design of its hull are necessary, so readers of the collection interested in this issue are offered two options:
Option 1 - most fully takes into account the requirements for a sailing and rowing boat, but provides for significant changes in the original design. This option is best implemented by those who are just planning to build “Chizhik”;
Option 2 is a compromise solution that involves a minimum of changes to a finished boat, built according to the original drawings.
In option 1, equipment is required for a centerboard well, a transverse and two side cans in the cockpit, and fastening of removable parts - the mast and rudder. The hull of the boat is built according to the original design, but the side stringer is brought to shp. 1. Instead of a longitudinal can, a centerboard well is installed, which is a narrow box, open only at the bottom, secured with screws and glue above the slot for the centerboard in the keel. The well is secured by a transverse can, resting on the side stringer.
The walls of the well and the flooring of the can are cut from waterproof plywood 6 mm thick. Final assembly the well is made after fastening from the inside vertical racks on sp. 2. On the Chizhik, it is the well that is closed at the top that is convenient - through the open well (involuntarily it would have to be made low), with any significant waves, water would begin to splash into the boat.


Alyosha" is the first dinghy based on the Chizhik, built in Gus-Khrustalny by V. Zhirnov.
The hull is manufactured exactly according to the drawings given in No. 24 “KYA”. A rigid canister is placed across the hull, securing the centerboard well. The stern fin is made higher, up to 120 mm, on the transom. The dinghy is armed with a sloop with a sail area of about 6 m2. Full Height mast, fastened with a forestay (st. rope diameter 3) and shrouds with screw turnbuckles, - about 8 m from the steps. The mast and boom (2.0 m) are glued together from pine slats and have a sealed groove. The boom-sheet cable strap is hung on the transom. A block with a diameter of 25 mm slides along the shoulder strap; the sheet is passed through a block approximately in the middle of the boom and a foot block attached to the bottom.
Due to the tourist purpose of the boat, it is necessary to use a centerboard; simpler fixed - “sticking” centerboards cause hard impacts when colliding with underwater obstacles and are inconvenient, and sometimes even dangerous, when sailing in an unfamiliar area.
The centerboard rotates on an axis, the cheeks of which are attached with screws to the outside of the keel to avoid drilling holes in the lower part of the centerboard well. The centerboard is rotated using a rod made of a metal rod or a thick-walled tube with a diameter of 20 mm, riveted to its rear edge (do not forget to put a plug in the tube!). The rod must be very carefully bent around a circle with a radius of 250 mm (along the axis). At its exit from the centerboard well, a seal made of microporous rubber about 10 mm thick is installed, pressed with a metal pad. The hole in the rubber should be smaller in diameter than the rod. The centerboard is raised and lowered by a pusher made of a 4X30 metal strip, hinged to the rod with an M8 screw. At the stern end of the pusher, it is advisable to install a handle in the form of a wooden ball (the idea of this design was borrowed from an old dinghy).
The leading and trailing edges of the centerboard should be sharpened, and it is advisable to fasten a protective brass strip 1 mm thick along the leading edge. The easiest to use are removable side cans, supported by a side stringer, a thrust block on the bulkhead of the aft locker, and a strip of plywood under the transverse can. They are held in place by rotary fasteners, the same as the floor fasteners. Under the longitudinal banks, foam buoyancy blocks must be securely attached to the boat hull.
The steering wheel consists of a steering block and a lifting feather. The block is assembled using glue and bolts with a diameter of 5-6 mm from three layers of bakelized plywood. The middle part, 12 mm thick, has a sector cutout for the rudder blade. The side cheeks are 8 mm thick. The tiller is attached to the block using a metal clip bent from a sheet. The steering loops are cut out of a square with a wall thickness of at least 4 mm or bent from a strip and attached to the block with screws with a diameter of 6 mm. The pins (from M8 bolts with cut heads) are screwed into the threads of the hinge holes and riveted. The lower pin must be about 20 mm longer than the upper one, otherwise the steering wheel will be difficult to install in place. The parts of the steering loops attached to the transom are also cut out from a square and installed on through MB bolts.
The rudder blade is cut from 12 mm thick bakelized plywood and, just like the daggerboard, is sharpened along the edges and protected by a rudder. The axis of the feather is an M8 bolt, the tightening of which is adjusted so that the raised feather is held by friction against the cheeks of the block. The upper part of the steering wheel blade should be sanded so that it fits freely into the slot of the block. The pen is lowered into the water directly by hand; For this purpose, a lever with a handle is provided on its rear edge. To protect against jumping out of the hinges, the steering wheel is fixed with a flat spring attached above the lower steering loop.
On the transom of the boat on the starboard side, at a distance of 400 mm from the DP, a second pair of steering loops is installed, onto which the rudder is hung when rowing. This is very convenient for the helmsman, since the tiller moves freely under right hand, and does not rest against the back; rudder displacement has virtually no effect on the boat's handling.

Equipment of "Chizhik" with centerboard and steering gear
1 - frame made from 1X30 strip; 2-rudder feather, buckplywood 6 = 12; 3 - handle for lifting the pen; 4- steering block; 5 - tiller, 40X40; 6 - main sheet; 7 - boom clip, 6 = 2 mm; 8- weft for halyard; 9- clip made of 3X40 strip, fasten to the beam with M 6 through bolts; 10- step pad, 6 = 2 mm with a rectangular hole for the mast spur; 11- sealing hole for rod 12; 12 - rod from a tube 0 20 mm; 13 - centerboard axis - pin 0 12 mm; 14 - centerboard, buckplywood 6 = 12; 15-cheeks of the centerboard axis, 6 = 2.5 mm; 16- well wall; plywood 6=6; 17 - stand (key) of the well 25X60; 18 - gunwale-plug well 25X30; 19- tiller clip, 6 = 2; 20 - side cheeks of the block, back plywood 6=8; 21 - steering loop; 22- plywood gasket 6 = 6; 23 - centerboard thrust; 24 side bench seats; 25 - rudder position when rowing.
The mast blank is glued out of three or four pine bars of the required length. The mast section above the cockpit coaming and up to about half the height is a circle with a diameter of 70 /l/l. Above this level, the front and side edges are smoothly planed to a section at the top of 40X50, below - to a section at the spur of 30 X 50 ( larger size in both cases along the DP).

Option with swivels
1 - forging 20X2; 2 - keel 25X80; 3 - base of the well 20 X 60; 4 - cutout for the centerboard pusher; 5 - well stand 20X60; 6 - well gunwale 25X30; 7 - from the well, 6 = 6; 8 - stiffening rib of the transverse can 20X30; 9 - can flooring, 6=6; 10 - coaming, plywood 4X50; 11 - carleygs, 20X 25; 12 - fender beam, 18X30; 13 - can support block, 18X30; 14 - toptimbers 6 = 20; 15 - zygomatic stringer, 18X30; 16 - sheathing, 6=4; 17- flortimbers 6 = 20; 18-bottom runner 20X30.

The simplest boom swivel.
1 - boom; 2- M5 screw, 2 pcs; 3 - strip b=6 to embed into the boom; 4.6 - M8 bolts; 5 - washer 8; 7 – bracket, fasten to the mast with two 5X32 screws; 8 – clip b=2.

Option for a boat with fenders.
1-shvertsa forging, X40, brass; 2-shverts, back plywood 6=15/16; 3-weed; 4-bearing; 5-holder made of steel, diameter 3; 6-support bar; 7-longitudinal seat; 8 - transverse bank 6=6; 9-pine lining; 10-check; 11 - bent axle; 12-circlip.
A pulley for the halyard is cut into the top of the mast; The boom swivel and halyard cleat are attached below. Along the trailing edge of the mast, a rail for the mainsail sliders is fastened with screws through a 5X10 rail - a carefully aligned 2X20 metal strip.
The mast spur fits into a step socket 25 mm deep, cut out in the rear part of the stem, and reinforced with a 2 mm thick metal bracket placed on top with a rectangular hole cut into it for the spur to pass through. The finished mast, like all parts of the spar, is coated with colorless varnish (oil or pentaphthalic). There is no standing rigging - shrouds and stays are not needed; The mast, along with the boom and sail, can be easily removed from the boat. If necessary, the mast can be made collapsible. In this case, the upper and lower parts of the mast are connected by a coupling made of metal pipe with a wall thickness of about 2 mm. A 400mm long coupling is attached with screws or through bolts to the top of the mast; to fix correct position connecting parts of the mast, a screw with a diameter of MB is screwed into the lower part, and a slot approximately 20 mm deep is made in the coupling. In the area of the coupling, the rail for the mainsail sliders is fastened with short M4 screws screwed into threaded holes.
It is better to glue a boom with a cross-section of 30 X 60 from two pine bars according to the thickness. Towards the ends, the boom is planed along the lower edge to a height of 40 mm.
When equipped according to the second option, the boat is no longer equipped with a centerboard, but with hinged centerboards. On both sides in the shp area. 2, on the inside of the casing, a support block for the transverse can is installed (cut on the frame), and on the outside, a block is installed to support the hinges. The transverse can is attached to these support bars at the side and to the longitudinal can. Below deck on both sides of the beam shp. 2, cushions for the bearings of the hinges are installed.
The doors are cut from bakelized plywood 15-16 mm thick, their vertical edges are sharpened, and protective shanks are placed on them. Top part The screw is put on an axle made of a steel bar with a diameter of 16 mm, bent at a right angle. In the axle cage, the axle is fixed with a stopper in the form of an MB screw without a head, screwed into the axle and running into the slots of the cage. The axis of the screw is inserted into the deck bearing and secured in it with a rotary pin. The transverse movements of the axle in the bearing are limited by a piece of tube riveted to it, from which the cage bushing was made. The shverts are raised by weeds, which are laid on the ducks inside the boat.
The design of the mast, boom and rudder is the same as in option 1, but it is recommended to reduce the sail area by 1 m2, taking into account the fact that the centerboard area is smaller than the centerboard, and the possibilities for heeling the boat due to the different arrangement of the cans are somewhat worse.
Making sailing rigs is a rather complex and time-consuming task, but the pleasure of sailing will, without a doubt, more than pay for this work. However, it must be warned that steering a sailboat, even one as small as the Chizhik, requires special training for the helmsman. The best way to learn sailing is at a yacht club.
At self-study In the art of sailing, basic safety rules must be strictly observed:
Don't overload the boat; do not take on board people who cannot swim and small children;
When sailing, the crew must always wear life jackets;
Monitor the weather carefully; if there is a danger of a squall, immediately remove the sail and sit down at the oars;
You cannot sail when the wind is stronger than 4 points, and in the beginning, with insufficient experience, no more than 3 points;
Never lay the sheets on the cleat; always keep the halyard bay clean - ready for lowering the sail;
When going out sailing, check if you have forgotten to take the oars;
Until you have gained confidence in your abilities, do not leave the area where you may receive assistance.
immediate assistance in case of capsize.
A boat is an indispensable thing if you want to go fishing or just spend time with friends or family on the river. This is a great device for a walk or even a whole water adventure that you can do yourself.
If you are interested in the technology by which you can make a punt boat from plywood yourself, the drawings presented in this article and the recommendations will be useful to you in your work.
Making a simple boat from plywood is the most budget method get a boat. To do this, you just need to stock up on everything you need, including tools and drawings, as well as show a little patience and diligence. Otherwise, making such a product will not be difficult for you, the main thing is to strictly follow the prepared drawing.

What do you need for work?
The material on which the structure is created is, of course, plywood. It consists of veneer layers glued with phenolic glue, which are pressed in production. There are several types, but not every type of plywood is suitable for making a boat with your own hands.
Note! The highest quality and waterproof plywood is marked FSF. It is usually made of birch veneer. When using it, you can achieve reliability and quality from your future product. As a result, you will spend significantly less effort on sanding and finishing your boat.

If for some reason you are unable to obtain quality plywood trademark When purchasing low-quality products, pay special attention to the execution of the end parts on the sheets. The absence of through cracks, knots, holes and defects is a sign of a standing material.
The quality of the chosen plywood will depend on:
- the quality level of the product itself;
- performance characteristics of the boat;
- cost of finishing work;
- time spent on finishing work;
- volumes of required material;
- number of seams in the finished boat.
Therefore, you must treat your choice with maximum responsibility. Some parts of your flat-bottomed boat may require blocks or boards, preferably dry and completely free of any flaws or damage.
To cover the boat, fiberglass is used, sold in rolls. You can cut it into pieces required size, which will be convenient for gluing joints and seams. A solid piece will be more appropriate for processing the bottom.
Varnish, glue and paint are used to protect the boat from moisture. It is best if the varnish is marine grade and the paint is not water based.
To make brackets for your boat, you can use plastic clamps and copper wire. Any other material will also work, which can then be easily removed.

List of tools:
- electric jigsaw and a set of files for it;
- sander;
- hammer and plane;
- clamp;
- tape measure for measurements, a metal ruler and a simple pencil for marking;
- brushes for applying varnish and glue;
- spray gun for working with paint;
- a spatula that will help level the fiberglass during the gluing procedure.

Boat manufacturing work: splicing method
After you have selected the appropriate drawings, prepared everything necessary tools, you can start making the boat.
Note! In the event that you cannot find the plywood of the size required for your boat, it can be joined together using plywood miter splicing technology.

Sheet splicing technology:
- Sheets of material must be laid on top of each other, mark a line of the mustache (its length is ten to twelve thicknesses of a plywood sheet).
- To obtain an even and high-quality result, it is recommended to secure the material using clamps and a limit bar. It is along this bar that the mustache will be formed. Make sure that you do not have sharp changes in the length of this line.
- The formed mustache must be sanded with a machine to an ideal state, constantly combining and adjusting the sheets.
- Apply to the mustache area adhesive composition, then plywood sheets it is necessary to stack the treated surfaces on top of each other and secure them with clamps, placing weights on top to ensure complete gluing.
- Excess glue must be removed immediately, without waiting for it to dry.
- After the glue has dried, you can remove the clamps and leave the product alone for 24 hours until the glue completely hardens.
The remaining glue must be sanded off with sandpaper to even out the seam and make it less noticeable.
First, you need to mark the bottom on plywood, first laying it out on a flat surface. Based on your drawing, draw the centerline of the boat, after which you can place a grid on the basis of which the contours of the future product are marked.

To ensure a tight fit of the joints, chamfers can be made at the edges of the plywood junction. A grinding machine is suitable for this. After this, you can sew the parts together using staples and clamps. The procedure should begin from the stern, gradually moving to the bow of the boat, slowly bending the plywood. Both the sides and the transom are secured.
The next stage is checking the geometric dimensions of the structure. After which you need to tighten the clamps more tightly, place spacers in the places where the frames are mounted to fix all the parts.
The seams are glued from the inside of the product. To do this, you need to take glue and fiberglass, which must be cut in advance into strips 7 cm wide. Using a brush, apply the adhesive to the joint, glue the fiberglass and level it with a spatula, removing bubbles and wrinkles. The seams need to be taped two or three times.


