DIY New Year's cookie cutters. Make any cookie cutter with your own hands. How to make your own cookie cutter. Make a cookie garland
It seems to me that December is the time for cookies) Because all the friends are in social networks they are full of pictures of Christmas cupcakes and cookies of various shapes. This is not surprising, because it is during the holidays that the desire to perform culinary feats and make beautiful treats arises. I also love baking cookies. But this year I wanted to bake cookies not in the usual shapes of stars and hearts, but something like that)) Well, this idea was born in my head - how to make almost any cookie cutter yourself
. I made a key, because, you know, the symbol of the key is an eternal, unfading classic and romance) With such cookies, it’s not a shame to go on a visit and give it as a gift and even decorate the Christmas tree.
Well, are you already excited about the idea of making your own cookie cutter? Then I'll tell you ;)
I must say right away that it will be a little more difficult than it looks in the pictures. For your first experience, it is better to come up with a simpler form, especially if you do not have the skills for fine manual work.
We will need:
- a tin of cheese or pate
-ruler
- pencil
-knife
-scissors
-pliers
- thread
-paper
First, we come up with a shape and draw sketches. As I said above, for the first time it is better to take a simpler form. Perhaps the key will be difficult for some. Then we cut out our shape from paper. By the way, it is not necessary to do this at all, you can just leave the drawing on paper, but it was more convenient for me :).
Then take some thread and a marker. And we draw the outline of our shape with a thread, marking with a marker (dots) all the folds on the thread. We do this to make it easier to repeat the shape.
Now let's take our tin can. I have this container from Camembert. It is important that the walls are quite thin and not too hard.
1) Large sharp knife make a cut at the top hard rim of the jar.
2) Insert scissors into the resulting hole and begin to carefully cut along the border line. I used regular scissors, they work great and easily with thin metal.
3) Make a transverse cut to the base of the jar.
4) Now cut along the bottom line.
5) So we cut out a not too smooth strip of metal.
6) Using a ruler and pencil, we draw out the uneven edge of our strip, giving it the appearance of a rectangle with smooth edges.
7) Use the same scissors to trim the uneven edges along the line.
8) Now we also cut the strip into two parts lengthwise. We need a strip of metal about 1.5 cm wide.
Now we can proceed to our form. In this case, the key :)
1) Since the top of the key shape is rounded, we need to find an object with a suitable diameter. This could be a pen or marker. I have a test tube with sparkles)) We wrap our strip of metal around this object and press it with our fingers to make a semicircle.
2) Then, using a pencil, transfer all the marks from the thread to a strip of metal. So we marked all the bend points.
3),4),5) Now using a ruler and a marker / pen / any object suitable diameter We begin to carefully bend the desired shape. It is very important to apply the ruler to the strip at a right angle so that the shape comes out even. So, apply the ruler to the point and bend it straight along the ruler. Here you can and should help yourself with pliers and fingers to achieve the desired contour.
6) Well, the key is almost ready, all that remains is to close the ends.
Shortbread cookies are easy and quick to prepare. It is quite suitable for inexperienced housewives. Success depends on the quality of the oil, as well as on the consistency of the dough - the dough must be plastic.


And also, shortbread cookies can be made beautiful if you give them a shape: cut them out with a knife, a glass, or using special molds, or roll the dough through a meat grinder, as our grandmothers often did.

In addition, shortbread cookies can be coated with glaze, sprinkled with colored sugar or nuts on top, painted with special pencils with food coloring and turned into a work of art.
Recently I found in my pantry a homemade mold - a “heart” for cutting out shortbread cookies, my mother also made it, and I remembered how my nieces on Valentine’s Day, because it was not possible to buy a mold, it was not on sale, handmade, cut out hearts from the dough using a knife according to a paper pattern. Everything worked out well for them, but it took longer than with the form.

|
| Mom's uniform |
And our grandmothers made them themselves from tin cans of condensed milk, for example.
I decided to try it myself. I am a thrifty person and I don’t throw away small tin cans of olives, condensed milk, coffee, or rather, I don’t throw away everything. Can be useful for baking small sized cakes.
So, I found 5 small tin cans: two 350 g for olives, one for 450 g and two 100 gram coffee cans.

First I made a shape for cutting out a heart:
1.I have good key for opening canned food. It is important that the edges remain smooth, otherwise you may cut yourself accidentally. I removed the bottom using a key.
2. Using pliers, I walked along the contour of the top, where the lid was, and pressed down the rim, squeezing it just in case, so as not to accidentally scratch or cut myself.
3. I bent the resulting pipe with my hands (you can press it on the table), first making a triangle with rounded corners.
I marked the middle, the place where the concave part would be, and there I made a fold with pliers and then gave it the shape of a heart.
And I made the bottom tip of the heart sharper. Heart shape to taste - whatever you like.
Similarly, from the rest of the cans I made what came to mind: a triangle, a triangular star, a shapeless star and a cat’s head.
I tried the forms in action:

I baked cookies and everything came out beautifully. Decorated with icing, etc. The result is in the photo above
Such a high shape has an advantage - it is more convenient to cut out cookies, because it is more convenient to press - not with your fingers, as is the case with small molds, but with your entire palm.
Of course, these are molds for those who like large cookies; if anyone likes small cookies, then this is large.
If you choose cans, you should pay attention to the thickness of the tin; it is clear that the thinner one is more suitable for crafts. I noticed that nowadays green peas are in thicker tin cans. Or I just get one like this all the time.
Also, please note that the bottom of the olive jars has a slightly barrel-shaped shape; it is clear that it is better to make the shape from the top of the jar.
And also, safety tips.
1.Wash carefully so as not to cut yourself
2.If you notice that a notch has appeared after removing the cover, it is better to squeeze this place with pliers so that it is smooth.
3. It is possible to organize a husband for such a job; to my surprise, I somehow managed it easily without him.

Forms from crystal wine glasses
You probably have crystal glasses or vases in your home; they are ideal for creating interesting cookie shapes.


Tarlet molds
An original idea to use a muffin tin upside down.

Molds for tubes
You don’t have a mold for straws in your house, don’t worry, make one yourself from a couple of spoons. You will need 2 spoons per mold.


Cookie cutters for cutting out cookies from a tin can. Master class.
SAFETY INSTRUCTIONS: the edges of the tin can be very sharp, and there may also be burrs (if you do not cut strictly in a straight line), you need to be very careful. It is better to do all cutting and processing operations over a newspaper or white cloth so that fallen pieces of tin and sawdust are immediately visible. A piece came off, I searched for a long time, I couldn’t find it, but my husband’s heel found it. You need to cut tin with metal scissors, you don’t need to spoil the regular ones.))
Of course, if I had a piece of suitable tin, making the molds would be much easier. But I don’t have it, so I got tin from tin cans. To begin with, we ate several cans of condensed milk.)) We chose condensed milk that was tastier, thicker (for those who know - from the Rogachev plant), but we should have taken another, Glubokoe, liquid, because... the tin turned out to be better in them. Yes, better in order:
There were two types of cans, one type - shiny on both sides, covered with tin, slightly corrugated (as in the photo below). Others are shiny only on the outside, the inside is covered with a yellowish varnish, they are smooth, so it is better to use them for making molds, because... The tin is thicker, and you don't need to tap it with a hammer to level it.
I decided not to test the strength of my new metal scissors; I cut off the lid and bottom with a can opener.
The result is a ring like this.
If you have a flat jar, then you can skip the next step.
If the can is corrugated, then you need to put it on a board and go over it with a hammer to make the tin more even. She won’t become like a mirror anymore, and she doesn’t need to, that’s enough.
From one jar I get three molds, i.e. The strip must be cut lengthwise into three parts. Then process each resulting strip with a file to remove burrs and sharp edges and corners. Please take this seriously, I wouldn't want anyone to get hurt.
Using a nail and a ruler, mark (press with force) a fold line at a distance of 0.5 cm from the edge in order to tuck the edge. This is necessary so that later it will be more convenient to press with your hand when cutting out cookies.
Using pliers, bend the edge along the basting. It is better to do it in two or three stages, first bend it to a smaller angle along the entire length, then to a larger one. Tap the edge with a hammer to ensure the edge is well aligned.
The result is a strip like this
I even have an extra ponytail left.
Now we take the prepared strip of tin and, using round-nose pliers, pliers, or thin-nose pliers, bend it according to the pattern. Make sure that the cutting edge of the future mold lies in the same plane. Apply a mold to the drawing cutting side, because it is she who will then give your liver its shape.
It is convenient to make round parts (as in a snowman) using various bottles, felt-tip pens and other round objects, as if wrapping tin around them. When you have completely bent the desired mold, all that remains is to cut off the excess tin (leave an overlap of 0.5-1 cm for soldering).
Then ask your husband/brother/dad/friend to solder the edges. I soldered myself, but for the first time in my life, so it didn’t turn out very neatly.
The mold is ready! Now you can knead the spicy dough, cut out cookies with cutters, bake, decorate and hang on the Christmas tree. For example, like this. I haven’t made cookies with new molds yet, so I’ll show last year’s as an example.
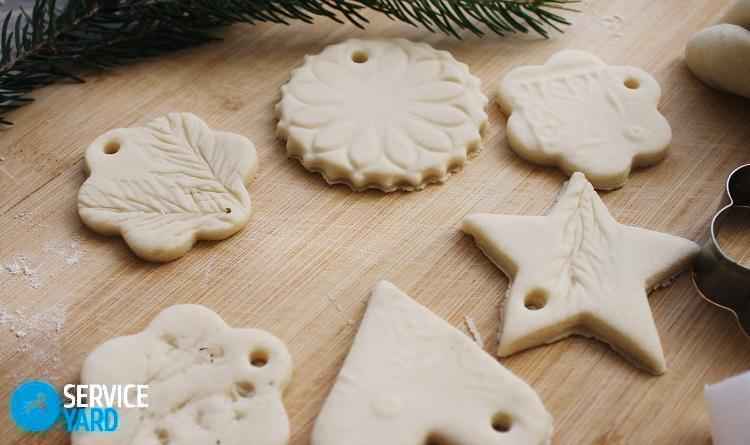
Or you can make salt dough and call the children, cut out figures with them, dry them and paint them.
In the same way, you can make molds for cutting out sugar mastic for decorating cakes.
Then take some thread and a marker. And we draw the outline of our shape with a thread, marking with a marker (dots) all the folds on the thread. We do this to make it easier to repeat the shape.
Now let's take our tin can. I have this container from Camembert. It is important that the walls are quite thin and not too hard.
1) Using a large sharp knife, make a cut at the top hard rim of the can.
2) Insert scissors into the resulting hole and begin to carefully cut along the border line. I used regular scissors, they work great and easily with thin metal.
3) Make a transverse cut to the base of the can.
4) Now cut along the bottom line.
5) So we cut out a not too smooth strip of metal.
6) Using a ruler and pencil, we draw out the uneven edge of our strip, giving it the appearance of a rectangle with smooth edges.
7) Use the same scissors to trim the uneven edges along the line.
8) Now we also cut the strip into two parts lengthwise. We need a strip of metal about 1.5 cm wide.
Now we can proceed to our form. In this case, the key :)
1) Since the top of the key shape is rounded, we need to find an object with a suitable diameter. This could be a pen or marker. I have a test tube with sparkles)) We wrap our strip of metal around this object and press it with our fingers to make a semicircle.
2) Then, using a pencil, transfer all the marks from the thread to a strip of metal. So we marked all the bend points.
3),4),5) Now, using a ruler and a marker / pen / any object of suitable diameter, we begin to carefully bend the desired shape. It is very important to apply the ruler to the strip at a right angle so that the shape comes out even. So, apply the ruler to the point and bend it straight along the ruler. Here you can and should help yourself with pliers and fingers to achieve the desired contour.
6) Well, the key is almost ready, all that remains is to close the ends.
To neatly connect the tails of the form, you need to make a small even bend 2-3 mm wide on each one so that they cling to each other. The picture below shows the principle. When the ends are bent, insert them into each other and press tightly with pliers. That's it, the mold is ready!
Now run to bake beautiful cookies! :)) Of course, it’s better to decorate such a treat with glazes, but I’m too lazy)) But for the New Year I will definitely bake cookies according to all the rules - with glazes and patterns :)
master-klass.livejournal.com/533269.htm
You will need
- - aluminum can;
- - plastic bottles;
- - ruler;
- - metal crochet hook or knitting needle;
- - sandpaper;
- - ballpoint pen;
- - scissors;
- - stapler;
- - sharp knife;
- - tracing paper or other transparent paper;
- - a computer with any graphic editor;
- - printer.
Instructions
For toy molds, choose plastic bottles. They can be of very different shapes. It would be great if you could find baby shampoo bottles in the shape of symmetrical animal figures. Draw a line of symmetry. The best thing to do is ballpoint pen, but it can be scratched. Make sure it crosses the entire figure.
Cut the bottle along the marked line with scissors or a sharp knife. If there are any unnecessary parts, such as the “spout” through which the shampoo is poured, cut them off too. Sand the edges with sandpaper to remove burrs. You may end up with two molds at once.
Such sand molds can be made from asymmetrical and shaped jars. Choose the most expressive and convex area (for example, the face of an animal). Step back a few centimeters from the marking line and draw another line. Cut the bottle along it. In this way, you can give a second life to broken plastic toys.
It's okay if you only have round and rectangular bottles on hand. Step back 3-4 centimeters from the bottom and draw a line along the entire perimeter. It should be parallel to the bottom. Cut the bottle along this line. You have a mold and “production waste”. If this second part has a neck, with one movement of the scissors it turns into a scoop. Once again, cut the bottle 5-6 centimeters below the neck. Give it a scoop shape. The neck will be the handle, and shape the blade depending on the shape of the bottle.
Make cookie cutters from heat-resistant material. An aluminum can of beer or any other drink will do for this. Canning jars will also work, but they are not very convenient because the strip you need will be too short. Wash the jar well, cut off the bottom and top. Cut it along the seam to make a rectangle. It is desirable that its edges be smooth, so cut off the bottom carefully with a sharp knife or scissors.
Straighten the sheet and mark its strips 1-1.5 cm wide. The strips should be parallel to the long side of the rectangle. You can draw lines with a ballpoint pen or scratch them with a knitting needle. Fasten two or three of these strips together. The size of the mold depends on whether you are going to bake a large cake or small cookies. It is most convenient to fasten with the most ordinary stapler.
You can make your own cookie cutters
DIY molds: choosing material
Everything you need to create your own molds is probably already in your kitchen. These are all kinds of bendable cans. The following container is suitable for work:
- aluminum soda cans;
- tin packaging of condensed milk, coffee, corn, etc.;
- large aluminum baking dishes;
- plastic bottles.
The main criterion in choosing is that the future device can be cut/bent. The material must be sufficiently pliable.
Experiment with the size: for a small DIY cookie cutter, a 0.3 liter jar is suitable, for larger baked goods - a 0.5-1 liter beer can.
Create beautiful pattern Glasses with a pattern on their stems will help. Just print it on the test. And if you want to bake tube cookies, use two folded spoons as a base.
How to make your own cookie cutters
From aluminum cans and plastic bottles Make your own molds like this:
- cut strips of aluminum. For small pieces, cut the can crosswise, for large ones - lengthwise. The ideal strip width is about 5 centimeters;
- draw on paper the outline in which you want to bake the cookies;
- bend the strips, applying them to the paper outline;
- Glue the ends of the mold with superglue.
It is important to remember that the edges of aluminum cuts are sharp and dangerous. Polish them with sandpaper or a nail file. Use ready-made models possible a day after their creation. This will completely remove the glue smell.
If you are making molds from tin, you will need pliers. With their help, you can give the container the desired look: folds, lines, corners. You can make a heart, a triangle, or even a star from cans.
Cookie shapes from jars are physically more difficult to make, but they are more convenient to use. You can press on the jar with your whole palm to cut out the dough, on the aluminum strip - only with your fingers.
For mini-cupcakes, you can make disposable molds from baking paper. To do this, take a metal mold with a bottom as a basis, cut out a circle of parchment according to its size + approximately 2 cm in diameter. We wet the paper circle, put it in a metal mold, insert another into it to fix the shape. After drying, you need to carefully trim the edges - and you can use it.
Use your imagination and experiment!
We all love homemade baked goods, because they turn out incredibly tasty, thanks to the fact that housewives put all their love and warmth into them during the cooking process. But, unfortunately, not everyone has the opportunity to diversify its external appearance. For example, mothers want to prepare interesting products with an original thematic shape for their babies, but they may not have the necessary equipment at hand. It doesn’t matter, because today we will learn how to make cookie cutters with your own hands from scrap materials. This article will describe the most simple ways their manufacture.
Making metal molds
To do metal molds for making your own cookies, which can then be used to cut out dough products, you will need the following materials and tools:
- Aluminum molds for oven use.
- Metal scissors.
- Clothespins.
- Pencil, marker and ruler.
- Thick gloves.
- Superglue.
- Pliers.
- Paper.
- Sample rectangular shape from any material for strips 4 cm wide.
Important! When making aluminum molds, you only need to wear gloves, otherwise you can seriously cut yourself from the sharp, raw edges.
First you need to prepare the material for work as follows:
- Remove the side edges from the mold and, using a marker template, draw stripes 4 cm wide on the metal.
- Draw another line right in the middle of the resulting strip with a marker. Thanks to this line, it will be easier to form a metal blank.
- Now you need to cut off part of the workpiece along the main line.
- Fold the cut piece in half along the line.
- We unfold the workpiece, on the left side we fold it in half along the length directly along the fold line.
- We do the same actions with the right side.
- We fold the workpiece inward with sharp edges.
- Using the handle of the scissors, smooth the edges.
- As a result, we get a durable and flexible tape.
Now let’s look step by step at how to make cookie cutters with your own hands:
- Draw a sketch of the required shape on paper. There is no need to use too complex bends to make the shape easier.
- Form an aluminum strip around the design according to the sketch. The tape must be bent using any available tool - a bottle, a rectangular or round glass, a pipe or a rolling pin.
- When you get the desired shape, you need to leave a few centimeters for fastening, and cut off the remaining piece.
- The ends should be glued together with superglue, secured on top with clothespins and left to dry completely.
So we have a durable baking pan.
Molds from an old tin can
When wondering what to make your own cookie cutters from, you can check to see if you have an unnecessary tin can at home? If you are lucky, then you will also need to take metal scissors and superglue for the work.
And making molds from these materials is as easy as shelling pears:
- Cut off the top and bottom of a tin can, and cut the wall lengthwise with scissors.
- Cut the resulting tin rectangle into strips 2-3 cm thick.
- From these strips, make the necessary shapes, for example, diamonds, hearts, houses, people, flowers or sponges.
- Glue the ends of the forms together with superglue, and if they turn out to be too sharp, go over them with a file.
Important! Using the resulting molds you can very easily cut out cookies from sugar or shortbread dough, but keep in mind that they quickly become unusable.
Simple foil cookie cutters
If you urgently need to bake a lot of cookies, but at the same time you want to give them a special shape, then you can use regular foil and a glass with a round or square bottom.
Follow this pattern:
- Cut the food foil into small squares.
- Wrap a square of foil around the bottom of the glass and iron it well to get the desired shape.
- All that remains is to place the resulting blanks on the baking sheet.
How to make molds from a plastic bottle?
Many may be surprised, but you can even make your own cookie cutters from plastic bottles.
Important! Use finished goods can be used not only with dough, but also with mastic.
They have undeniable advantages:
- We get them completely free of charge, the process of making them only takes a few minutes.
- The quality of the molds and the features of their application will depend on the selected material.
- you get necessary equipment and dispose of the bottle.
- These molds are made of food-grade plastic, making them completely safe and harmless.
- Making them yourself is quite simple.
To get them, you need to draw sketches of future shapes on paper, then cut the bottle, attach them to the base, and cut them clearly along the contour. At the end you will need to secure their ends with a bracket.
As we can see from the above master classes, you can make cookie cutters with your own hands from plastic bottles, foil, metal and even old tin cans. Thus, you will not only get the elements you need for baking, but also use items that have been lying around on the shelves for a long time, and will also certainly please your loved ones with delicious original cookies unusual shape.
Many people prepared homemade shortbread cookies in silicone molds or Easter cookies using tin cans. Such devices greatly simplify the process of creating a culinary work, allowing you to create baked goods, as in the photo. With them you don’t have to cut out perfectly even hearts and circles, and your culinary masterpieces will be very beautiful.
How to choose a baking dish
Making homemade baked goods in molds can be compared to art. There are a lot of difficulties - from the recipe to external design gastronomic miracle. Making beautiful cookies, pie or cake yourself is very difficult, because for this you have to prepare a sketch and struggle with cutting out each element. Molded products made of silicone and metal come to the rescue. They help keep the dough, cream or curd mass intact. This will allow you to prepare delicious gingerbread or attractive gingerbread cookies.
What should the ideal baked goods look like? Housewives can always order in an online store, choosing from a catalog, or buy entire kits for preparing homemade food in the supermarket. confectionery. The most popular are ceramic, glass, silicone and metal cookie cutters. The first two options are often used for pies, casseroles and other bulk products. They are a little more expensive than iron ones, but are also very practical: they wash well, withstand high temperatures ovens.
Silicone cookie molds
Preparing cookies in silicone molds is very simple. The delicacy can have the most unusual look, since modern manufacturers offer large selection options, as in the photo. Many housewives question the safety of such material. However, you can safely use them, because the device has a whole series advantages:
- does not rust;
- easy to clean;
- withstands very low and very high temperatures without emitting harmful substances;
- the confectionery product never burns in such forms;
- thanks to the flexibility of the material, you can create unusual shapes and designs that will delight your child: numbers, mushrooms, letters, flowers;
- affordable price.
The ease of use of the device makes it indispensable in the kitchen. With its help, you can immediately get a beautifully shaped pie or cake that will not need additional decoration. The disadvantages of the tool include the softness of the sides: if you are preparing a large dish, then pouring the dough and then carrying it to the stove or oven will be inconvenient. This problem can be solved using a special safe ring pad, the price of which is affordable.
Silicone molds come in standard and unusual forms. Now there are options on sale that can be used to make not only simple squares and hearts, but also sweets in the shape of movie and cartoon characters. This idea will appeal to those who are planning to cook for their child. Homemade cookies of an unusual shape will be very beautiful, tasty and natural. You can also prepare unusual cakes and casseroles from cottage cheese or mastic. The family will appreciate the funny gastronomic creations.

Metal molds for baking cookies
If you prefer metal molds, then choose those that are made of aluminum and have non-stick coating. Light material will give you excellent results. The products will have an attractive appearance - as if for sale. The mold heats up and cools down quickly, which is convenient for housewives. Please note that after preparing cookies in metal molds, you cannot cut them directly into a baking sheet or frying pan - otherwise the non-stick layer will be damaged.
Cookie cutter price
Baking tools can be purchased inexpensively at any store or online market. The cost of the molds varies depending on the material used and the brand of the manufacturer. In a set or set kitchen utensils They are cheaper per unit. The photo shows different options that are currently on the market. Comparative characteristics prices for molds can be seen in the table below:
How to make a cookie cutter
Making your own cookie cutters at home is very easy. You don't need to be an expert to do this. You need to have some free time and imagination. Different recipes require different approaches to preparing the dish. For some options, simple tin ones are better suited tin cans, and for other baked goods it is worth preparing special sketches from cardboard. The price of finished products is higher: homemade design will cost much less than purchase option. Cookies in “homemade” molds will not change their taste.
DIY cardboard forms
If you want to make cookies in a cardboard pan, this is a good choice. Making your own design is very simple. To do this, you will need a sketch of the item you like. It could be a heart, a mushroom, a nut. After cutting several strips of cardboard, you need to glue them together like a sketch. Those items that you plan to put in the oven should be secured at the joints with staples, and then begin to use. Original cardboard molds will help you prepare unusual cookies.
Tin cookie cutters
Housewives often use cutters from tin cans to cut out perfectly identical cookies. With their help, you will get very even and beautiful baked goods. To practice at home, use a simple open jar. It can be used for baking cupcakes and other confectionery products. To get an unusual configuration, simply bend the can slightly on different sides. The simple method, due to its affordable cost, became popular and allowed housewives to make shaped cookies: triangles, circles, squares.
It is easy to make a baking dish with your own hands from available materials that can be found in any home. The main material for the production of this product can be a tin drinks bottle or an ordinary tin can. Using sharp metal scissors, cut off the bottom and top part empty tin bottle.
The resulting cylinder must be turned into a flat tin sheet and for this you need to cut it along the entire surface. This workpiece is placed on any hard surface and, using a special knife and a metal ruler, is cut into identical strips 1.5 - 2.5 cm wide.
Using pliers or pliers, each tin strip is given the desired shape. The perimeter is closed by connecting the ends of the strip to each other. For the convenience of making various molds, it is recommended to first draw their templates on a sheet of paper. Similar examples can not only be invented, but also found on the Internet.
Before you make a baking dish, you need to decide on its size. If you plan to make small-sized cookies, one tin strip will be enough to make the mold. Otherwise, two or more tin blanks can be used for this purpose, connecting their ends into a “lock”.
The DIY baking dish is ready, but it is imperfect and has a number of significant shortcomings. As practice shows, it is not at all easy to remove dough from such a workpiece, especially if it has small sizes. In this case, a fork or any other similar object is often used to push the dough.
This not only takes up valuable time, but can also deform the baked product. Your DIY baking pan will become more perfect if you make a special pusher for it. To do this, you can use improvised means such as large paper clips and an awl.
It is necessary to make a pusher rod from two large paper clips and to do this they should be unbent and connected to each other. For strength, one tin strip is folded in half or three times so that it fits freely inside the molds made for baking. Using an awl or an ordinary nail, two holes are made in the middle of such a structure for connection with a special rod made of paper clips.
The so-called pusher is installed on the baking pan. When pressed, the rolled out dough will lift the pusher up, and when the pusher is pressed from above, the squeezed dough will freely separate from the mold. After thoroughly washing the completed structure with a sponge and dishwashing detergent, you can begin cutting out the rolled out dough. However, to prevent it from sticking to the molds, experienced chefs recommend lightly sprinkling it with flour.
We will need:
- a tin of cheese or pate
-ruler
- pencil
-knife
-scissors
-pliers
- thread
-paper

First, we come up with a shape and draw sketches. As I said above, for the first time it is better to take a simpler form. Perhaps the key will be difficult for some. Then we cut out our shape from paper. By the way, it is not necessary to do this at all, you can just leave the drawing on paper, but it was more convenient for me :).
Then take some thread and a marker. And we draw the outline of our shape with a thread, marking with a marker (dots) all the folds on the thread. We do this to make it easier to repeat the shape.
Now let's take our tin can. I have this container from Camembert. It is important that the walls are quite thin and not too hard.
1) Using a large sharp knife, make a cut at the top hard rim of the can.
2) Insert scissors into the resulting hole and begin to carefully cut along the border line. I used regular scissors, they work great and easily with thin metal.
3) Make a transverse cut to the base of the jar.
4) Now cut along the bottom line.
5) So we cut out a not too smooth strip of metal.
6) Using a ruler and pencil, we draw out the uneven edge of our strip, giving it the appearance of a rectangle with smooth edges.
7) Use the same scissors to trim the uneven edges along the line.
8) Now we also cut the strip into two parts lengthwise. We need a strip of metal about 1.5 cm wide.
Now we can proceed to our form. In this case, the key :)
1) Since the top of the key shape is rounded, we need to find an object with a suitable diameter. This could be a pen or marker. I have a test tube with sparkles)) We wrap our strip of metal around this object and press it with our fingers to make a semicircle.
2) Then, using a pencil, transfer all the marks from the thread to a strip of metal. So we marked all the bend points.
3),4),5) Now, using a ruler and a marker / pen / any object of suitable diameter, we begin to carefully bend the desired shape. It is very important to apply the ruler to the strip at a right angle so that the shape comes out even. So, apply the ruler to the point and bend it straight along the ruler. Here you can and should help yourself with pliers and fingers to achieve the desired contour.
6) Well, the key is almost ready, all that remains is to close the ends.
We all love homemade baked goods, because they turn out incredibly tasty, thanks to the fact that housewives put all their love and warmth into them during the cooking process. But, unfortunately, not everyone has the opportunity to diversify its external appearance. For example, mothers want to prepare interesting products with an original thematic shape for their babies, but they may not have the necessary equipment at hand. It doesn’t matter, because today we will learn how to make cookie cutters with your own hands from scrap materials. This article will describe the simplest ways to make them.
Making metal molds
To make metal cookie cutters with your own hands, which can then be used to cut out dough products, you will need the following materials and tools:
- Aluminum molds for oven use.
- Metal scissors.
- Clothespins.
- Pencil, marker and ruler.
- Thick gloves.
- Superglue.
- Pliers.
- Paper.
- A rectangular template made of any material for strips 4 cm wide.
Important! When making aluminum molds, you only need to wear gloves, otherwise you can seriously cut yourself from the sharp, raw edges.
First you need to prepare the material for work as follows:
- Remove the side edges from the mold and, using a marker template, draw stripes 4 cm wide on the metal.
- Draw another line right in the middle of the resulting strip with a marker. Thanks to this line, it will be easier to form a metal blank.
- Now you need to cut off part of the workpiece along the main line.
- Fold the cut piece in half along the line.
- We unfold the workpiece, on the left side we fold it in half along the length directly along the fold line.
- We do the same actions with the right side.
- We fold the workpiece inward with sharp edges.
- Using the handle of the scissors, smooth the edges.
- As a result, we get a durable and flexible tape.
Now let’s look step by step at how to make cookie cutters with your own hands:
- Draw a sketch of the required shape on paper. There is no need to use too complex bends to make the shape easier.
- Form an aluminum strip around the design according to the sketch. The tape must be bent using any available tool - a bottle, a rectangular or round glass, a pipe or a rolling pin.
- When you get the desired shape, you need to leave a few centimeters for fastening, and cut off the remaining piece.
- The ends should be glued together with superglue, secured on top with clothespins and left to dry completely.
So we have a durable baking pan.
Molds from an old tin can
When wondering what to make your own cookie cutters from, you can check to see if you have an unnecessary tin can at home? If you are lucky, then you will also need to take metal scissors and superglue for the work.
And making molds from these materials is as easy as shelling pears:
- Cut off the top and bottom of a tin can, and cut the wall lengthwise with scissors.
- Cut the resulting tin rectangle into strips 2-3 cm thick.
- From these strips, make the necessary shapes, for example, diamonds, hearts, houses, people, flowers or sponges.
- Glue the ends of the forms together with superglue, and if they turn out to be too sharp, go over them with a file.
Important! Using the resulting molds you can very easily cut out cookies from sugar or shortbread dough, but keep in mind that they quickly become unusable.
Simple foil cookie cutters
If you urgently need to bake a lot of cookies, but at the same time you want to give them a special shape, then you can use regular foil and a glass with a round or square bottom.
Follow this pattern:
- Cut the food foil into small squares.
- Wrap a square of foil around the bottom of the glass and iron it well to get the desired shape.
- All that remains is to place the resulting blanks on the baking sheet.
How to make molds from a plastic bottle?
Many may be surprised, but you can even make your own cookie cutters from plastic bottles.
Important! You can use finished products to work not only with dough, but also with mastic.
They have undeniable advantages:
- We get them completely free of charge, the process of making them only takes a few minutes.
- The quality of the molds and the features of their application will depend on the selected material.
- You get the necessary equipment and dispose of the bottle.
- These molds are made of food-grade plastic, making them completely safe and harmless.
- Making them yourself is quite simple.
To get them, you need to draw sketches of future shapes on paper, then cut the bottle, attach them to the base, and cut them clearly along the contour. At the end you will need to secure their ends with a bracket.


