Blog What can be made from decorative tape? Ideas. How to make decorative tape with your own hands Ideas with decorative glitter tape
When renovating an apartment or a separate room, the issue of wall covering is very important, because this will serve as the basis for the design of the entire room. In this article we will focus on painting walls yourself. But here we will look at more interesting way– applying patterns on the apartment wall with your own hands.

Using paint, you can create drawings or abstract patterns on the walls of an apartment or room that will reflect your style and create homeliness.
When painting walls, there are several main questions that need to be answered:


What paint is suitable?
Of course, you choose the color as you wish, it’s personal to you design solution. But the type of paint will determine its resistance to water, heat and, in general, how long it will last. We recommend using water-based paints, They tolerate heat and humidity well, do not peel off, the surface covered with them can be washed, and are suitable for all rooms in the apartment.

What do we paint with: a brush or a roller?
Before application, you need to make a plain background.
- Roller: For this, it is better to use a roller; it is much faster to cover large, flat surfaces; the paint applies evenly, without leaving streaks.
- Brush you will spend significantly more effort and time. It is suitable for smaller objects, reliefs where the roller cannot reach hard to reach places(furniture: high chair, wardrobe, etc.).


TIP: When painting walls, it is convenient to use a brush in the corners, as an addition to a roller; it is also useful when working with stencils.
How to properly prepare a wall? What surface can I paint on?
If you have bare walls and you decide to paint them, then initially need to level the surface, since all the irregularities are very visible on painted walls.
- Suitable for this sandpaper (grinding machine, of course, will be much faster than manually).
- If there are cracks or scratches on the wall in that area, you need make putty, and then level it again.
- Next, wipe off the dust and Apply primer, preferably two coats.
By putty, old paint and it is not advisable to paint regular old wallpaper, the paint may not adhere well and come off.
- In order not to waste money and make really high-quality and durable repairs, before painting remove the old coating(using special solutions),
- and then do everything described initially.
ATTENTION: The exception is special wallpaper for painting; paint applies to it easily and evenly, as that is what they are intended for.
Main 3 methods of applying patterns:
- By using masking tape(geometric shapes are obtained)
- Using stencils (flowers and other designs)
- Roller with a pattern
Let's take a closer look at each of them.

Using masking tape
The essence of the method is that special masking tape is glued to the wall (just lines or combinations thereof), then paint is applied, and when the tape is removed (without leaving marks on the wall), a geometric pattern is formed.


Master class: Stepped forms
Here we will create patterns on the walls - steps. To apply the tape evenly and evenly, use a cardboard stencil.

Tools:
- tape, thick cardboard (you can cut the box),
- paint, small roller.
Drawing technique:


- Cut out a stencil from cardboard and cover it with tape (so that the edges do not tear). For example, let the first step be 5 cm high, the second and third 10 cm each, and each step 10 cm wide.
- Make it even parallel lines masking tape. Next, apply the stencil, cover it with masking tape and repeat this action, moving the stencil the same distance each time. And so on level after level.


The result should look like in the picture:


- Before you start color painting, it is better to apply white paint. This is necessary in order to be sure that the colored paint will not get under the tape and a neat pattern will be formed.
- Now apply the paint with a roller different colors for each level.
- Carefully remove the tape and get a beautiful, even design with clear lines, without mixing paints.


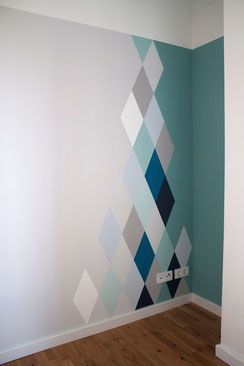
Master class: Triangles on walls in ombre style
Triangles, the color of which changes from the base to the top from bright to increasingly lighter shades, will make the room elegant and modernist.

You will need the following materials:
- Ruler
- Stationery knife
- Rollers and brushes
- Paint tray
- 4-5 shades of the same paint color (a can of each)
- 1 can of contrasting color paint
- Masking tape
Execution instructions:
- Place masking tape on the wall, using it to form triangles. Make sure all lines are straight.
- Using a utility knife, carefully adjust the corners of the triangles; the tape is applied on different sides and may protrude beyond the lines. It is very important not to damage the wall!


- The most light shade start painting the top of the wall, continue until the quarter is covered. Then take the paint a shade darker and paint from where you left off before. And so on until the darkest shade, that is, to the bottom of the wall.
- After the previous step, the wall does not look very neat, the colors change too sharply, this needs to be smoothed out. Use a dry brush to blend the lines where the different shades meet.


- Wait for the paint to dry (based on the instructions for your specific paint)
- Remove the masking tape, leaving only those parts of the triangles that you will paint contrasting color. To do this, grab the corner of the triangle and pull it towards you at an angle of 45 degrees.


- Apply contrasting paint to the remaining covered areas of the triangles.
- Wait for the paint to dry and remove the masking tape using the method described above.


Master class: Optical patterns
This painting method will require a little more calculations and preparatory steps than the previous ones. But the resulting drawing with a 3D effect is worth it.

You will need the following materials:
- Masking tape
- Paint in different colors (3-5 will be enough)
- Paint tray
- Roller
Stages of creating a drawing:


- Draw on a piece of paper a rough sketch of the pattern that you will apply to the wall.
- Choose a primary color (the elements of which will appear most often) and paint the entire surface of the wall with it.
- Apply masking tape to any surfaces that may get paint to protect them. For example, baseboards, tiles.
- Based on the sketch, apply marks evenly with a pencil and ruler, creating a pattern grid.
- Indicate a color on each section; this will make the work easier and faster, eliminating confusion.

- Choose which paint you will apply first and cover these areas with masking tape. Apply the paint and wait until it dries (about a day). Remove the tape by pulling it towards you at a 45 degree angle.
- Cover the areas for the second color with tape and repeat the steps from the previous step. Same with the remaining flowers.
- Make sure there is no tape left anywhere and your pattern is completely finished.
In this way, you can paint both the entire wall and part of it, then there will be a 3D effect of the painting.


Master class: Geometric shapes on the wall
Triangles, squares, circles and other geometric shapes scattered on the wall will create an original composition.

Materials:
- Masking tape
- Paint in two colors (for the background and patterns, the first needs more)
- Paint tray
- Roller
- Stencils for shapes with irregular lines (such as circles and ovals)

Work progress:


- Paint the shapes with a different color of paint.
- Let the paint dry for 24 hours.
- Remove the tape by pulling it towards you at a 45 degree angle.


Using stencils
The stencil method allows for drawings of varying complexity, regardless of artistic abilities. You can create even a very complex ornament just by purchasing the appropriate stencil.


And it will take much less time to create a drawing using a stencil than with hand painting. The range of drawings obtained by this method is very wide: flowers, trees, animals, insects, abstraction, and the list goes on.

For inspiration with this painting method, we offer a master class on creating a floral ornament.
Master class: Floral print
To somehow diversify the walls and not leave them just white, decorate them with contrasting colors. floral pattern created using stencils.

To do this you will need the following materials:
- Stencil
- Paint (white for the background and contrasting, in this case bluish with a tint, for the drawing)
- Brush (a small one with short, stiff bristles is best)
- Painting tape (only for attaching the stencil to the wall while you work, and not asking someone to hold it)

Work progress:

- Clear the room by providing a comfortable approach to the wall. Apply white paint, thus creating a field for the drawing. Wait until it dries.
- Place the stencil on the wall and secure it with masking tape. It must be well fixed, since if it slides after painting begins, it will be difficult to return it exactly to its previous place.

- Dip the brush into the paint, then shake it out thoroughly or wipe it a little with a towel so that the paint does not drip, otherwise it may flow under the stencil and the design will be ruined. The brush should be almost dry. Start sketching the stencil.


Important: When painting, carefully watch your free hand so as not to leave fingerprints with paint on the white wall.


- When the stencil is drawn and the paint has dried, move it to the next place and repeat the previous steps. Continue until you have covered the entire wall.
- When the last paint has dried, place the furniture in place and enjoy the created design.


Roller with patterns
This painting method allows you to quickly create patterns on the wall, requiring a minimum of effort. Its essence is that initially you apply background paint to the wall with a regular roller, and then use a special roller with patterns to paint the wall with a different color.
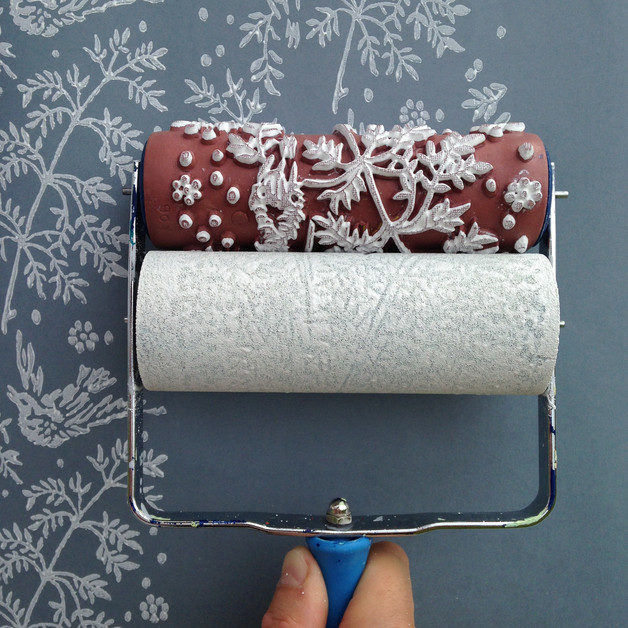
Of course, colors need to be selected so that everything together looks stylish and harmonious.
Working with such a special roller is the same as with a regular one:
- pour paint into the tray, dip the roller into the paint,
- walk along the wall and repeat these steps until the entire wall is painted.
If you don’t want to bother too much, but also want something more original than the usual plain wall color, this method is exactly what you need.


With Washi Tape you can decorate and transform almost anything - from small accessories, dishes, notepads, wrapping paper to furniture, walls and stairs. And most importantly: you don’t need to have special skills or any special knowledge to do this. All it takes is a little imagination creative thinking and a little patience. We want to offer you interesting ideas how you can bring to life the unique possibilities of using this amazing material - colored tape for decoration.
But first, let's talk a little about what exactly is Washi Tape? This magnificent thing came to us from a country famous for its unconventional ideas, - Japan. Washi literally means “Japanese paper”. Washi Tape, that is, “Japanese paper tape,” is similar to regular tape, but still it is not. This colored tape is made from translucent rice paper in a variety of widths and colors and comes in a variety of pleasing patterns and designs.

The original was manufactured by the Japanese company Kamoi and was first used in the automotive industry. But the potential of this colored tape was quickly recognized, and soon Washi Tape began to be used to decorate furniture, walls, create crafts, cards and much more. The wide palette of shades and patterns is still being actively expanded, and famous artists not only from Japan, but also from all over the world are happy to create new lines of colored tape designs, considering it an honor to work with Kamoi.

Colored Washi Tape for furniture decor
The general rule is this: before applying Washi Tape to any surface, it must be cleaned of dust, grease and dirt. Use gentle cleaning products suitable for your furniture. After this, you need to wait a little until the surface is completely dry, and you can start gluing. So old, worn-out chests of drawers will become the center of the entire interior, and boring ones wall shelves will turn into bright elements, eye-catching. The most simple furniture will gain individuality if it is decorated with multi-colored stripes!
An old chest of drawers becomes the main highlight of the room

It's amazing how attractive simple small polka dots look

Colored tape will help black objects look less severe

Great decor idea for a nursery

Colored Washi Tape for wall decor
Of course, Washi Tape is good for more than just furniture. Why not turn your wall into a work of art with some colored tape? It has an undoubted advantage: when removed, Washi Tape does not leave any traces and certainly does not remove part of the plaster along with it. This way, you can easily update your walls, decorate them according to your mood, while saving money. Great option for those who rent an apartment.

This is not to say that decorating with colored tape is simple task. No, this is painstaking work that requires accuracy and imagination; on the other hand, no special skills are required here, and this is definitely a plus. However, this task cannot be called difficult either. Joint creativity will bring a lot of joy to you and your children (if they participate, of course). Stripes, dots, images of animals and geometric shapes - your imagination is unlimited!


Decoration of smartphones, laptops, etc.
Does your smartphone case seem too boring? This problem is easily solved! All electrical appliances, including chargers and cables, are easy to change. This is good news primarily for teenagers, but adults can also feel the joy of bright colors. Just look at these gorgeous pictures.
With Washi Tape you can transform any gadget


Keyboard design with Washi Tape

Enjoy our collection of photos from Wahi Tape! We are sure that here you will easily find something that you will definitely want to repeat. We wish you pleasure while watching!
Decor ideas with colored Washi Tape


Paint the walls - great idea when you want to refresh your interior, but not everyone wants to live among plain walls. We offer original solutions decorate walls that are akin to designer interiors. In order for the walls to be painted on top level, it is not at all necessary to turn to professionals and pay a lot of money for their work. Here are a few ideas that you can follow to radically change the design of your room.
Original ideas for painting walls
1. Different colors of geometric pattern
Using masking tape and different shades of paint, you can play with the geometry of the room.
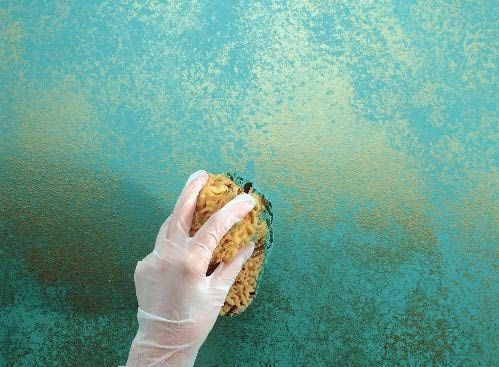
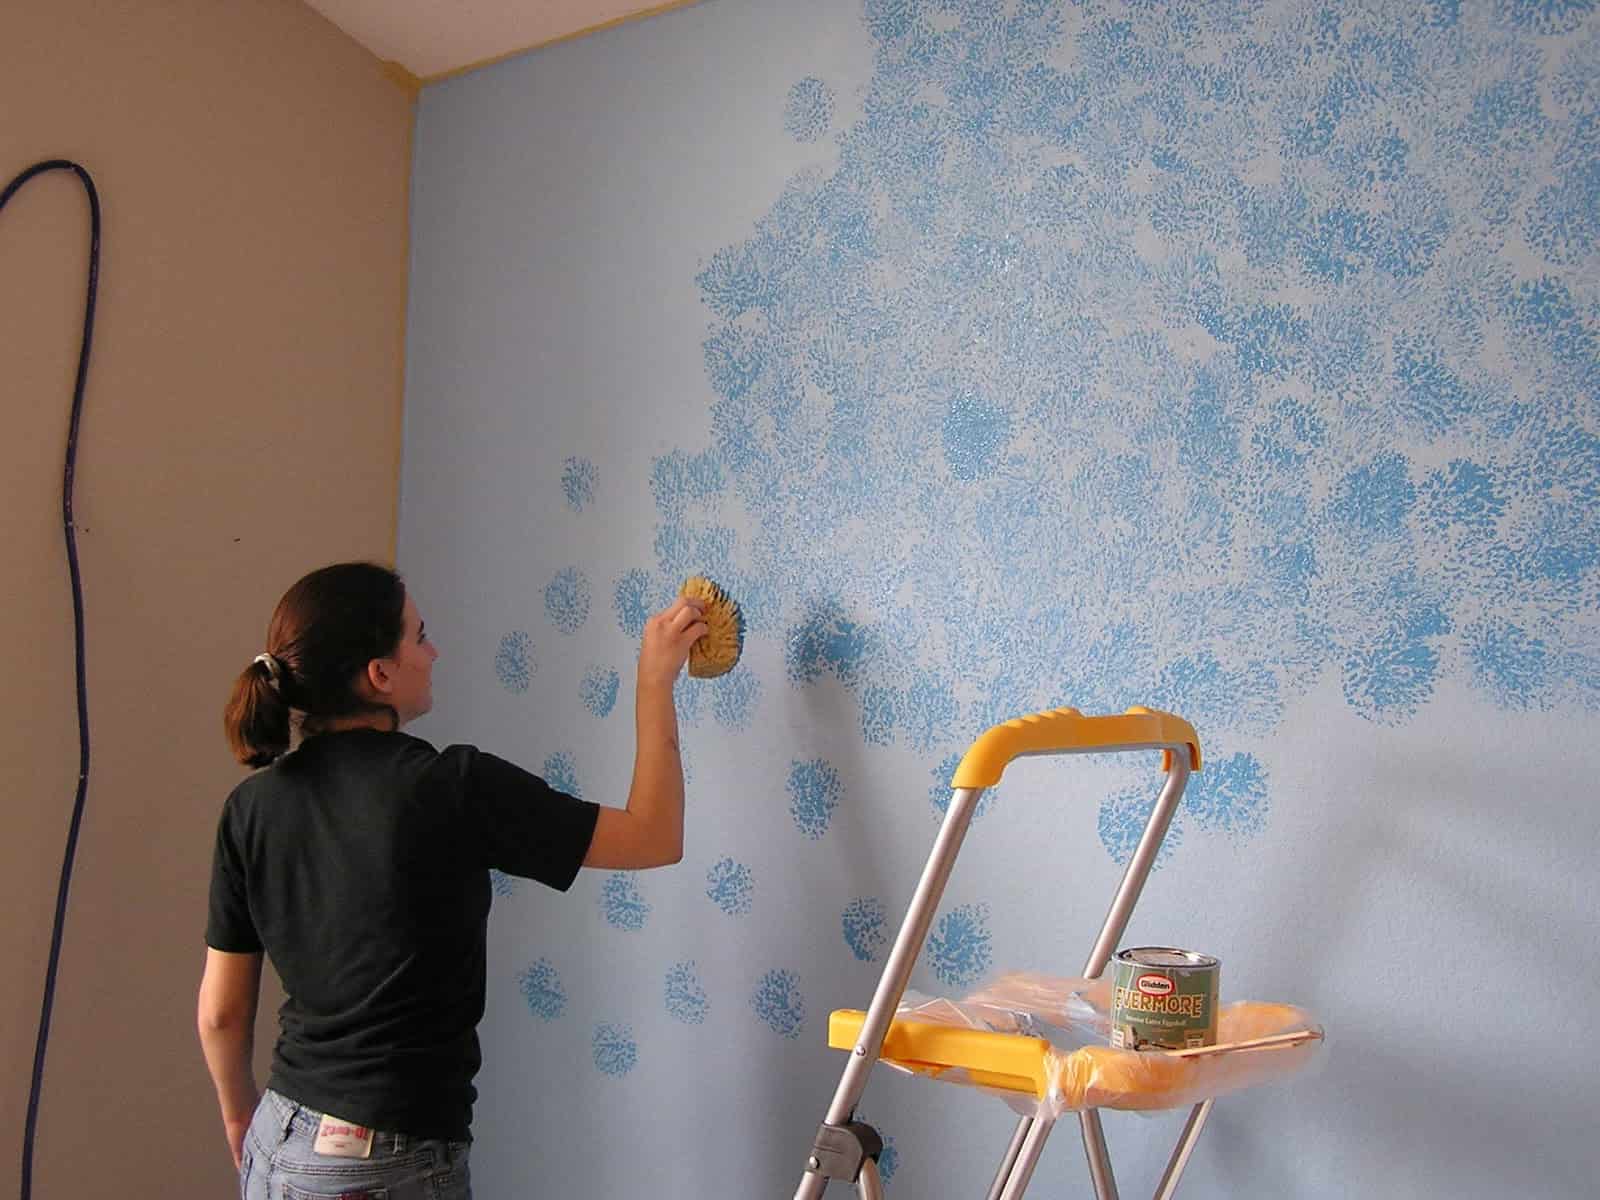
2. Incredible wall texture with a simple sponge
With this trick, even an inexperienced painter can achieve excellent results.
3. Imitation of brickwork using a rectangular sponge
Agree, it’s not difficult, but it looks great

4. Almost real wood in your room
This tree can be drawn using stencils

5. Light airy composition
Feathers on the wall make the interior of the room look lighter and no additional wall decorations are required. Such feathers are also applied to the wall using stencils.

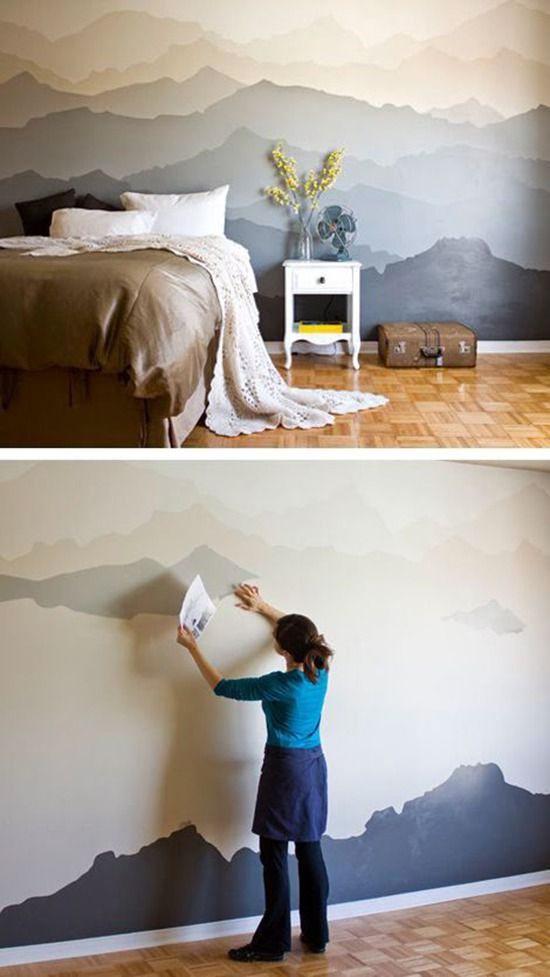
6. Mountain peaks using Ombre technique
Ombre is a smooth transition from a rich shade to a lighter one. This technique can be successfully used in painting walls. This look is worth the effort, but with great desire and patience you can get a great result.

Another example of mountain slopes using the ombre technique. A sheet of newspaper is used as a stencil.
7. Ombre technique
If you want to achieve an ombre effect without an additional pattern. Each shade of paint is applied separately, then the transition between colors is shaded.
8. A color transition on one wall using a geometric pattern will allow you to zone the space in an original and beautiful way
An excellent option for designing a color transition border between two different walls.
9. Decorative honeycombs of different shades will make the interior modern and original.

10. It is better to place a complex geometric motif on only one wall. This pattern is easy to make with masking tape and a roller.
11. Two in one: ombre technique and geometry. This method of painting imitates a wall panel and will become a bright accent in the interior.

12. Just let the paint dry
In this case, you will not need any brushes, stencils, or rollers. For smooth flowing lines, use a syringe, adjusting the width of the stripes only by the size of the syringe opening.
Decorative tape is an indispensable item for decorating gifts and creative crafts. But she herself is colored adhesive tape can become a craft. Now the market is overflowing with all kinds of decorative adhesive tapes, and making a greeting card or a homemade gift without them is not so interesting and impressive. And why? After all, they were created specifically to make our holidays more beautiful and fun.
Many believe that its manufacture requires special production technologies. This is not entirely true. There is a fairly simple way to make decorative tape at home. The manufacturing process itself will take just over an hour.
What is needed to make decorative tape
The following materials will be required:
- glossy magazines;
- regular tape (choose the width depending on what size you want the decorative tape);
- warm water;
- plastic card or regular ruler.
How to easily make decorative tape yourself
When everything you need is prepared, you can begin the creative process.
- Cut strips from a glossy magazine so that their width matches the width of the tape. paper base You can make it a little wider, since it can be trimmed later.
- All cut paper strips must be attached to adhesive tape. Trim the edges by trimming off any excess along the edges.
- To avoid any pimples, smooth the adhesive tape with a card or ruler, displacing any trapped air. Remember how, as a child, you smoothed out the foil from a chocolate bar with your fingernail. The principle of operation is the same.
- Next, immerse the strip in warm water and leave for about an hour. The water should not be hot.
- When paper pellets appear on the tape, you can pull the craft out of the water. Peel off the paper layer. You can use a sponge or do it by hand.
- Apply the tape to any clean surface where it can be easily removed.
- Leave it to dry.

Here's how to make decorative tape quickly and easily. This method is suitable for older children, as it requires patience and accuracy.
How to make tape at home without using water
But there is an easier way to make decorative tape. Last time, water was required, and the technology resembled more professional than amateur. This time you will only need colored clippings or purchased stickers, as well as wide transparent adhesive tape and scissors.
So, instructions on how to make decorative tape without water:

Even small children, using this method, will learn how to make decorative tape on their own and decorate a notebook, personal diary or anything else. IN children's creativity Such a beautiful adhesive element is simply necessary.
Blinds decorated with colored tape to match other interior details will look much more impressive.
2. Desk organizer with drawers

You can see how a simple wooden organizer and other items from IKEA are turned into beautiful home decor items here.
3. Calendar of anticipation of holidays and events

The holiday calendar is a thing that is still unfamiliar to many, but very interesting. Traditionally, it is done for children a month before the New Year to “brighten up” the anticipation of the holiday. For each day of the calendar, an envelope with candy or other small gift is glued. The envelope can be opened once a day. Of course, you can “wait” with the help of a calendar not only for the New Year, but also for any other joyful event. Decorative tape will help you make and decorate such a calendar.
4. Old chair
 5. Pots for "/>
A little imagination, paint, colored tape - and old chair like new. Instructions.
5. Flower pots
 6. Under"/>
Using tape you can create flower pots, for example, as shown here and here.
6. Candlestick
 7. Frames for f»/>
A few simple steps and wonderful cozy candlesticks are ready. Instructions.
7. Photo frames

With the help of decorative tape, an ordinary white frame turns into a bright piece of furniture. Instructions.
8. Soap dispenser
 9. Tea candles»/>
Read about how to make it here and here.
9. Tea candles

Tea candles in candlesticks decorated with decorative tape are a wonderful decor for own home And good gift. Photo instructions.
10. Hot stand

In the example we used tiles, but you can take anything as a basis, say, wood or cardboard.
11. Tin boxes
 12. Plastico»/>
Thanks to the decorative tape, we got very cute boxes for small items.
12. Plastic organizer for small items

13. Notebook page dividers

 «/>
«/>
How to turn a standard notepad into a product self made, shown in simple photo instructions.
15. Gift wrapping
 16. Headphone holder»/>
You can use decorative tape to decorate gift wrapping.
16. Headphone holder

17. Keyboard
 18. Case for tablet»/>
If you're bored with the standard keys, the keyboard design is easy to change.
18. Tablet case
 19. Switch "/>
Tired of a plain case? No problem, it can be updated without much effort.
19. Switch
 20. Corner bookmark"/>
The old switch gets new life. Instructions.
20. Corner bookmark
 21. Magnetic bookmark»/>
These are not ordinary bookmarks. You can check here.
21. Magnetic bookmark

Really very convenient thing and a great gift for those who love to read. It's very easy to do according to the instructions.
22. Hot coasters in the form of mini-pallets

 24. Drawing on the door»/>
Great idea for a cottage or balcony.
24. Drawing on the door

A little patience - and the usual white door turns into an attention-grabbing interior detail. More photos of the project and simple photo instructions here.
25. Vase
 26. Gift packaging for wine»/>
A few more options.
26. Gift packaging for wine
 27. Decorations for "/>
Decorative tape and these instructions will help you decorate a bottle of wine as a gift.
27. Decorations for glasses

28. Napkin rings
 29. Festive dishes»/>
Napkin rings are also part of the atmosphere. Instructions.
29. Festive dishes

Ordinary glassware takes on a completely different look if you apply bright patterns to it. 30. Disposable cups for a party or picnic
 31. Kitchen spatulas»/>
You can even decorate disposable tableware.
31. Kitchen spatulas
 32. Chopsticks»/>
More more ideas with colored stripes.
32. Chopsticks
 33. Clothespins»/>
Own reusable chopsticks.
33. Clothespins
 34. Mat for hot food on the table"/>
Pretty simple, but you can still look at the instructions.
34. Hot mat on the table
 35. Cake dish»/>
A beautiful, practical and easy-to-use napkin for hot dishes.
35. Cake dish
 36. Screw cap"/>
A simple example of how to decorate a standard cake plate.
36. Screw cap

37. Labels
 38. Candle»/>
Making labels is also a great idea.
38. Candle
 39. Feces»/>
A worthy replacement for expensive decorative candles. You can see how to make one here.
39. Calendar or diary
 40. Pencil holder»/>
You can decorate your diary with decorative tape.
40. Pencil cup

Instead of a boring stand from the store - an original glass in your favorite colors. The creation process is shown here and here. 41. Folder cover

Binders can also be varied according to your wishes. See instructions with photos here.
42. Gift envelope
 43. R»/>
In such an envelope you can give a handmade card or money. It's very easy to do.
43. Multi-colored buttons

With the help of colored tape, ordinary buttons will become much more attractive. You can see how to make heart buttons here.
44. Desk organizer
 45. Old hole punch"/>
This blog has photos of the stand from different angles.
45. Old hole punch
 46. P»/>
Using decorative tape, you can give an old hole punch a very attractive look.
46. Cork board for notes
 47. Plug and wire dawn"/>
A boring note board can be decorated with a colorful geometric pattern.
47. Charger plug and wire

A bright charger cord not only looks more interesting, but will also be less likely to get lost among other things.
48. Organizer for wires

Simple cardboard covers will help keep all the wires in order. And a colored ribbon will make them different from each other.
49. USB cable markers

Constantly tangled cords from devices can irritate even the calmest person. Therefore, making bright markers for them is a great idea.
50. Geometric pattern on the glass door
 51. Multi-colored furniture legs»/>
More options and gluing techniques here.
51. Multi-colored furniture legs
 52. Striped wall»/>
Bright accent will refresh the furniture and add liveliness to the interior.
52. Striped wall
 53. Mirror frame»/>
An idea for those who like stripes.
53. Mirror frame
 54. Drawings on the walls»/>
The creation process in photographs is here.
54. Drawings on the walls
 5″/>
5″/>
The drawing on the walls will look great together with other interior details in the same style.
55. Instead of wallpaper
 56."/>
Decorative tape on plain walls can replace traditional wallpaper. Gluing process.
56. Open shelves
 57. Bright accent on a white door"/>
Edge on open shelves can be made in any color.
57. Bright accent on a white door
 58. Retro armchair for the cottage"/>
The necessary materials and process are described here.
58. Retro armchair for the garden
 59. Picture frames»/>
All you need is thick tape in two colors.
59. Picture frames
 60. Us»/>
Decorative tape is a great idea to transform an old or just boring picture frame.
60. Wall clock
 61. Desk clock»/>
View other colors for inspiration.
61. Desk clock
 62. Boxes for small items"/>
Unpretentious table clock turn into bright and stylish.
62. Boxes for small items
 63. Bracelet»/>
To avoid confusing the boxes, you can use tape with different patterns.
63. Bracelet
 64. Hoop for "/>
You can choose colors and patterns to suit your style. The bracelet itself is quite simple to make.
64. Hair hoop
 65."/>
Wrap a regular metal hoop with decorative tape and you will get an interesting accessory.
65. Earrings
 66. Box for bobby pins from the box “/>
The instructions show you how to make these cute earrings.
66. Box for bobby pins from a Tic Tac box
 67. Brush holder»/>
A simple and cute way to make a convenient bobby pin box.
67. Brush holder
 68. Bags made from envelopes»/>
A simple organizer will help you put your makeup bag in order.
68. Bags from envelopes
 69. Under"/>
All you need to make such a bag is a regular envelope and tape. Instructions.
69. Phone stand

Now your phone will always be in a visible place. How to make such a stand, see here. 70. Postcards and photos on the refrigerator


Using colored tape, you can divide the pages of your diary into logical blocks. Looks comfortable and cute. You can take a closer look here.
72. Pencil case
 73. Pencils»/>
Simple step-by-step instructions.
73. Pencils
 74. Paper clips»/>
This is how in five minutes a simple pencil turns into a colored one.
74. Paper clips
 75. Colored patch"/>
Nice and simple. Here are more colors for inspiration.
75. Colored patch
 «/>
«/>
Colored patterns will brighten up the need to wear a patch a little. It will be especially useful for children.
76. Folder-tablet
 77. Vases made from bottles»/>
An easy way to add some variety to your stationery.
77. Vases made from bottles
 78. Indoor flowers in "/>
From empty glass bottles Makes excellent tall flower vases.
78. Indoor flowers in jars
 79. Table lamp from IKEA»/>
But the jars will make wonderful pots.
79. Table lamp from IKEA
 80. Laptop cover"/>
Things from IKEA give unlimited scope for creativity. Here is one example.
80. Laptop cover
 81. Stand for magazines»/>
You can also use decorative tape to cover the lid of your laptop.
81. Magazine stand
 82″/>
82″/>
You can cover a purchased stand with decorative tape or even make one yourself.
82. Old book spines
 83. Postcards»/>
A good idea for the covers of old books or notebooks.
83. Postcards


85. Table top
 86. Chest of drawers"/>
Here you can see more photos of the project.
86. Chest of drawers
 87. Play town for the children's room"/>
Another cute way to update old furniture.
87. Playground for the children's room
 88. Drain pipe under the sink"/>
More photos and ideas here.
88. Drain pipe under the sink

It's great when there is order and beauty even in places where we rarely look. This is just such an example.
89. vertical wall in the restroom
 90. Luggage marking»/>
Instead of a boring white wall, there are wide vertical stripes.
90. Baggage marking
 91. Stylish paper bags»/>
Now the suitcase will definitely not get lost or mixed up.
91. Stylish paper bags
 92. Lampshade table”/>
These bags are suitable for spices, beads, jewelry or a small gift.
92. Lampshade table lamp
 93. Decor for the battery"/>
With the help of multi-colored stripes you can refresh the lampshade of a table lamp.
93. Decor for the battery

It's not always possible to hide batteries. But if you don't like them appearance, here is one idea on how to change this.
94. Case for glasses
 95. Photos in the album»/>
Glasses cases often look monotonous, but not like this.
95. Photos in the album

This decor will appeal to those who love printed photographs and paper photo albums, decorated with their own hands.
96. Christmas toys for the New Year

Of course, there is still a lot of time until the new year, but to collect holiday ideas you can start now. How to make such a toy is shown in the instructions.
97. Pumpkin for Halloween
 98. Table edge»/>
Instructions and other original ideas black and white decor Here.
98. Table edge
 99. Stool from IKEA»/>
An easy way to replace missing or old furniture edges.
99. Stool from IKEA
 100″/>
Once again, a simple item from IKEA is transformed into a stylish piece of furniture. Step by step instructions.
100. Refrigerator decor


