The electric trimmer shaft does not rotate. Repairing a lawn mower with your own hands: breakdowns and methods for eliminating them. Disassembling a gasoline scythe, lubricating its parts and replacing faulty elements
We all have to deal with the improvement of our gardens. land plots- in the summer and of course, to give beautiful view area:
- in the country;
- V private house,
- You can’t do without a trimmer. Causes of breakdowns electric trimmers is a strong vibration \during operation\, which affects various electrical connections of this electrical appliance.
Here is a photograph with technical data of an electric trimmer. Trimmer repair will be accompanied by personal photographs from detailed description carrying out repairs.
Electric trimmer circuit
Electrical circuit of a trimmer with fishing line, simple, consisting of:
- potentiometer, motor control speed;
- capacitor
and directly the electric motor itself.
The cause of the malfunction was initially unclear during a visual inspection; the trimmer had to be completely disassembled to determine the real reason breakdowns.
Disassembling the trimmer
Let's start disassembling the electric trimmer:

First, we separate the two connected halves of the trimmer, the control handle from the contact connection with the electric motor itself.


Two photographs \photo No. 2, photo No. 3\ show the sequence of disconnecting the electric motor from the control handle.


Checking with an indicator screwdriver
To check the electrical connections, we need a simple tool - an indicator screwdriver.

Photo No. 6 shows a detachable contact connection from the control handle. To check the electrical circuit of connections from the plug contacts \photo No. 7\ to the detachable contacts \photo No. 6\ - for this, you can short-circuit with the fingers of your left hand plug and tip indicator screwdriver alternately connect to the detachable contacts.

With integrity, absence of any break \photo No. 9\ in electrical connections, — the indicator light of the indicator screwdriver will light up, that is, the electrical circuit is closed to the LED light of the indicator screwdriver.
When performing this diagnostic, it is also necessary to close the contact of the potentiometer \press contact\ as shown in photograph No. 8.


We checked one half of the electric trimmer \control handle\ - the handle of the manual trimmer is in good condition and then we need to check the second half of the trimmer, consisting of an electric motor and a capacitor.
Diagnostics with a multimeter
For this test we will need a digital multimeter. You can also use a dial multimeter or a device such as an Ohmmeter - there is no difference at all.
We set the digital multimeter to the measurement range of the least resistance, connect the probes of the device to the detachable connection socket \electric motor output contacts\. The device in this example \photo No. 10\ shows one - the device display indicates a break in electrical diagram electric motor.

Checking the commutator motor
First, let's check the commutator motor. We connect the probes of the device to the contacts of the graphite brushes \photo No. 11\, the display of the device shows the resistance as shown in the photograph - 29 Ohms. The instrument reading indicates the integrity of the stator windings of the commutator motor.

We wrap the two output contacts from the electric motor with the fingers of one hand and, with the tip of an indicator screwdriver, touch the contacts of the graphite brushes \photo No. 12, photo No. 13\.


And when checking these electrical sections, the cause of the trimmer malfunction is discovered.

In the contact connection of the wire \photo No. 13\ with the graphite brush, the contact is broken. Eliminating such a malfunction does not present any difficulties. To do this, it is necessary to etch the contact connection with the wire and the contact connection with the graphite brush with soldering acid \photo No. 14\. Next, apply a small layer of tin with a soldering iron \photo No. 15\ and solder the wire to the contact of a graphite brush \photo No. 16\.


So, the cause of the malfunction of the “electric line trimmer” has been identified and eliminated. As you have seen for yourself, such reasons can be minor breakdowns that can be identified without any difficulty.

All that remains is to wish you all friends successful repair in troubleshooting various electrical equipment.
A garden plot will not have a neat appearance if bushes have grown in its gardening area and the grass has formed a thick cover. This indicates the neglect of the site by the owner, who does nothing even to mow the lawns. But mowing the grass is the easiest task on the site, because various equipment has been created for this work.
The advantage of a gasoline trimmer
For example, a trimmer is a very convenient and productive, lightweight, reliable and practical device to use. It can be electric, having little weight, or gasoline with high performance. Gasoline ones are more common, as they have a fuel tank and can operate at a distance from electrical communications. Perhaps the only disadvantage of a gasoline trimmer is that, like any equipment, it periodically breaks down. But in this matter it also has an advantage, since for people who understand a little about technology, it is possible with their own hands.

Troubleshooting
If the trimmer stops starting, then you should not immediately sound the alarm and contact the service center, since the cause of the inoperability can be easily eliminated. Any DIY repair of gasoline trimmers begins with checking for the presence of a spark, without which it is impossible to ignite the fuel in the combustion chamber. If there is no spark, then the problem is either in the spark plug or in the ignition itself. An exception is in cases where the spark plug is filled with fuel mixture when the fuel is overfilled above the required level. In this case, you just need to wipe it dry and the treasured spark will appear.
It will also indicate that there is no fuel supply. If it is dry and light brown in color, in this case, repairing a gasoline trimmer with your own hands will involve adjusting the fuel pumping or All these reasons can be easily eliminated, the main thing is that the engine itself works properly. But if the cause of the malfunction is still hidden in the engine itself, then it is recommended to contact a service center due to the complexity of repairs. But for people who can hold a screwdriver in their hands, nothing is impossible. In most cases, trimmer ends successfully.
Briefly about engine repair

Engine problems begin after a few years correct operation from wear of components or suddenly due to improper use of the trimmer. Unfortunately, people regret improper operation when they repair gasoline trimmers with their own hands after an engine breakdown. And this happens in cases where the dosage of oil in the fuel is not observed or the device operates to the point of terrible overheating. Overheating may cause the crankshaft to jam, the piston rings to break, or the piston to completely burn out. In order to perform a piston inspection, it is enough to remove the cylinder head, from under which a piston will appear, clearly reflecting the condition of its work surface. The rings themselves do not protrude from the cylinder, so it does not matter whether you change the rings or the piston, in both cases you will have to remove the cylinder. When repairing gasoline trimmers with your own hands, it is worth remembering that they are fragile and can easily break if you lack experience. Installing the piston itself on the crankshaft is not too difficult. The main thing when repairing an engine is to assemble everything the same way as it was before disassembly, and then everything will work again.
Trimmer, both electric and motorized internal combustion(ICE), is an indispensable tool in summer and autumn period for owners of dachas and private houses. With its help, weeds, small bushes are easily removed and the lawn is trimmed. But, like any equipment, trimmers fail at the most inopportune moment. To troubleshoot problems with your own hands, the user of this equipment first needs to determine the cause of their occurrence.
With a lawn mower and an electric trimmer, if we do not consider breakdowns associated with the bar and the mowing head, malfunctions mostly occur in the engine area.
Gasoline trimmer breakdowns
Typical breakdowns of a gasoline trimmer that owners of this unit most often encounter are the following:
- engine breakdown;
- problems with the carburetor;
- problems with fuel supply;
- muffler malfunction;
- gearbox failure;
- the starter is broken;
- problems with the air filter;
- The breather on the gas tank is clogged.
Malfunctions of electric trimmers
Since the design of an electric mower is much simpler than a motor trimmer, there are few reasons for its failure.
It should be noted that it is better to entrust the elimination of some of them to a specialist.
Basically, the trimmer stops working normally in the following cases:
- electrical cable fault;
- control button is faulty;
- burnt out motor stator winding;
- break contact connections on the engine.

Why does the gasoline trimmer not start?
The reasons why a gasoline trimmer stopped starting may be different, so it is necessary to carry out a step-by-step diagnosis of the device.
Fuel tank (fuel quality)
Remember that before starting the unit you must always checking the availability and quality of fuel. In this case, you shouldn’t be greedy and save, and also “get smart” about the amount of oil added. Everything must be done according to the manual supplied with the device, since if the piston group fails, its replacement will cost about 70% total cost trimmer. Fill with fuel in the expectation that you will completely use it up when performing the work. . Gasoline remaining in the tank loses its properties after some time and can harm the engine.. Therefore, do not prepare the mixture for future use or large quantities. If the lawn mower has trouble starting, try draining the “old” fuel from the tank and refilling it with a freshly prepared mixture.
Important! Filling the device with fuel, the origin of which is unknown, is fraught with danger negative consequences. Gasoline must be of high quality, purchased at a gas station, and its grade must be at least AI-95.
Candle and candle channel
So, you changed the fuel, but nothing changed, and the trimmer still won't start. In this case, it is worth checking the spark plug channel to see if it is filled with a combustible mixture. Users often translate air damper to the “OFF” position when starting, and when the engine starts, do not turn it to the “ON” position, after which it stalls. Further, an attempt to start the internal combustion engine again leads to the spark plug being flooded with gasoline, and starting becomes impossible. To diagnose and fix possible problem in this node, do the following.
- It is necessary to unscrew the spark plug, wipe it well and dry it. When installing a spark plug into an internal combustion engine cylinder, it must be dry.
- Drain any accumulated fuel from the combustion chamber. This is done through the hole from which you unscrewed the candle.
- If there is carbon deposits on the spark plug electrodes, it must be removed either with a thin file or a nail file.
- Do not forget to set the gap between its electrodes before installing the part in place. The gap on the spark plug should be 1 mm. You can use a coin as a feeler gauge to check the gap.
- Next, reassemble the unit, read the starting instructions and try to start the engine again.
If the internal combustion engine does not start, you will need to check the spark. For this:
- unscrew the spark plug;
- put the cap of the high-voltage wire on it;
- touch the metal part of it to the cylinder body (to ensure contact, you can insert a tubular wrench) as shown in the figure below;
- Pull the starter cord until the engine turns several times.

Normally, each time the piston pumps, a spark should jump between the electrodes of the spark plug. If there is a spark, then the reason that the internal combustion engine does not start must be looked for in other components of the device.
To better understand the process of how to test a spark plug for the presence of a spark, you can use this video, where the test is shown using the Soyuz lawn mower as an example.
If there is no spark, then at the beginning check the cable connecting the spark plug to the coil - perhaps this is the reason. You can ring it using a tester. If a circuit break is detected, the high-voltage wire will need to be replaced.
Also, the reason that the spark has disappeared may be ignition coil malfunction(magneto). The figure below shows what a coil (magneto) from a Patriot gasoline trimmer looks like.

To exclude a malfunction, you will need to use a tester to check the trimmer magneto, namely, its primary and secondary windings. On the primary winding, the resistance should be in the range from 0.4 to 2.0 Ohms. If the device shows 0, this means that a short circuit has occurred in the winding, and if infinity, this means a clear sign circuit break. The resistance on the secondary winding should be in the range from 6 to 8 kOhm.
On some coils it can reach a value of 15 kOhm.
If your lawn mower does not start well or immediately stalls after starting, you should pay attention to air filter, since it may be clogged, as a result of which air does not enter the combustion chamber and ignition of the fuel does not occur. To check if the problem is in the filter, remove it and try to start the engine. If it works, then the reason has been found. The filter must be replaced or thoroughly washed and dried before installation. In case you find oil in air filter, it must be washed with gasoline, wrung out well and dried for at least 2 hours before reinstalling.

If the unit still does not start with the air filter removed, it is recommended to check the fuel filter.
Fuel filter
This filter cleans the fuel from possible contaminants. If it is clogged, then gasoline does not enter the cylinder, and, accordingly, the unit does not work or stalls after starting. The fuel filter is located at the end of the intake hose, which is located inside fuel tank. To get to the filter, you need to remove the plug with the tubes coming out of it.

When removing the plug, the intake hose may become detached and remain in the tank. It is removed using tweezers.
Next, remove the old fuel filter from the hose and put a new one, purchased in advance, on it. You can also clean the fuel filter, if you don't have a new one. The filter must be secured to the hose using a spring clamp.

Install the intake tube onto the plug and insert the latter into the tank.
It should be noted that in some trimmer models the intake hose is not located on the plug, but inside the tank. You can remove it using tweezers or a hook bent from wire.

Breather is check valve, which is designed to equalize the pressure in the gas tank. If it is clogged and does not allow air to pass towards the tank, then a vacuum forms inside the fuel container and fuel stops flowing into the carburetor. To check the serviceability of the valve, remove the hose that goes from the reservoir to the carburetor. If gasoline does not flow out of the tank, it means the breather is clogged.
Trimmer users often wonder: where is the breather? This valve is usually located in the gas tank cap and looks like the following picture.

Cleaning the breather is very simple: disassemble the valve and wash all its components. In some lawn mowers, this valve may be located directly on the fuel tank. It will not be possible to find it right away, since it is hidden from view under the starter housing. This breather can be cleaned using a regular needle.
The reason that the trimmer has significantly lost power, and when trying to increase engine speed, it gains them slowly, is often a clogged exhaust channel through which exhaust gases exit the combustion chamber.

It is necessary to remove the muffler so that no fumes get inside the cylinder. Next, clean the exhaust channel of carbon deposits.
This must be done very carefully, preventing carbon deposits from entering the combustion chamber.
After this procedure, the weak power of the unit and the slow increase in the speed of rotation of the mowing head will no longer frustrate you.
Insufficient compression
If the compression is insufficient, then in most cases it will not be possible to start the engine. To check the compression, you can use a car compression tester.

What compression should it be? Normally, compression should be not lower than 8 kg/cm 2. Although, even at 8 kg/cm2, some engines do not idle and stall because fuel is not pumped sufficiently. If your lawn mower does not pump above 8 kg/cm2, you will have to check the cylinder, piston and rings.
Also, poor compression may be due to loose carburetor. Check if it is wobbly. If so, tighten the fasteners holding it in place well. Also, if the carburetor is not screwed on properly, you may notice that gasoline drips during operation.

Electric trimmer vibrates
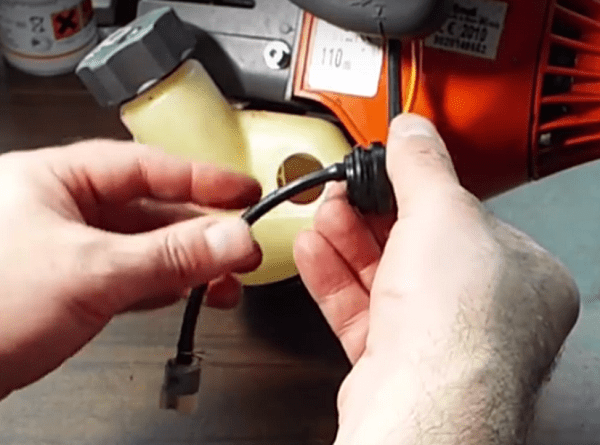
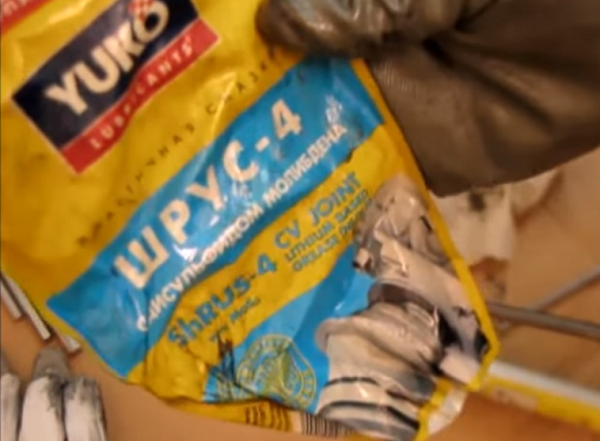
Many users of mowers have noticed that after some time after the device starts operating, it begins to vibrate strongly. Some trimmers, mainly more expensive models, have an anti-vibration system in the form of shock absorbers located between the engine and the rod. But in some cases, even this cannot save you from strong vibration. The reason that strong vibration appears in the trimmer may be a small amount or complete absence of lubricant on the hard or flexible shaft, located inside the apparatus boom.
Replacement hard shaft lubrication happens as follows:
- unscrew the gearbox located at the bottom of the rod;

- after removing the gearbox, you will see the end of the shaft, which you need to pull to remove the part;

- after removing the shaft, it must be generously lubricated with special grease “Shrus-4” or regular grease “Litol-24”;

- Apply a small amount of lubricant to the shaft and spread it evenly along the entire length of the part, including the splines at the ends of the rod (if they are worn out, the shaft will have to be replaced);
- After lubrication, insert the shaft back into the rod and put the gearbox in its original place.
Flexible shaft lubrication is done as follows:
- unscrew and remove the mowing head;
- remove the rod from the electric motor by unscrewing a couple of bolts;
- pull out flexible cable from a rod;
- Lubricate the cable along its entire length.
This is done like this: first you need to lubricate the end of the cable, and then insert it into the rod, after which, as it moves inside the pipe, you should apply lubricant to the part and distribute it evenly over the surface. Then insert the flexible shaft rod into the electric motor and secure it.
If lubrication does not help and vibration continues to appear, you will need to change the flexible shaft.
The trimmer gets very hot
Overheating of the trimmer can occur for many reasons:
- gasoline does not have the same octane number as indicated in the instructions for the unit;
- the proportions of gasoline and oil were not observed during preparation of the fuel mixture;
- the mixture of fuel and oil was prepared a long time ago (the mixture cannot be stored for more than 2 weeks);
- the trimmer operates beyond the time specified according to the instructions;
- a low-power trimmer is used on thick and hard grass, the device works with overload and heats up quickly;
- has moved towards the rod or the cassette cover has become stuck.
The latter happens if you set unsuitable mowing head for this machine, or when the axis moves inside the rod. These changes make it harder to rotate, the load on the engine increases, and it overheats.
Buyers' Choice 2018
Trimmer ECHO SRM-2305SI
Trimmer ECHO SRM-350ES
Trimmer Hitachi CG22EAS
Trimmer BLACK+DECKER GL8033
Trimmer Hammer MTK25B
Electric scythe or trimmer like any electric tool has a limited work resource. As the intensity of use increases for various reasons, the service life of the device decreases.
You should be prepared that at any time during operation, the electric scythe may break, but such situations can be avoided if you regularly disassemble, inspect and inspect all important elements braids.
Malfunctions of electric scythes can be very diverse, it can be either a breakdown in the electrical part of the engine and wiring or in the mechanical part.
In most cases, repairing a trimmer or scythe is not difficult and you can do it yourself if you have minimal tool and basic concepts in technology. Well, for readers of the site, I will reveal the main malfunctions and secrets for quick and reliable repair of your electric scythe, consider an example of repairing Bosch and Gardener electric scythes.
The design of most electric braids is not a complex device; the main components, be it a trimmer or a braid, are an electric motor, a power cord, a button with a capacitor, a spool with fishing line that is attached to the motor shaft, or more complex mechanical versions of the braids where the torque from the motor is transmitted to the spool through flexible shaft, but among electrical options this option is rare.
Electrical faults
To identify faults in the electrical part, as a rule, inspection alone is not enough; you need a multimeter or at least a continuity tester.Such malfunctions are usually characterized by complete engine inoperability, severe overheating or jerky operation.
The check begins with the power cable; if it is damaged, it is either repaired or replaced.
An express check involves checking the voltage of 220 volts at the motor contacts.
Voltage should appear when you press the button; if voltage is present, then we can safely say that the trimmer motor is faulty; it must be disconnected and carefully inspected.
Slight contamination of the commutator plates and brushes is normal, but it is still better to clean them with a soft cloth moistened with alcohol; if the brushes clearly look worn, it is better to replace them.
Using a multimeter in resistance testing mode (lowest limit - Ohms), touch the probe contacts of the brushes or the graphite brushes themselves; the tester should show a resistance of no more than 100 Ohms.

If the resistance is infinite (one on the multimeter), then try turning the motor shaft without removing the probes.
A working electric motor has a resistance of approximately 10 - 40 Ohms; if the brushes do not ring, it means there is no contact or the integrity of the stator windings is damaged, a break or burnout is possible.
When the resistance is less than 5 ohms, there is an inter-video short circuit, most likely caused by severe overheating of the engine.
To identify the specific reason when the motor brushes do not ring, you can resort to the following procedure.
The graphite brushes must be pulled out by first removing the brass inserts or removing the pressure springs.
The commutator motors in these devices are designed in such a way that the stator and rotor windings are connected in series, and in expensive models of electric motors a thermal relay (110 degrees) is also connected to this series circuit, such a relay in normal conditions keeps the power contact closed.
A separate diagnostic method can be checking the resistance on the collector drum plates.

To identify the culprit of the malfunction, it is necessary to remove the insulation in the form of cambrics from the fluoroplastic where the windings and the thermal relay are connected and use a multimeter to ring each winding separately, as well as the thermal relay itself.
Mechanical problems
In electric scythes, the most loaded mechanical elements are the bearings and the trimmer reel (spool).In most cases, the device stops cutting grass due to the failure of its line reel.
The line has run out. According to the instructions provided, wind the fishing line onto the reel.
The line got tangled. If the reel is not damaged, then you need to cut or unwind the fishing line and, if necessary, rewind the entire spool.
The line stuck together. Due to rather intense work and high overheating, plastic threads lines can fuse with each other. It is necessary to rewind the reel with new fishing line and inspect the damage to the bobbin itself.
The engine runs but the line spool does not rotate. Most likely, the structure of the fishing line reel has been damaged. The attachment points for the bottom of the reel may break off; you need to completely disassemble the bobbin and, if necessary, modify the fastening or replace it altogether. In most electric trimmers, the bobbin is simply pressed with its plastic casing onto the motor shaft and, if it is overheated greatly, when the plastic melts, it can turn and fly off altogether.
Repair of Bosch Art 23 combitrim trimmer and GARDENER GT - 550 electric scythe
Both devices showed no signs of life; the engines did not work when turned on.The case of both devices consists of two halves, the screws are on one side, which is convenient for disassembly.
After all the screws are unscrewed, the upper housing is separated from the lower one by gently pressing flat screwdriver into the slot to open the interlocking plastic locks.
After disassembly, we proceed to inspect the internals and troubleshoot.
During the inspection it was found on the engine trimmer Bosch, on one of the brushes, which is fixed by a pressure spring, a copper conductive wire fell off, which naturally was the reason for the lack of voltage on the brushes and the engine did not rotate.

The wire was restored to its place, and at the same time the collector pads were cleaned with a soft rag soaked in alcohol to a copper shine. The brushes were in good condition and did not need replacement.

It was also found that the switch did not create a reliable electrical contact, the button had to be pressed with force, it was decided to disassemble the button, its contacts were cleaned of carbon deposits and lubricated with current-protective spray KONTAKT S-61.
WITH electric scythe GARDENER It wasn’t all that simple, it lay for quite some time in a broken state, and in the literal sense of the word “broken”, its rod at the place where the engine housing was attached was broken in half, apparently the conditions of its operation were so difficult.
Using perforated plates from metal profile fasteners, a new fastening of the engine housing to the rod of the electric scythe was made in a simple way. The integrity of the structure has been restored, albeit not in an aesthetically pleasing way, but in a reliable way, because the main thing in an electric scythe is its functionality.

The engine shaft was noticeably difficult to turn; an internal inspection revealed burnt commutator plates and worn brushes. The plates were sanded to a shine, and the brushes were replaced with new ones.
In mind long work without lubrication and subsequent storage of the device in an aggressive environment, the bearings became a little stuck and the motor shaft did not rotate naturally with difficulty.
The engine bearings were washed with WD-40 spray and then lubricated. As a result, the engine began to rotate noticeably better, but still the bearings were already “broken” and when the engine was running from the mains, the sound of its operation was not so smooth and monotonous.
Further inspection of the electrical part led to the button, it was completely broken from its fastenings, although it was pressed, the tester showed its malfunction. The button is not removable, so it was replaced with a new one. The fastenings had to be restored with hot glue.

In addition to the broken rod, there was a crack on plastic protection, apparently someone dropped it with some force. The scythe could work with it, but it was decided, as far as possible, to restore the protection design.
Naturally, simply gluing such a loaded and impact-prone object with glue would not be a reliable solution. Therefore, using the same perforated plates from the metal profile, two brackets were made that created a “monolithic” connection between the two parts of the cracked body.
The plates were connected to the body using aluminum rivets.

When the brushcutter was assembled, it was discovered that the rod at the handle attachment points was poorly secured and rotated, so the places where the plastic protrusions of the handle body pressed against the metal of the rod were additionally sealed with a strip of rag tape. Now the design has no extra play.

The main most common malfunctions of electric scythes and trimmers
Doesn't cut the grass
The reel (spool) has run out of line. In most spools, the mesh feed is semi-automatic; when the spring-loaded button is lightly hit on the ground, the line is fed out. If the line does not feed, then you need to remove and disassemble the reel - spool and, if necessary, wind a new line.
The fishing line may be too long due to the fact that the blade, which is intended for trimming the excess length of the fishing line, is dull or does not exist at all.
The length of the fishing line should be slightly less than the diameter of the protection.
Vibration during operation
A large hum and vibration when the engine is running may indicate that the bearings need lubrication or that they have completely used up their service life.
The body of the reel with fishing line (spool) may also be cracked; it, as well as its attachment point, must be inspected for cracks and damage.
Reducing speed
Most electric motors in scythes and trimmers are commutator and do not have a speed controller; as the voltage in the network decreases, the speed and power decrease.
The line spool may be wound incorrectly.
Perhaps the rotation is hampered by the presence of a stuck twig or a rope wound around the shaft; the structure should be inspected. In a working scythe, the shaft should rotate easily and without the slightest effort, even after it has been dispersed with a finger.
Electric scythe does not work
Doesn't the engine turn? We look at the presence of power on the electrical plug; if everything is in order, then the device needs to be disassembled.
If no obvious damage is noticeable, then begin sequential testing of the electrical circuits of the device.
Using a multimeter (tester), first test the power cord, the fuse if there is one, and the button.
If the button does not ring when it is on, then it should be replaced, or if it is dismountable, then open it and clean the burnt contacts.
The cord may be broken, in which case the engine may start intermittently.
A malfunction of the engine can be due to the fact that when the button is turned on, there is a voltage of 220 volts at the motor contacts, but it does not rotate.
Some electric motors are equipped with a thermal fuse that is built into the motor housing and was triggered by overheating or simply failed. A working thermal fuse should restore its operation when the engine cools down.
Trimmer repair is necessary when the device does not turn on or functions incorrectly. All owners of private houses and suburban areas are familiar with the problem of excessive vegetation, which is sometimes difficult to get rid of. As you know, progress does not stand still and new developments and useful inventions appear in all areas. This also affected Agriculture. You no longer need to mow the grass with old, inconvenient devices; modern gas mowers have come to the rescue, capable of getting rid of vegetation in the most inaccessible places.
With a gasoline trimmer you can mow the grass even in cloudy weather. look after personal plot Using this unit is very simple, and any adult man can cope with this activity.
Despite their versatility, like any equipment, trimmers tend to break and fail.
Not everyone can do the repair of a lawn mower with their own hands, because this requires repair skills electrical appliances, but today we will try to figure out how to start a trimmer without a starter and how you can generally debug its operation with your own hands.
Trimmer breakdowns and methods for eliminating them
Do-it-yourself trimmer repair involves eliminating all problems that interfere normal functioning unit. Among the most common are the following:

- breakdown of the CPG (cylinder-piston group) of the engine;
- the trimmer fails when trying to increase the operating speed;
- ignition coil failure;
- there is no connection between the motor and the gearbox;
- there are extraneous sounds during operation;
- the engine cannot reach the required speed.
Failure of the engine CPG can occur due to low quality fuel or wear and tear of engine parts. As you know, the piston group is lubricated thanks to the oil that is added to gasoline. In old oil, the lubricant precipitates out, which makes the oil unusable. If you continue to try to start the trimmer, you can ruin the motor in a matter of seconds, and this will entail additional costs for repairing the trimmer. This breakdown is considered the most expensive. To eliminate it, it is necessary to replace the piston group assembly; to be more precise, it may be necessary to replace the cylinder, rings, piston and seals. In such cases it is unlikely to be possible without additional help, unless you yourself are a master and know how to handle such equipment.
You can repair a lawn mower yourself if it starts and idles, but then chokes when you try to increase the operating speed. To eliminate this breakdown, carburetor repair or cleaning of the muffler or gas filter is required. At first glance, everything can be solved quite simply, but if after you clean the clogged parts of the trimmer, it does not work, then additional diagnostics may be required.
Replacing the ignition coil
 The main sign that the ignition coil has failed and trimmer repair is required is the absence of a spark at the spark plugs. In this case, it is very important not to rush to replace the coil; in most cases, the cause of the breakdown is a lack of contacts, a switch button that may have broken, or a problem in the spark plug itself. It definitely needs to be checked, perhaps there is current flowing somewhere or there are gaps or carbon deposits.
If the trimmer motor cannot reach the required speed, then it is likely that the air filter is clogged or there is debris in the motor itself. The solution to the problem is immediately clear - clean the engine and filter; in some cases, replacing the filter may be necessary.
Knocking and extraneous noise
During operation, most trimmer users encounter constant noise. If you hear a characteristic knocking sound, as if on metal, then it is likely that the engine in the trimmer is overheated or fuel is not passing through. To eliminate this sound, you need to add gasoline or turn off the mower for a short time.
You should not wear out the unit: if it constantly works for wear and tear, its service life will be shortened several times. If a knock is felt in the engine itself, then the cause lies in a malfunction of the piston, piston ring, worn cylinder or crankshaft bearing. To make the knocking noise disappear, you need to replace the failed part in the trimmer.
Sometimes it happens that the motor in the trimmer works normally, but the output shaft rotates very weakly or does not rotate at all. This is reflected in the fact that when the trimmer touches the grass, it stops working altogether and turns off.
To restore normal operation of the mower, you need to check 3 main components, namely:
- bushing;
- output cup;
- flexible or rigid shaft.
The gearbox is a very important component, so repair of the trimmer in this case must be carried out experienced craftsman, and to prevent similar breakdowns from happening in the future, the gearbox needs to be properly maintained.
Other common breakdowns
In addition to the above breakdowns, other failures also occur, for example, the power button sticks or the limiter falls off the mowing head. You can replace the power button using a soldering iron, and the limiter can be wound using copper wire. Have you noticed that the fishing line has broken or run out? It is enough to buy a new skein of the same diameter of fishing line and, having disassembled the drum, wind it onto the bobbin.
If you want your mower to work for a long time and without interruptions, then it requires constant maintenance, you can contact service centers or carry out diagnostics yourself.
To do this, you need to constantly check the rod bushings and change them if necessary, the same goes for the spark plug.
You constantly need to fill the gearbox with special lubricant, partially disassemble the motor part and clean it of accumulated dirt. In most cases, such trimmer maintenance is carried out according to a certain number of hours worked.
Now you are a little familiar with how to carry out repairs petrol trimmers without additional help. But it is worth noting that if you are not confident in your knowledge and skills, it is better to leave this matter to the professionals.


