Thermoelectric Peltier cooler. Do-it-yourself car refrigerator using Peltier elements Diagram of a car refrigerator using Peltier elements
In this article, there is a model of a car refrigerator, which was made by the author of the channel, Alex Shev, with his own hands, despite the sophisticated nature of the resulting product, in just three days. The device operates on Peltier elements. Below, at the end of the publication, is another model that works on the same basis.
A number of materials and parts were used.
Work on the product
We cut the foam using a 1 kilowatt spiral and a 5 volt power source. The spiral was secured between the legs of the table. I glued the foam together with polyurethane foam. We cut grooves in the lid so that it does not fidget.

It was supposed to cover the tray with polystyrene foam, but it was easier to make a box out of it and use the tray to strengthen the strength of the car refrigerator. The dimensions turned out to be 38 X 30 centimeters, depth 28. Capacity: 3 bottles of 1.5 liters in a row. You can have two such rows, or 2 by 2 liters side by side.
We drill holes in two radiators for thermistors to control the temperature. In cold weather also for fastening. We cut a hole in the lid of the car refrigerator and heat the heat exchanger inward by 1 -1.5 centimeters. Next, using thermal conductive glue, we fasten the two Peltier elements to the radiators. One just fits two Peltier elements. The gap between the foam and the radiator is also insulated. In the example shown, bestizol was used.
We put it together, screw the fans onto the heat exchanger, install the microcontroller, LSD monitor, and relay. So far only using the mounted method.
See also cool models with free shipping in this Chinese store. There you will also find Peltier elements.

We are writing a program for a microcontroller. The author of this video tutorial used an insert to turn off Peltier elements when the temperature of a hot radiator is more than 55 degrees. And also when the temperature in the refrigerator itself is less than 5 degrees. Only the elements themselves are disabled. The fan and microcontroller continue to work.
The temperature is measured by an ADC converter: on a hot radiator, on a cold one, in the refrigerator itself. Shown on the display.
Power is supplied to the elements through an additional relay only when the ignition is on (engine is running), so as not to drain the battery.
When checking at home, the temperature in the car refrigerator dropped to 12 degrees in 1 hour and stayed there. The temperature of the hot radiator stopped at 49 degrees. In the car, when cooling 4 bottles of Mojito and using Peltier cold accumulators, the Peltier turned off in the first hour at 55 degrees of the hot heat exchanger. And subsequently they turned off when the temperature inside was less than 5 degrees. Operation interval: 4 minutes on, 1.5 minutes off.
Conclusions:
Do-it-yourself car refrigerator-thermobox
Greetings, dear readers! Since my family and I travel a lot in the summer and regularly go out for barbecues, the issue of food storage came to the fore. Both on long trips and for one day.  It became clear that we couldn’t do without a refrigerator or a thermal bag. Familiarization with the market has begun. The simplest thing is thermal bags. We will not consider thermal packages. They are soft, take up little space, light, and the cheapest. The downside for me is that there is fabric and seams inside, which is inconvenient to wash. average price 500-1000 rub. Thermal containers. Hard plastic body, easy to clean. Cons: They take up space regardless of whether there is food inside or not. Average price from 2500 rub.
  Both bags and containers require cold storage batteries. Refrigerators with Peltier elements are the same thermal containers, but with a cooling system built into the lid. Depending on the power of the elements, it can cool up to 20°C from the outside temperature. Nutrition from electrical network car. Minus - if it is not equipped with a shutdown system, it can drain the car’s battery. Average price from 3500 rub. Compressor car refrigerators. The most serious of all. Designed for long trips. They can operate on both electricity and gas. They cope with their responsibilities perfectly. The downside is that they cost the same as two regular home refrigerators. *** I looked at all this and decided, in order to understand what I needed, to make a refrigerator with my own hands.
Well, to be more precise, a thermal box. For me, the main thing is that condensation does not drip anywhere and the food does not get choked on the road. I took a sheet of penoplex (the insulation is orange). Cut it out. Assembled using self-tapping screws and sealant. There are no corners, no insulation on top, no upholstery or painting. Everything is “as is”. Why complicate things? 
 Photo by the channel author. Cutouts were made at the joints of the walls and on the roof to reduce heat loss. Conducted sea trials under load. Considering that the lid is solid, that is, every time you open it, it gets into the container. warm air, boxing performed well. The cold lasts for at least a day and a half (on one stack of cold accumulators), with regular openings. Watermelons, water, chilled foods, meat - everything feels great. In general, I left everything as it is for now; it suits my purposes perfectly. And it’s not a pity, if anything. Nothing is as permanent as something temporary. And you choose what suits you best.
Refrigerator made of foam plastic and Peltier modules
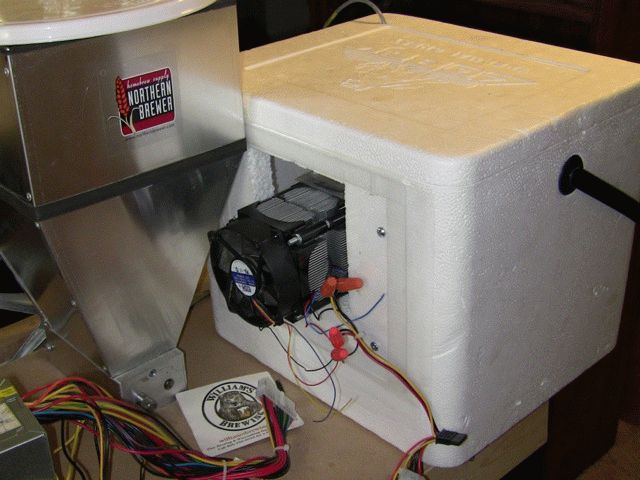
Today’s article is not about turning packaging foam into glue by dissolving it in acetone. Today we’ll talk about a homemade product that’s a little more complex, but very useful in the household, garage or home. Since our school days, we have known about the Peltier element, which, when some voltage is applied to it, emits heat on one side and cold on the other.  The same element, 75 Watt. So, we will make a mini refrigerator, you can call it a tabletop one. And, to begin with, let's take thin packaging foam and use double-sided tape to assemble a box with a door from it. We take the size of the box approximately as a 5 liter water bottle.
  A box made of polystyrene foam. Next, we assemble the main part. Glue a small one to the cold side of the element using thermal paste. aluminum radiator from electronics. On the hot side we glue a processor radiator with a fan onto the same compound.
  The main unit of the device. Having cut a hole in the back wall of the box, insert a cold radiator inside and glue the entire unit to the back wall.
  Rear wall of the refrigerator. Connect the ends of the element and the fan in parallel, supply 12 Volts. We put a couple of cans of foam in our refrigerator. After an hour, drink the drink at a temperature of 15 degrees.
Everything you need to know about auto-refrigerators for Fishermen and Autotourists

In the category of goods for tourism, active rest and equipment for country house Compact portable refrigerators are consistently popular. Most of the products offered by the industry are passive coolers - these are various kinds containers with thermally insulated walls, lengthening the heating process of the food packaged in them. In contrast, active type devices generate cold inside the chamber, powered by external source electric current. To save your budget on purchasing an expensive travel accessory, you can make a car refrigerator using Peltier elements with your own hands.
Preparatory stage
To successfully put the Peltier element into your service, you need to familiarize yourself with the theoretical part of the problem:
- what is a Peltier element;
- how to calculate the required refrigerator volume;
- how to provide the device with the required power and proper heat dissipation;
- What are the connection diagrams for this thermoelectric module?

The operation of the Peltier element is based on the effect of the same name, in which, depending on the direction and strength of the current flowing through the point of contact of two semiconductors different composition, either heat is released or absorbed. This phenomenon began to be used in radio electronics for local cooling of integrated matrices, diodes, etc. Later, a compact, quiet, inexpensive and reliable part began to be used as a makeshift replacement air cooling PC processors. Most often, a Peltier element 12703 for a refrigerator with a useful volume of up to 0.5 cubic meters is considered as a working module. m.
One Peltier element 12703, operating at 12 V, consuming about 3A and 28 W; dimensions 40x40x10 mm; enough to create a closed volume of 0.5-0.7 cubic meters. m. temperature difference of 20 degrees with the environment. The part will function correctly only with a working heat sink (metal radiator) and a fan that ensures air flow from it. If you power the 12703 element without ensuring heat dissipation, as well as its counterparts that cooled powerful diodes, it can burn out within a minute.

Housing and working chamber of a homemade unit
To construct a car refrigerator with your own hands, you will need a heat-insulated box with a solid non-metallic wall. This can be a commercially available travel thermal box (which passively keeps the temperature cool) or a suitable plastic, plywood, MDF or similar box. heat-insulating material, a box with a tight-fitting lid.
- For convenience, the body of the portable freezer can be equipped with handles on the sides.
- Inside the camera homemade device must be insulated with penofol, expanded polystyrene, polyurethane foam or sheet foam. The exception is the installation location of the cooling module. At the mounting point you need to make a hole for the module, recesses for mounting radiators and correct air exhaust.
- When choosing which radiator and cooling fan is best to install, you should pay attention to inexpensive computer parts: a CPU cooling cooler and its radiator.
- When installing a radiator on a Peltier module, you must use thermal paste.
- The external radiator with the cooler placed on it should be protected from damage or contact, preferably with a grille.

What you will need to assemble the cooling unit
A homemade car refrigerator with a Peltier element will require the following parts:
- insulated container;
- cooling module;
- 2 radiators and 2 fans (inside and outside);
- thermostat with remote sensor(microcontroller with thermostat);
- switch with two positions (on/off) and wire.
To connect to a car battery you will need long wires and connectors (crocodiles). It is not recommended to connect through the cigarette lighter connector, since during operation the contact becomes very hot and can damage the car's wiring. To ensure work freezing unit from the network in the country, you should purchase a computer or other suitable power supply for 12-15 V with wires and plug.

Installation sequence
Before placing a Peltier element on a home-made refrigerator, you should check the functionality of the structure by mounting it in finished form on a flat board of appropriate size.
The parts layout is as follows:
- the module is mounted in a hole cut exactly to its size in the base (lid or wall of a car refrigerator);
- radiators pre-lubricated with thermal paste are attached to both of its planes;
- A fan is installed on each radiator in air exhaust mode.

To understand which side is best to place the module, you should refer to the practice of marking the “plus” with a red wire and the “minus” with a black wire. When current is supplied from the positive terminal of the battery to the red wire of the module, the side on which the marking is located will heat up. When connecting in reverse, it is the opposite.

When operating a homemade car refrigerator, it should be taken into account that the products loaded into it must be as cool as possible, otherwise the device will have to spend a large amount of energy and time to first cool them, and only then maintain the set temperature inside the chamber .
A Peltier element is usually called a converter that is capable of operating from a temperature difference. This happens by flowing electric current through conductors through contacts. For this purpose, special plates are provided in the elements. Heat passes from one side to the other.
Today, this technology is in demand primarily due to its significant heat transfer power. Additionally, the devices can boast of compactness. The radiators installed on many models are weak. This is due to the fact that the heat flow cools quite quickly. As a result, the desired temperature is constantly maintained.
This element has no moving parts. The devices operate absolutely silently, and this is a definite advantage. It should also be said that they can be used for a very long time, and breakdowns occur extremely rarely. The simplest type consists of copper conductors with contacts and connecting wires. Additionally, there is an insulator on the cooling side. It is usually made from ceramics or
Why are Peltier elements needed?
Peltier elements are most often used to make refrigerators. Usually we are talking about compact models that can be used, for example, by motorists on the road. However, this is not the end of the range of applications of the devices. IN Lately Peltier elements began to be actively installed in sound and acoustic equipment. There they are able to perform the functions of a cooler.
As a result, the device amplifier is cooled without any noise. For portable compressors, Peltier elements are indispensable. If we talk about the scientific industry, scientists use these devices to cool the laser. In this case, it is possible to achieve significant stabilization of the study wave of LEDs.
Disadvantages of Peltier models
It would seem so simple and effective device It has no shortcomings, but it does have them. First of all, experts immediately noted the low penetration capacity of the module. This suggests that a person will have certain problems if he wants to cool a device that operates from a network with a voltage of 400 V. In this case, a special dielectric paste will partially help solve this problem. However, the current breakdown will still be high and the winding of the Peltier element may not withstand it.
Additionally, these models are not recommended for use in precision electronics. Since the design of the element contains metal plates, the sensitivity of the transistors may be impaired. The last disadvantage of the Peltier element is the low efficiency. These devices are not capable of achieving a significant temperature difference.

Module for regulator
Making a Peltier element for a regulator with your own hands is quite simple. To do this, you should prepare two metal plates in advance, as well as wiring with contacts. First of all, conductors are prepared for installation, which will be located at the base. They are usually purchased with the "PP" marking.
Additionally, for normal temperature control, semiconductors should be provided at the output. They are necessary in order to quickly transfer heat to the top plate. To install all elements, you should use a soldering iron. To complete the Peltier element with your own hands, last of all, connect two wires. The first is mounted at the lower base and fixed at the outermost conductor. Contact with the plate should be avoided.
Next, attach the second wire at the top part. Fixation is also carried out to the outermost element. In order to check the functionality of the device, a tester is used. To do this, two wires need to be connected to the device. As a result, the voltage deviation should be approximately 23 V. In this situation, much depends on the power of the regulator.
Refrigerators with thermistor
How to make a Peltier element with your own hands for a refrigerator with a thermistor? Answering this question, it is important to note that the plates for it are selected exclusively from ceramics. In this case, about 20 conductors are used. This is necessary so that the temperature difference is higher. You can increase it up to 70%. In this case, it is important to calculate
This can be done based on the power of the equipment. A refrigerator using liquid freon is ideal in this case. The Peltier element itself is installed near the evaporator, which is located next to the motor. To install it, you will need a standard set of tools, as well as gaskets. They are necessary in order to protect the model from the starting relay. Thus, the cooling of the lower part of the device will occur much faster.

To achieve a temperature difference (Peltier effect) with your own hands, you may need at least 16 conductors. The main thing is to reliably insulate the wires that will be connected to the compressor. In order to do everything correctly, you must first disconnect the refrigerator dryer. Only after this is it possible to connect all contacts. Once installation is complete ultimate voltage should be checked using a tester. If the element malfunctions, the thermostat is the first to suffer. In some cases it occurs
Model for refrigerator 15 V
You can make a Peltier refrigerator with your own hands with small modules. The modules are attached mainly near the radiators. In order to securely fasten them, experts use corners. The element should not lean against the filter, and this should be taken into account.
To complete a Peltier thermoelectric module with your own hands, the bottom plate is mainly selected from of stainless steel. Conductors, as a rule, are used with the marking "PR20". They can withstand a maximum load of 3 A. The maximum temperature deviation can reach 10 degrees. In this case, the efficiency can be 75%.
Peltier elements in 24 V refrigerators
Using a Peltier element, you can make a refrigerator with your own hands only from conductors with good sealing. At the same time, they must be stacked in three rows for cooling. The operating current in the system must be maintained at 4 A. You can check it using a conventional tester.

If you use ceramic plates for the element, the maximum temperature deviation can be achieved at 15 degrees. The wires to the capacitor are installed only after the gasket has been placed. You can attach it to the wall of the device different ways. The main thing in this situation is not to use glue, which is sensitive to temperatures above 30 degrees.
Peltier element for car cooler
To make a high-quality auto-refrigerator with your own hands, a Peltier module (module) is selected with a plate whose thickness is no more than 1.1 mm. It is best to use non-modular wires. Copper conductors will also be required for operation. Their throughput must be at least 4A.
Thus, the maximum temperature deviation will reach 10 degrees, this is considered normal. Conductors are most often used with the marking "PR20". They have recently shown themselves to be more stable. They are also suitable for various contacts. A soldering iron is used to connect the device to the capacitor. High quality installation possible only on the relay block gasket. The differences in this case will be minimal.
How to make an element for a drinking water cooler?
A DIY Peltier module (element) for a cooler is quite simple. It is important to select only ceramic plates for it. At least 12 conductors are used in the device. Thus, the resistance will be maintained high. The connection of elements is usually carried out using soldering. There must be two wires for connecting to the device. The element must be attached to the bottom of the cooler. In this case, it may come into contact with the cover of the device. In order to exclude cases short circuits, it is important to fix all wiring on the grille or housing.
Air conditioners
The Peltier module (element) is made with your own hands for an air conditioner only with class “PR12” conductors. They are chosen for this task mainly because they are good at low temperatures. At most, the model is capable of producing a voltage of 23 V. The resistance indicator will be at the level of 3 ohms. The temperature difference reaches a maximum of 10 degrees, and the efficiency is 65%. Conductors can only be laid in one row between sheets.

Manufacturing of generators
You can make a generator using a Peltier module (element) with your own hands. Device performance will increase by a total of 10%. This is achieved due to greater cooling of the motor. The device can withstand a maximum load of 30 A. Due to the large number of conductors, the resistance can be 4 ohms. The temperature deviation in the system is approximately 13 degrees. The module is attached directly to the rotor. To do this, you must first disconnect the central shaft. In many cases the stator does not interfere. To prevent the rotor winding from heating up from the inductor, ceramic plates are used.
Cooling a video card on a computer
To cool the video card, you should prepare at least 14 conductors. It is best to select copper models. Their heat conductivity coefficient is quite high. To connect the device to the board, non-modular type wires are used. The model is mounted near the video card cooler. To secure it, small ones are usually used.
To fix them, you can use regular nuts. The appearance of excessive noise during operation indicates that the device is not working properly. In this case, it is necessary to check the integrity of the wiring. You also need to inspect the conductors.

Peltier element for air conditioner
To make a high-quality Peltier element with your own hands for an air conditioner, double plates are used. Their minimum thickness should be at least 1 mm. In this case, you can hope for a temperature deviation of 15 degrees. After equipping the modules, the performance of air conditioners increases on average by 20%. Much in this situation depends on temperature environment. The stability of the mains voltage should also be taken into account. With minor interference, the device can withstand a load of approximately 4 A.

When soldering conductors, they should not be placed too close to each other. To properly complete Peltier modules with your own hands, the input and output contacts must be installed only on one of the two plates. In this case, the device will be more compact. A serious mistake in this situation would be to connect the module directly to the unit. This will lead to inevitable damage to the element.
Installing the module on a capacitor
To install it yourself, it is important to evaluate the power of the capacitor. If it does not exceed 20 V, then the element should be mounted with conductors marked “PR30” or “PR26”. In order to attach the Peltier module (element) to the capacitor with your own hands, use small metal corners.
It is best to install four of them on each side. In terms of performance, the capacitor can ultimately add plus 10%. If we talk about heat losses, they will be insignificant. The efficiency of the device is on average 80%. For high voltage capacitors modules are not calculated. In this case, even a large number of conductors will not help.
A great craft for the summer is to make a miniature refrigerator with low-voltage power. A variety of supply voltages (220 V, 12 V, 5 V) makes it possible to use such a refrigerator almost anywhere: in the car, office, home, etc. This is a great thing to cool drinks on a hot summer day.
Will need

Manufacturing a miniature refrigerator using a Peltier element
The case was made of arbitrary dimensions, taking into account the placement of the cooling unit, power supply and beverage chamber. It will consist of two sections: one for the technical part, the other for cooling products.We make the body. We mark a piece of hardboard using a pencil and ruler.

We cut out all the elements with a hacksaw.

All body parts are ready.

From the middle part dividing the refrigerator into two parts, we cut out a window for a radiator with a Peltier module.

We apply the cooling unit to the side of the case.

And we drill a lot of holes on both sides. That is, the air flow will enter from one side through the holes in the side. Pass through the radiator, picking up heat and exiting through the holes on the other side.

We paint all parts of the refrigerator body with aerosol paint from a can.

Let's start assembling.

Glue the separating part of the cooling block with hot glue.

We glue all parts of the body on both sides.


The cooling unit rests on a piece of wood that is glued to the base.

You will need two sections for lighting LED strip at 12 V. One color is white, the other is colored.

Screw on the small fan.

We divide the technical part of the refrigerator into two parts. The power source will be located at the top. The dividing wall is placed on square pieces of wooden slats glued to the sides.

Installing the back wall.


We will make the door from a piece acrylic glass. Mark with a ruler and pencil.

You can buy miniature loops or make your own. Glue them on with instant glue.

We cover the sides of the acrylic glass with black self-adhesive tape.

Glue the handle to the door.

We will organize lighting. Solder the contacts to the mini limit switch.

Solder the wires to the pieces of LED strip. We glue the pieces themselves onto a mini shelf made from the same acrylic.


We connect the backlight, fans, Peltier element.

Install the switch on the side.

We isolate all open twists.

Close the compartment with the cooling unit. This must be done in order to hot air did not rise up and heat the power supply.

Drill a hole for the 220 V power cable.

To prevent the refrigerator door from opening, we will install small neodymium magnets from a broken sidir on the side.

We close the top cover, but before that we cut in the power switch and solder the wires. Now the refrigerator can be turned off with the button on top.

Close the lid and secure with glue.

For proper thermal insulation we paste over inner part refrigerator with thin foam. Place the cut foam panels on hot glue.
And finally, the result of the work is such that in thirty minutes the temperature inside the chamber dropped from 42 to 16 degrees Celsius. The drinks were cooled to a temperature of 20 degrees Celsius. And all this in 30 minutes!

Of course, the efficiency of such a refrigerator is much lower than that of a compressor, but it also has its advantages, one of which is low-voltage power supply, which can be not only 12 V but also 5 V! Naturally, it is quite possible to power it from a computer’s USB port, although the output will be lower than when powered by a voltage of 12 V.
The total power consumption when powered from a 220 V network is about 100 W.More detailed instructions for assembly in the video below.
During the struggle for environmental friendliness and a decent existence, attention is paid to the smallest details. Are you tired of the constant noise of the cooler in the processor - remember, the device requires cooling, otherwise the BIOS will simply turn it off system unit together with operating system. And in the heat you want peace and quiet. The solution has been found. Previously they said that refrigerators do not rely exclusively on compressors; alternative models have been created. Let's think, perhaps we will be able to assemble the refrigerator with our own hands.
The history of refrigerators, or a manual for the inventor
We mentioned in reviews about adsorption refrigerators running on blue fuel. The gas, when burned, causes the refrigerant to circulate and cool the compartments. The undoubted advantage of the design is noiselessness. You can hear a slight hiss from the combustion of fuel and the flow of liquid through the tubes. But the solution is far from the only one. They wrote that expensive car refrigerators work on a different principle - on Peltier elements.
In 1834, it was discovered that when direct current is passed through conductors and semiconductors, heat is released or absorbed. The effect was not attributed to the Joule-Lenz law: in the latter case, heat was released, but cooling remained unattainable. No one gave a scientific explanation, but it became known that when current is passed in one direction, heat is absorbed and released in the other!
There is a known case when a student reported to a teacher on the subject of digital technologies; computers have not yet acquired the power they have today. Pentium II processors have just appeared on the Russian market, although fourth ones have, of course, already been seen in the USA. It came down to powering the computer's brain, to the desire to constantly reduce the voltage.
We noticed that the processor consumes 75 W. At the same time, the supply voltage remained around 3 V. It turns out that the small crystal consumed current... 25 A. Any battery when charging is not capable of this. The teacher spoke out, but turned out to be not entirely right.
At this low voltage, the processor actually consumes a huge current, part of the power is spent on useful needs, and heat is inevitably released into the environment. And tangible! Without a cooler, the processor can reach the boiling point; it would heat up further, but the protection systems will turn off the power earlier. It turns out that the processor consumes significant power. Recently, Peltier elements have appeared on the market, designed to cool the raging brain. A certain user noticed that the processor cooled down... to minus 10 degrees Celsius. Impressive?
Peltier elements cannot be called cheap. How to build a homemade refrigerator based on them: place them parallel inside a thermally insulated container, where the temperature will begin to gradually drop. But the freezing power of refrigerators is not measured in watts, it is calculated by the number (in kilograms) of products whose temperature can be reduced to a given temperature. We don’t know what is meant by the statement that the power of the Peltier element is 77 W. At a price of 300 rubles per piece, it’s worth trying to calculate the cost homemade refrigerator, correlating the specified parameters. We offer a different way.
Remember, in the reviews they presented a method for determining the required heating power of a room, and now we use it in the reverse order. Experiment steps:
- You will need an ordinary thermometer. Better than a simple street one. We will place the thermometer in our homemade refrigerator.
- We make the body. Real refrigerators use polyurethane foam for thermal insulation. Buy a can at the store building materials. Polystyrene foam will also work; we recommend using reflective insulation of the Penofol type or similar. For example, take a box, tightly trim it on both sides with the mentioned material, in fact, a good homemade refrigerator is already ready. For information, the material was taken from the space industry, where it was used to create spacesuits. Sun rays are deadly outside the atmosphere, and the cosmic cold will make Sauron himself shudder, but all of the above did not cause any particular harm to the astronaut under a layer of Penofol. Of course, gold and silver were used in the spacesuits, and not aluminum; perhaps they did not use polyethylene. Fact - the characteristics of the material are amazing.
- The cooler will initially be a single Peltier element. We mount it with adhesive sealant. Then we will show a technique that allows you to find the number of modules needed for a homemade refrigerator to start freezing.

Calculation method for a homemade refrigerator using Peltier elements
We proceed from the fact that heat loss depends linearly on the temperature difference inside and outside a homemade refrigerator. Let's go from simple to complex:
- Let’s say the temperature in the room is 20 ºС and remains unchanged throughout the experiment. Let's start the research. Obviously, in the absence of Peltier elements, the temperature inside the refrigerator will be 20 ºС. This is the first point on the straight line (losses increase linearly from the temperature difference between the outside and inside of a homemade refrigerator). We will install a Peltier element with radiators on both sides, and the outer one will be blown by a cooler to enhance the effect.
- After a while, the temperature in the 30-liter compartment was 14 ºС. We claim that by adding two more Peltier elements with radiators and coolers, anyone will receive 2 degrees of heat inside a homemade refrigerator if the room is 20 ºC warm. Scheme:

Conclusions on the design of a homemade refrigerator
Readers will draw the rest of their conclusions on their own: a homemade refrigerator will give 2 degrees of heat on the Celsius scale if you equip the device with three Peltier elements with coolers. It is permissible to generalize experience, select optimal insulation, and vary conditions. For example, remove coolers so as not to make noise and waste energy. This will simplify the design. But we want to cool the ardor of the inventors: in real, not homemade refrigerators, two fans are used, for the cold and hot circuits. Experiment.
The refrigerator device will withstand computer unit nutrition. Remember how much the processor consumes! The Peltier element is far from the most important thing inside. The voltage has already been adjusted in advance, so you don’t have to look for rare parts. You buy three Peltier elements to make your own refrigerator, take a power supply from an old PC, build a box with two coolers, and get the finished product. Moreover, it can operate from a car battery.
The principle of operation of the refrigerator is so obvious that children can understand it. When the direction of the current changes, the Peltier elements work to heat. It's good to have warm food nearby when there is no heating device around. In the latter case, the law works in reverse side. Three Peltier elements inside a homemade refrigerator will provide a temperature 18 ºС above the environment. If the car has 25, the box will show 43. Enough to have a snack and not complain. It turns out that there are two devices in one person.
We would like to thank the author of the YouTube video for the great idea on how to make a refrigerator yourself. Let the idea not be too successful, but only because the volume is large. Peltier processor elements are not so powerful that they can single-handedly overcome a large volume that is not fully formed.


