How to install a shower cabin yourself. How to assemble a shower stall: proper installation of equipment without the involvement of a specialist. Next, we’ll figure out how to install a siphon in a shower stall.
When installing a shower cabin, many people use the services of craftsmen. However, often the installation procedure does not take place according to technology, since the master tries to finish as quickly as possible and take money for all completed and uncompleted actions. Knowledge of installation technology will allow you to easily install a shower stall yourself or competently control the installation process by a specialist.
The main thing when installing a shower stall is to choose right place for installation. It should be next to the hood and, if the model has many additional functions, connected to the electrical network with mandatory grounding. When assembling the pallet you need to use building level, since the pallet must be installed strictly horizontally. When installing a pipeline, be sure to use sealants, otherwise water leakage will force you to redo the entire job. When connecting the cabin to the water supply, you must install at least one filter. All pipes are run along the baseboards or hidden in a box or wall.
Let's consider detailed example installation of a shower stall using the example of Massimo. This is a corner booth made in China with a high tray. Size - 100x100 cm. Bought for 30 thousand rubles. For other models and manufacturers, assembly may vary.
Tools
For installation we will need:
- wrench 19 and adjustable wrench 45;
- long Phillips screwdriver with PH2 bit;
- transparent sanitary silicone;
- construction gun for sealant;
- silicone spatula;
- spray;
- fairies;
- drill with 3 mm drill bit;
- roulette;
- bubble level 1 m;
- jigsaw;
- erasable marker;
- thread locker or cold welding;
- water supply hose 1/2″ nut-nut - 2 pcs. (length is selected according to location);
- sewer crossing 40x50;
- toilet paper.
Pallet assembly
After attaching locknuts to the studs, screw them into the pan. Short - to the center. Screw it in by hand until it stops and secure it with a nut. When tightening, do not apply much force, otherwise the thread may break. Only cold welding will help save the situation.
Screw the second locknut onto each stud with the notches facing up.
We lay the frame on the studs, tighten it and fix it on both sides with nuts.
We screw plastic brackets for the shower screen onto the 4 front studs. The perforated part should hang down.
We fasten the legs with locknuts and install the pallet in place.
We adjust the height of the screen to the lower edge of the side of the pallet. It is adjusted to the level by twisting the legs.
The lower edge of the brackets must be set with a gap of 20 mm from the floor, without being tightened to the end.
Connection to sewerage
To install the drain and siphon, remove the protective film around the drain hole. It is better to replace the upper rubber gasket with silicone sealant. We screw on the siphon. We also treat the threads and lower connections with sealant for reliability.
You need to connect the siphon to the sewer through an adapter. This connection is also coated with silicone.


If everything works, you need to disconnect from the sewer and continue installation.
Installation of side walls
We remove the protective film from the top of the pallet, but leave the bottom protected for now.
 We move the pallet away from one wall and install an opaque wall there.
  We connect the holes in the pallet with the corner and screw it with 35 mm self-tapping screws (without much effort).


 We install the partition back and remove excess silicone. Further I will not write about removing excess, remove it immediately after pressing the parts.
 We move the pallet with the partition to the wall and try on the central panel to see if additional lining is needed.
  We apply silicone to the junction of the side wall and the central panel.
  We tie them together with 10 mm self-tapping screws.
We fasten the second one side wall similar to the first one.
Let's try on a fixed transparent partition. Oblique cut metal profile should be at the bottom.
If everything matches, we silicone the profile and install the partition. We set the top edge flush with the wall. From the upper outer side of the profile, drill a hole with a diameter of 3 mm and tighten the partition with the wall using self-tapping screws. This is what it looks like in practice.
Install the upper and lower profile. The rounded parts are directed towards each other, the upper profile is wider than the lower one. We apply silicone under the bottom one.
Ceiling assembly
Assembling the ceiling of the shower stall. To remove the film, unscrew ventilation grates and speaker.


We install the ceiling in place, without silicone for now. It is screwed from below using 4 self-tapping screws. of stainless steel 16 mm.


We connect and check water and electricity. Do not wet the top edge of the tray.
We put the booth in place and check its stability and level.
WITH inside We treat the lower perimeter and the central pillar with silicone.
Door installation


From the handle side we put magnetic moldings on the doors. On the other sides there are L-shaped moldings with the shelf facing outwards.

We hang the doors on the upper rollers. To start the lower ones, press the buttons.
We check the smooth movement of the doors and the tightness of the connection. Doors must not open independently from any position. The connection is adjusted using screws on the upper rollers.
Screen installation

We remove the screen and make marks opposite the brackets.


We install the screen by installing wedges from below.


When the silicone dries, we spill the joints of the cabin and check the functionality of the watering cans and switch.
Installing a shower stall is a fairly simple procedure, provided you follow the instructions and know the basics plumbing work. If you have never dealt with connecting plumbing, it is better to entrust the installation work to specialists.
A shower is a device whose appearance can be dated back to the time when people just learned to supply water through pipes. Shower stalls are a logical development of this device. Even in the Soviet Union, they were actively used where there were restrictions on the size of bathrooms, although they gained the greatest popularity in the West. At the present time, shower stalls are in stable demand in the domestic market, which determines the variety of prices for them. As a consequence of this popularity, the price of installation is increased, which is why assembling a shower cabin with your own hands is becoming popular.
Shower cabins on the market are represented by both Chinese models, which are in demand due to their average quality and low price, and more durable ones made in Germany, Italy, Russia and other countries. It is this variety of goods that makes choice accessible.
Preliminary stage
Cabin assembly begins with checking all components. It is necessary to fully check the integrity of all elements, especially glass. They are manufactured according to special technology, are shockproof and hardened, therefore, if damaged, they break into many elements without sharp edges. Simply shake the packaging to determine the integrity of the glass by sound. Defects, geometric errors, or damage are unacceptable on the remaining parts of the shower stall.
Cabin elements include:
- pallet (has various shapes, most often comes with a reinforced frame);
- doors (most often have rollers for movement and fastening elements);
- glass for doors (usually transparent, less often frosted);
- walls, side panels(water supply and other functions are carried out);
- roof of the shower stall (depending on the manufacturer and type, may be missing);
- factory fasteners and installation elements.
The assembly of a Chinese shower cabin, like any other, begins only after a thorough check and creation of a workplace. If the size of the bathroom is not large enough, it is better to assemble it in another place in several stages, transferring the finished parts.
For high-quality installation you need to have tools on hand and Additional materials from the list below.
Required tools:
- adjustable wrench (or gas);
- flat and Phillips screwdrivers;
- metal drills of small diameter (3-6 mm);
- level (for leveling installed parts);
- a screwdriver, or a drill as a replacement;
- gun for squeezing out silicone;
- sharp knife.
Additional materials that may be needed:
- sealant (silicone) transparent, antibacterial;
- waterproofing tape;
- hoses for supplying hot and cold water;
- transition to sewer 32/50;
- paint, gloves, brush for correcting defects.
It is necessary to check the location for the shower stall being installed. It must be level, have waterproofing, and it is also desirable to have ventilation to remove steam if the cabin does not have a roof.
Pallet assembly
This is the most important stage, which determines how firmly the booth will stand, as well as how well it will work. Almost all pallets are equipped with legs on which it will stand, and the main thing is to align them correctly (use a level) and secure them (nuts and fasteners). Items related to pallet assembly:
- apron;
- bracket;
- hairpins;
- frame;
- nuts;
- screws;
- siphon;
- the pallet itself.
Advice. Before starting work, it is worth removing the apron from the pallet - it will only be needed at the end of assembly.
The installation instructions for the pallet are very simple.


Installation of panels
First, you need to once again inspect the glass panels and determine their orientation. Typically, the top of the glass has more holes than the bottom. To decide on the guides, you need to look at the dimensions - the top one will be larger and wider, and in the bottom guide you can see a small figured cutout. The assembly of a corner shower stall differs only in the number of side panels, there are fewer of them, only 2.
Installation must begin by installing the glass in the appropriate places in the guides. It is advisable to lubricate all joints with sealant. The guides must be connected to the stand with self-tapping screws, which are included in the kit. In this case, you need to put the seal on the glass. Silicone sealant you need to lubricate the entire lower guide that will connect to the pallet. Then install the glass.
Advice. When applying sealant, it is necessary to leave the places for water drainage unfilled; it is advisable to clean them of foreign material.
You need to install the side panels on the pallet, checking the positions at the special fastening points where the self-tapping screws will have to be inserted to attach one to the other. After tightening the screws, you need to treat all joints with sealant, then install and secure the back panel.
Advice: do not tighten the screws all the way, maintaining a small gap, which may be needed for adjustment in the future.
The installation of the pallet assembled with panels must be done carefully, carefully measuring the level and gaps. Try to avoid strong impacts, as the metal may bend.
After installation, it is worth checking the operation of the electricity by connecting the radio, lighting or fan. If no problems arise, you can leave the shower stall for a while to allow the sealant to cure.
Installation of glass sashes
Before installing the doors on the doors, it is necessary to attach the rollers and seals in the places indicated for fastening. Having carefully secured and coated with sealant, it is necessary to install the sashes. You can adjust the gap between the doors using the upper rollers, ensuring that one door is completely adjacent to the other, in order to avoid water leaks while using the shower stall. On some models, the rollers have screws where you can install plugs to protect them from moisture.

Final stage
Your corner shower assembly is nearing completion. All that remains is to secure the shower head in the cabin with a hose; lamp for illumination, fan and speaker. All elements along the edges must be coated with sealant, and also used with the factory protective layer, protecting from moisture.
After installation, you will need to check the cab pan for cracks, leaks, or other defects. If you hear a crackling sound or feel a change in the position of the tray, you need to adjust the height of the legs.
Advice. fill the pan with water and wait a few hours, you can see all the leaks.
If everything is in order, then you should finally connect the necessary communications: water, electricity and sewerage, and also attach the missing fittings - handles, mirrors and shelves.

Features of the assemblies of some models
The assembly of the Serena shower cabin differs from the general assembly of Chinese production
The first stage - installation of the Serena cabin tray is no different from the standard one, but then there are differences in the installation of the side parts of the shower stall and doors. They are installed on special factory racks, which must first be secured in the floor. Using factory fasteners, the side parts of the cabin will be attached to these racks. In this case, maintaining the angles between the pallet and the screen plays an important role. During the fastening process, it is necessary to carefully coat the holes with sealant.
The doors are installed last, have an original sliding system, special hinges for fastening, with the help of which they are opened and closed.
Installing the roof is very simple. It is fastened with bolts in the provided fastening points and does not cause any difficulties.
The Niagara shower cabin assembly also has several differences in the installation and installation of the side parts and doors
The side parts of the Niagara cabin must be assembled according to the following instructions:
- the base (main part) is attached tightly to the wall;
- the side ones are threaded through specially provided holes. In this case, the entire connection is strengthened with sealant;
- after the connector has hardened, the doors are installed on factory hinges, which are located on one of the side parts;
- roof installation and additional equipment is in the last stage.
In this section we have selected various videos instructions for assembling shower cabins with your own hands.
Now you don’t have to spend a long time searching on the Internet for the video instructions you need. We have selected them especially for you and grouped them by brand.
Just scroll down the page and watch the videos that interest you.
If you didn’t find something, then don’t worry, look at similar instructions for assembling a shower cabin. Because almost all shower cabins are assembled in the same way.
Assembling a shower hydrobox with your own hands video instructions
How to assemble a shower tray video instructions
DIY assembly of a shower cabin with a plastic back wall, video instructions
How to select, disassemble and change a faucet in a shower stall with your own hands
What kind of rollers are there in shower stalls and which rollers are better?
Showers Niagara
DIY Niagara shower cabin assembly video instructions
Shower cabins Water World
Do-it-yourself assembly of the shower cabin Vodny Mir 8811A video instructions
Do-it-yourself assembly of the shower cabin Vodny Mir 8814 video instructions
Do-it-yourself assembly of the shower cabin Vodny Mir 8811(100*100) video instructions
Do-it-yourself assembly of the shower cabin Vodny Mir 8862 video instructions
Do-it-yourself assembly of the shower cabin Vodny Mir 8801 video instructions
AquaPulse shower cabins
Do-it-yourself assembly of the AquaPulse 4106A shower cabin video instructions
Erlit shower cabins
Do-it-yourself assembly of the Erlit 4510TP-C4 shower cabin video instructions
Do-it-yourself assembly of the Erlit 4515TP-C3 shower cabin video instructions
Sensea shower enclosures from Leroy Merlin
Do-it-yourself assembly of the Sensea IVON shower cabin video instructions
Shower cabins Artex
Do-it-yourself Artex shower cabin assembly video instructions
Radaway shower enclosures
Video instructions for installing the Radaway Carena KDJ shower cabin
Video instructions for installing the Radaway Almatea PDD shower cabin
Video instructions for installing shower enclosures with your own hands
Finn shower cabins
DIY assembly of the Finn A-408 shower cabin video instructions
Shower cabins, due to their convenience and wide functionality, are gradually replacing traditional bathtubs in small apartment. However, installing a shower cabin significantly more difficult to install baths. However, you can assemble this plumbing fixture yourself if you use the right tools, quality materials and follow the instructions on how to install a shower cabin with your own hands. In this article you will find detailed information on how to properly assemble a shower stall.
During preparation, it is recommended to study all the diagrams and instructions that the manufacturer included with the cabin. Instructions for assembling the shower cabin are included with it upon purchase. It is often difficult to understand all the manuals and diagrams the first time, but it is better to be patient and understand everything carefully. The better you understand the essence, the clearer you will imagine the future assembly of the shower cabin and less mistakes you will do during installation.
You also need to take care to obtain the appropriate permits. If the installation of shower cabins will be carried out on the site of the bathroom, then you don’t need to worry about anything, but if the cabin will be installed together with a bathtub, then you will have to notify the relevant services, since an additional water intake point in the bathroom needs to be decorated.
- read the installation instructions before starting work;
- check that the floor at the installation site is perfectly level;
- Carefully insulate the drain connections;
- the places where the pallet and frame are connected must be sealed.
Installing a shower cabin with your own hands will not be difficult if you follow these recommendations.
What tools are needed?
Whatever model you purchase, installing and assembling a shower cabin with your own hands consists of the same steps. The most popular corner options. They all consist of the same elements, which include:
- back wall;
- racks;
- side panels;
- roof;
- pallet;
- screen.
Before you assemble the shower cabin with your own hands and to assemble these elements, you will need the following tools:
- wrench 19 and adjustable wrench 45;
- long Phillips screwdriver with PH2 bit;
- transparent sanitary silicone;
- construction gun for sealant;
- silicone spatula;
- spray;
- dish soap;
- drill with 3 mm drill bit;
- roulette;
- bubble level 1 m;
- jigsaw;
- erasable marker;
- thread locker or cold welding;
- hose for water supply ½″ nut-nut - 2 pcs. The length is selected according to location;
- sewer crossing 40×50;
- toilet paper.
It is better to always have a diagram of the shower cabin assembly before your eyes.

The main stages of installing a shower cabin
Let's study the cabin assembly technique step by step.
Pallet assembly shower stall consists of the following steps
- You need to attach locknuts to the studs and screw them into the pan. We screw the short one in the center. We do this manually until it stops, then fix it with a nut. If a thread breaks, you must use a thread locker or cold welding.
- On each stud you need to screw another one with locknuts with the notches facing up.
- The frame is placed on the studs, tightened and secured on both sides with nuts.
- Plastic brackets for the shower screen are screwed to the 4 front studs. The perforated part should be on the bottom.
- After screwing the legs with locknuts, the tray is installed in place.
- The height of the screen is adjusted to the lower edge of the pallet side. By twisting the legs, we set everything to the level.
- Without tightening it all the way, set the bottom edge of the brackets with a gap of 20 mm from the floor
Installing a shower cabin with your own hands is unthinkable without connecting to sewer pipes In bathroom.

Connection to sewerage:
- We install a siphon and drain. The protective film around the drain hole must be removed. It is recommended to replace the upper rubber gasket with silicone. Silicone is screwed on. Bottom connections and the threads are also treated with silicone for reliability.
- Using an adapter, the siphon is connected to the sewer. This connection also needs to be siliconized.
- If everything is in place, disconnect it from the sewer and continue the installation.

Assembling a shower cabin with your own hands must include installation of side walls:
- We remove the upper part of the pallet from protective film, but we don’t touch the bottom yet.
- The pallet is moved away from one wall and an opaque wall is installed in this place.
- We connect the holes in the pallet with the corner using 35mm self-tapping screws (without effort).
- Mark the holes by running a marker along the corner.
- The partition is removed and a 5 mm layer of silicone is applied.
- We put the partition in place and immediately after pressing it remove the excess silicone.
- We move the pallet with the partition to the wall and, to understand whether additional lining is needed, we try on the central panel.
- Silicone the joint between the central panel and the side wall.
- We connect them using 10 mm self-tapping screws.

We attach the second side wall according to the instructions for installing the shower, similar to the first wall:
- A fixed transparent partition is tried on. It must be remembered that the bevel cut of the metal profile should be from below.
- If everything fits, the profile is siliconized and a partition is installed.
- The top edge is aligned with the wall.
- Drill a 3 mm hole in the profile from the outer top side and use self-tapping screws to connect the partition to the wall.
- We mount the upper and lower profile. We direct the rounded parts towards each other. The lower profile is narrower than the upper one, we apply silicone under it.

Before you can properly install the shower stall, you need to assemble its ceiling.
Roof assembly:
- Assembling the shower cabin ceiling. In order to free it from the film, you need to unscrew the speaker and ventilation grilles.
- In order for the fan to work as a hood, it must be secured with the markings facing outwards.
- To avoid twisting the ceiling watering can, it is recommended to silicone it.
- We install the ceiling in place without silicone. It should be screwed from below using 4 16 mm stainless steel screws.
- Using clamping clips, we connect the hoses to the watering cans.
- The wires are connected through the lugs according to their markings and color. There is a transformer on the ceiling.
- We connect everything and check the electricity and water. Be careful not to get the top edge of the tray wet.
- The cabin is put in place and its level and stability are checked.
- The lower perimeter and central pillar are siliconized from the inside.

Door installation:
- Rubber door stops are screwed from the inside using 12 mm self-tapping screws.
- We screw the handles to the doors. The cap on the handles on the outside should be on the bottom. If the self-tapping screw does not fasten, it is recommended to seal the hole with a plastic insert; for example, a cut cross for a tile may be suitable for this.
- Magnetic moldings are placed on the door handle side. On the other sides there are L-shaped moldings with the shelf facing outwards.
- The doors are put on with the wheels facing outwards. Rollers with a button that should face up are attached to the bottom of the doors. And on the upper rollers the adjusting screws point down.
- The doors are suspended on upper rollers. In order to start the lower ones, you need to press the buttons.
- We test the tightness of the junction and the smooth movement of the doors. Doors should not open independently from any position. The connection is adjusted using screws located on the upper rollers. See instructions on how to install a shower cabin yourself.

Screen installation:
- Supporting it with wedges, we mount the screen in place. If pipes are in the way, use a jigsaw or small hacksaw to make a cutout.
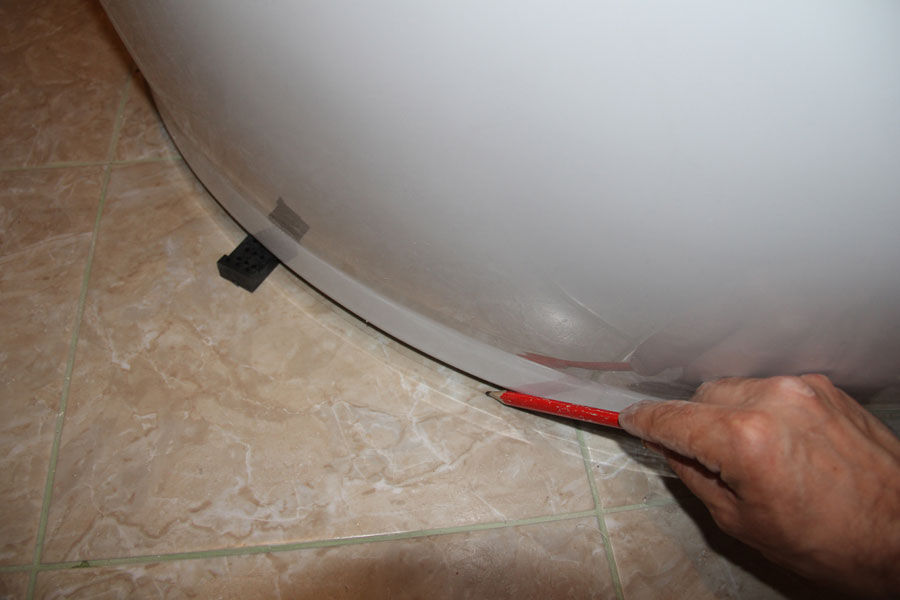
- We try on the screen and make marks on the floor with a pencil.
- We remove the screen and apply marks opposite the brackets.
- Using a square from the marking minus 2 mm on the floor, we adjust the brackets. We set the bottom edge of the bracket with a gap of 2 cm from the floor.
- Tighten the nuts completely.
- Wedge it from below and install the screen.
- Opposite the marks with a distance of 5 cm from the floor, we align and drill holes.
- With help decorative screws attach the screen to the brackets.
- We check the tightness of the connection of the ceiling to the upper arc. If there is a need, we silicone the connection and press it with a spacer or weight.
- After the silicone has dried, we check how the watering cans and switch work. We spill the cabin joints.

Now you know how to install a shower stall yourself - the main thing is to follow the instructions. You can choose any product to suit your taste and assemble the shower stall yourself. But stores also offer an assembled version, which is much easier to install. However, such models are more expensive and do not fit into all doorways.


