How to disassemble a wall clock. How to select and assemble a clock mechanism. Simple and reinforced clock mechanisms and hands
Judging by the inscription on the watch itself, this is still a Japanese alarm clock, but we are not interested in the manufacturer, but in the parts that can be taken from this inexpensive device :)
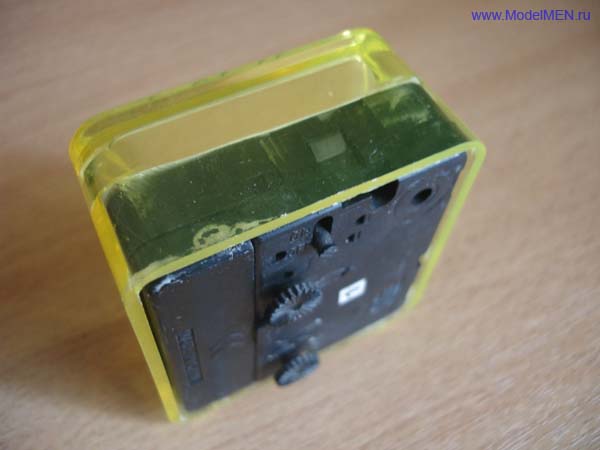
I'm not disassembling this alarm clock just to take from it necessary details, even from the pictures you can assemble it if you have previously tried to repair it) First, remove the inner box with the clock from the transparent case.
Carefully remove the arrows.

On the back wall you need to remove the clock adjustment knobs.

Now open the plastic latches on four sides of the alarm clock. Be careful, the latches break easily!

At the bottom of the watch there is an electric motor; it consists of metal plates with a coil copper wire and a permanent magnet combined with a small gear. This electric motor operates from current pulses supplied from a microcircuit on the board.

Remove the upper gears.

We take out the electric motor coil and the plastic partition. The wires on the coil are very thin and any inaccurate hand movement will lead to a wire break!

We remove the gears.

I no longer need this alarm clock, so I tore off the motor coil.

We bend the metal contacts of the alarm clock and take out the gear.

One by one, we tear off the contacts from the electrical board; they are attached to plastic pins from the housing.

The board has a molded microcircuit, quartz, and a small speaker mounted on wires. This board can be used as a security device or another device for giving a sound signal; I will talk about such circuits more than once on the pages of the site.

Do not rush to throw away the plastic box; there is still a battery compartment in it and it can also be used as a housing for a security device.

Alarm clock gears can be used for various crafts.
Chapter 3. Quartz watches
This is the name of an electronic-mechanical wristwatch with a quartz oscillator (Fig. 9).
Rice. 9. Kinematic diagram of the KNCH 3050 quartz watch:
1 - transfer head;
2 - transfer shaft;
3 - clamp;
4 - backstage;
5 - sprocket with wheel;
6 - bill wheel;
7 - clock wheel;
8 - minute hand trib;
9 - central wheel with tube;
10 - stepper motor rotor;
11 - stator of the stepper motor;
12 - stepper motor trib;
13 - transmission wheel;
14 - second wheel with a tribe;
15 - intermediate wheel;
16 - transfer wheel;
17 - cam clutch;
18 - winding lever;
19 - transfer lever with pin;
20 - rocker spring
A quartz oscillator is a source of highly stable oscillations located in an electronic unit.
The crystal oscillator block is printed circuit board with a quartz resonator, an integrated circuit and passive elements placed on it. The block is connected to the platinum with screws. The actuator in the clock is a stepper motor, made in the form of an autonomous unit. The battery provides at least 12 months continuous operation hours.
The operating principle and kinematic diagram of the clock are as follows: the electrical signal of the quartz oscillator is subjected to division of its frequency and, after generating a pulse, is sent to the stepper motor. Pulse repetition frequency - 1 Hz. The stepper motor, in turn, converts successive electrical impulses into intermittent rotation of the main wheel system.
Through the wheel system, the rotation of the engine shaft is transmitted to the hands and calendar device (if equipped).
The stepper motor trib (12) is meshed with the transmission wheel (13), the trib of which drives the second wheel (14). From the trib of the second wheel through the intermediate wheel (15) with the trib, rotation is transmitted to the central wheel (9). The pointer mechanism consists of a minute hand trib (8), a bill wheel (6) with a trib, and an hour wheel (7).
The transfer shaft (2) with the head (1) can occupy two fixed positions. If the watch has a calendar device, then the transfer shaft will be designed for three positions.
In order to move the hands, it is necessary to place the adjustment head in the second fixed position. The jaw clutch (17) must engage with the transfer wheel (16). Next, the rotation is transmitted to the pointer mechanism.
During the transfer of the points, a locking lever, mechanically connected to the transfer shaft, locks the transfer wheel and prevents the movement of the wheel system and the stepper motor when transferring the points. After installing the arrows and when the transfer head returns to the initial position, the lever returns to its normal position, ensuring the start of the stepper motor.
Disassembling the watch
Unscrew the locking ring and remove the housing cover.
Unscrew the battery spring screw, remove the spring and carefully, preferably using tweezers, pull out the element, taking it only by the cylindrical part of the housing.
Insert the battery into the mechanism and use a tester to check the serviceability of the electronic unit.
The positive probe of the tester is connected to the platinum of the clock mechanism, and the negative probe is connected in turn to the connection contacts of the stepper motor. In this case, the device needle should deviate to 1.4–1.5 V and oscillate within 1–2 mm with an interval of 2 s. If there are no such fluctuations, replace the electronic unit.
Then determine if the stepper motor is working properly. To do this, the tester switch should be set to the resistance measurement position.
Connect the tester probes to the contacts (terminals) of the stepper motor and measure the resistance of the coils, which should be within 3–4 kOhm.
Connect one probe of the tester to the clock plate, and the second to one of the terminals of the stepper motor.
In this case, the instrument arrow should be in the left extreme position of the instrument scale. Repeat the same with the other output. If during measurement the arrow deviates to the right, it means that the stepper motor coil is shorted to the housing. This engine needs to be replaced.
Remove the electronic unit. To do this, you need to unscrew the screw securing the current conductor, remove the insulating washer, unscrew the two screws securing the block to the platinum, carefully lift the block with tweezers, move it to the side and remove it from the speakers.
Press the transfer shaft support, pull the shaft out of the housing, and then the entire mechanism.
Remove the screws securing the stepper motor bridge. Remove the bridge, then unscrew the two screws securing the stepper motor and carefully pull it out using tweezers.
When removing and installing the stepper motor, you can only use brass tweezers, and for the power supply - only plastic ones.
Next, disassemble the switch mechanism. This requires removing the hands, two dial screws, the dial, three screws, the bridge, the hour wheel, the bill wheel, the dial wheel, and the minute hand trib. Then remove the calendar device, if present.
Disassemble the main wheel system. To do this, unscrew the screws and remove the bridge.
After disassembling the mechanism, the parts should be cleaned. Wash all parts except the power supply, stepper motor, dial, case glass, inserts, quartz oscillator unit and painted hands. All listed parts, except the stepper motor, are cleaned with a soft hair brush.
Watch assembly
Install the central wheel with tube (9), minute hand trib (8).
Press the central tube into the hole of the minute hand tube, then check the smooth rotation of the central wheel, as well as its axial and radial clearances. Lubricate everything seats central tube.
Assemble the wheel system. This is done in the following order: install the intermediate wheel (15) with a tribe, the gear (13) and second (14) wheels with tribes and the bridge of the main wheel system so that the brake of the locking lever fits into the groove of the bridge, secure the bridge with screws. Check the clearances of the intermediate and second wheels with the tribes and the smooth rotation of the system.
Assemble the transfer mechanism. To do this, you need to install the transfer lever (19), the clutch lever and the claw coupling itself (17), as well as the transfer shaft (2).
Check the smooth rotation of the shaft in the plate, install the locking lever and lubricate all parts.
Install the minute wheel with tribe, transfer wheel, bridge and secure it with screws.
Install the hour wheel (7).
Install the spring washer and dial. Screw the dial in place and then install the hour, minute and second hands. In this case, it is necessary to monitor the position of the transfer shaft; When installing the hour and minute hands, the shaft must be in the arrow position.
Using the transfer shaft, move the hands to the number 12 and set the second hand, coordinating its position with the divisions of the dial.
Minute, second and clockwise should be installed without using much force so as not to disturb the established vertical clearances in the main wheel system.
Insert the mechanism, mechanism fastening ring, and transfer shaft into the body.
Install the crystal oscillator unit, stepper motor and power supply. The stepper motor mounting screw should not be over-tightened.
Close the housing cover. After assembly is completed, the stepper motor should immediately begin its operation, this will be visible from the movement second hand.
Oversized quartz watch
As an example, we will consider the mechanism of a desktop electronic-mechanical clock with a quartz resonator (Fig. 10).

Rice. 10. Structural diagram quartz watch “Yantar” 59206:
1 - battery;
2 - terminals;
3 - gearbox mounting nuts;
4 - rear axle;
5 - locking device;
6 - screws for fastening the stepper motor;
7 - stepper motor trib;
8 - coil mounting screws;
9 - stepper motor;
10 - bill wheel;
11 - columns;
12 - clock wheel;
13 - panel;
14 - transfer shaft;
15 - central wheel;
16 - spring;
17 and 19 - intermediate wheels first and second;
18 - front axle;
20 - second wheel;
21 - electronic unit;
22 - electronic unit mounting screws
The mechanism consists of a stepper motor, a main wheel system, a battery and an electronic unit.
The quartz clock oscillator starts working when the batteries are connected to the electronic unit. A stepper motor (9) is used to convert electrical energy into mechanical energy. From the trib (7) through the first intermediate wheel (17) the rotation is transmitted to the second wheel (20). The seconds hand is located on the axis of the seconds wheel. In order to set the minute hand in motion, the rotation is transmitted further through the second intermediate wheel (19) and the central wheel (15), on the sleeve of which the minute hand is fixed.
The movement from the central wheel is transmitted to the bill wheel (10), and from there to the hour wheel (12). The central wheel assembly is equipped with a special device that allows you to coordinate the readings of the minute and hour hands. To set the exact time and move the minute and hour hands, a transfer shaft (14) is used.
To set the second hand to exact time a device for stopping the second hand (5) is used.
Disassembling the watch
Remove the cover and remove the battery and terminals.
Remove the electronic unit (21); to do this, you must, firstly, unscrew the two screws (22) securing the electronic unit in order to disconnect it from the panel columns (13) and the bridge (4); secondly, disconnect the electrical connector.
Remove the stepper motor (9); To do this, you need to unscrew the two screws (6) securing the stepper motor to the panel columns.
Unscrew the two nuts (3) securing the gearbox.
Remove the rear axle (4), second wheel (20), first (17) and second (19) intermediate wheels.
Remove the second hand locking device (5), front axle (18), center wheel (15), bill wheel (10), hour wheel (12).
Remove the spring (16) and the transfer shaft (14).
Remove the speakers (11) by unscrewing the two nuts securing the speakers to the front side of the panel.
If necessary, disassemble the stepper motor. To do this, you need to remove the stepper motor rotor assembly, unscrew the two screws securing the coil and remove it. After disassembling, all parts of the stepper motor and gearbox, except the coil, must be washed in gasoline. To wash the motor rotor axis, you need to remove the coils and rotor, and carry out the washing itself with the magnetic circuits assembled.
The main problem with a stepper motor is usually a broken coil wire. Repair is only possible if the outer end of the wire is broken. The repair procedure is as follows: dissolve the coil varnish using amyl acetate near the torn end so that there is enough length to pull out the wire. Then use a soldering iron to remove any remaining wire from the terminal. Make 2-3 turns around this terminal and solder the wire again.
Dip a brush in a mixture of alcohol and gasoline and clean the soldering area, and then coat it with varnish.
The most common malfunctions of the electronic watch unit are the failure of the integrated circuit and the quartz resonator. These components are best replaced.
Defects in the main wheel system are corrected in the same way as in a mechanical watch.
Assembling and adjusting the watch mechanism
Install two columns (11). Place the spring (16) on the right column and secure its position with the stand pin. Then place the front axle (18) on the same column; the bend of the spring must fit into the groove of the bridge.
Insert the first intermediate wheel (17) into the hole of the bridge with the tribe facing up. Place a washer and a spherical spring on the axis of the second wheel (20) and also insert the second wheel into the hole in the bridge.
Lift the second wheel slightly and install the second idler wheel (19) and the locking device.
Install the rear axle and tighten the two nuts.
Place the main wheel assembly on the rear axle. Place the minute wheel on the front axle tube, and secure the transfer shaft (14) in the holes of the front and rear axles.
Place a bill of exchange wheel on the front axle axle, and an hour wheel on the minute wheel hub.
Place the panel (13) on top of the speakers and tighten the two nuts.
Place the coil on the base of the stepper motor assembly and secure with screws. Install the motor rotor on the axle.
Engage the rotor trib with the first intermediate wheel. Install the stepper motor and secure it with two screws.
Install the electronic unit into the corresponding motor sockets and secure it with two screws. Insert two terminals into the grooves of the panel and check the contact. If necessary, the terminal tabs can be bent.
To check the operation of the mechanism, connect it to a power source.
From the book Fraud in Russia author Romanov Sergey AlexandrovichWatches It is known that the orientation of watch collectors is hampered by the numerous fakes passed off as originals. For a long time, the fame of watchmakers and the value of their work have tempted tricksters and swindlers (by the way, also good craftsmen) to falsify them. And the reason for
From the book The Big Book of Aphorisms author Dushenko Konstantin VasilievichClock See also “Time”, “Punctuality” We are crucified on the dial of a clock. Stanislav Jerzy Lec The clock hands are two hands that take away our time. Grzegorz Stańczyk Listening to the ticking of a clock, we notice that time is ahead of us. Ramon Gomez de la Serna Broken watch twice in
From the book Encyclopedia of Educational Games author Danilova LenaClock If your child can count and is familiar with numbers, teach him to tell time using a clock. Show your child a model of a clock (toy clocks are often on sale, if you were unable to buy them, make them yourself from a sheet of thick cardboard, sewing on the arrows, securing them on both sides
From the book Security Encyclopedia author Gromov V I author Nesterova Daria Vladimirovna From the book Great encyclopedia technology author Team of authorsQuartz watch Quartz watch is a device for precise measurement time, in which oscillations of a quartz resonator are used to keep time. A quartz oscillator is used to excite the oscillations of the resonator. Quartz watches also contain a frequency divider,
From the author's bookSundial A sundial is a device for measuring time by the Sun, it is one of the simplest chronometric devices, which is designed based on the daily movement of the Sun, and in rare cases, the annual movement. Represents the oldest scientific measuring tool,
From the author's bookClock Clock – meter, which is used to determine the current time - hours, minutes, seconds. The need to know the time has always been there, and this contributed to the creation of devices for determining it. The very first device of this kind appeared already 3000 BC. e. –
From the author's bookClock (device) Clock is a device for measuring periods of time with a periodic sequence of a given duration, measured in units not exceeding one day, starting from 3/4 seconds. Clocks are divided according to size and portability into tower, pocket,
I recently told you... Now I would like to talk about wall ones.
Nowadays it is probably impossible to find a house that does not have watches made in China or India. Wall clock- this is an element of home comfort that practically does not change its appearance. The only thing that wears out in them is the mechanism.
And it often happens that after several years of operation, the appearance is in perfect condition, but the watch either stops working, or is in a hurry and lags behind, or, as is typical for smooth-running mechanisms, begins to literally “eat up” the batteries.
It would be a shame to throw away such a watch, especially if it had a high purchase price or is valuable as a memory. The most reasonable solution is to repair the wall clock yourself and replace the mechanism.
In the example given, we will replace the mechanism by swapping it from another (new, but barbarically broken) watch.
By the way, at any time point you can buy such watches for literally pennies. The advantage is that if the diameter of the hands from the “original” watch does not fit, you can easily install the hands from the broken ones.
Unscrew the bolts of the fastening strip holding the glass.
MK - How to install a quartz watch movement - watch assembly
I make watches, people often buy them from me. I usually give the watch to the buyer personally, or send it by mail. And in this case, one problem always arises - how to pack the watch so that the hands of the watch do not bend or break. They are quite fragile, they can easily bend if you press on them a little harder, and you yourself know very well how parcels are thrown at us at the post office. As a result, the package turns out to be of a huge format, and all due to the fact that I in cunning ways I try to pack the hands exactly, fix them so that they do not dangle and are protected (foam plastic, bubble cellophane, etc.).
I suggest sending a watch without hands - i.e. remove them and put them separately in a bag. Then the parcel will be smaller in size and the likelihood of the hands breaking is reduced to zero. But, as it turned out, almost 90% have a fear: “Oh, don’t take it off, otherwise I won’t be able to put them back together - it’s difficult, I don’t know how and I’m afraid of breaking it!” Almost everyone has similar words to these words... To be honest, when I assembled the clock mechanism for the first time, I also tinkered with it for half an hour until I took the other clock apart and looked at how everything was put together) . It’s funny when you can and know, but when you don’t, the torment begins.
In the end, I decided to do small PHOTO MK and tell in it, or rather, show how to assemble a clock mechanism, and what some of the tricks are. Now I will send a watch without hands, and send the buyer to this article))), and he will be able to assemble everything himself. And why didn't this thought come to mind earlier...
Let's get started:
1. You have a clock - this is a wooden (or any other) disk, and there is a kit for assembling a quartz clock mechanism.
This set you see in the photo. Typically, arrows are not included in such a set, but are sold separately. Let's assume that we have everything completely and consider the complete set.
The set includes:
- a clock mechanism (black square box in the photo) with a stem and a thread on it,
- metal loop bracket - for hanging on the wall (the loop is sometimes immediately installed on the body),
- rubber washer,
- golden washer,
- golden nut,
- 3 hands - hour, minute, second.
2. On a square base there is small ledge, I show it with an arrow.

3. We put a metal loop on the rod so that it fits exactly into this ledge. The loop (hole) itself should be at the bottom, as in the photo, do not mix it up, otherwise you will not be able to hang the clock on the wall.

4. Now take the rubber washer - gasket.

5. We put on the rubber washer on the stem - either side.

6. Now string the clock disk onto this assembled structure . The rod must pass through the hole in the disk and come out along with thread! This important point, keep this in mind when you buy a watch movement. Its rod and thread must be of such a size that they (namely the thread) protrude outward by at least 5-6 mm. or even more when installing the mechanism on the disk, otherwise you will not be able to screw the locking nut onto the thread.
Let me give you my specific example:
I use plywood for the disk thickness 8 mm. and 10 mm., I buy the clock mechanism with a stem 22 mm.(its thread is 18 mm.). Mechanism with 18 mm rod. (12mm thread) is not suitable for 8mm plywood thickness. (for 10 mm, even more so), despite the fact that the instructions say that it should fit (for some reason they do not take into account the thickness of the rubber washer and the thickness of the golden washer, and they both add a few more mm to the thickness of the disk itself.). The thread protrudes slightly above the surface, but there is no way to screw a nut onto it at all.
Remember:
Stock 22 (18)
8-10 mm.
Stock 18 (12)
suitable for thick plywood 6 mm. or less.

7. From the back everything looks like this.

8. Prepare a golden washer and nut.

9. First we take the puck.

10. And string the puck on the stock

11. Then we take nut and screw it onto the thread stock It is necessary to secure the entire structure tightly with a nut. Do everything by hand, no need to resort to pliers!

12. In this photo (made larger) you can clearly see that the thread protrudes slightly above the nut. This is fine. Now, if it were not visible at all, then the nut simply would not be able to screw onto it and the entire structure would fall apart.

13. Now you can put on the arrows.

14. First puts on the hour hand.
Attention! She puts it on TIGHT! Keep this in mind. You need to hold it with two fingers and press them on both sides of the base of the arrow at the same time, otherwise it won’t fit - it has its own place on the rod, its own diameter, it will fit exactly there all the way.
If suddenly the arrow does not want to fit (this often happens, and this is what scares everyone - they think they are doing something wrong), do this - turn it upside down and string it onto the rod in exactly this position. This is how it will definitely fit. The hole drilled in the arrow has a “skirt” and it will stretch a little if you put the arrow on inside out. Then take it off and put it on correctly.

15. Then puts it on minute hand. It’s the same story with her, she also puts on quite tightly. We proceed by analogy with the first arrow. And don't bend the sides at the base of the arrow when you put pressure on it!

16. All that remains is to put on second hand. It is not threaded onto the stem, but is simply inserted from above into the hole in the stem - place it there and press on top with your thumb.

17. That's all. The mechanism is installed.

18. Now we need to check Are all three arrows parallel? relative to each other - otherwise, during rotation, they will catch on each other and... there will be no rotation. The arrows will just get stuck.

19. Let's watch this, collecting all three arrows in one place, and turning the watch to the side. If they touch each other, bend them with your fingers at the base to the desired position.


20. Insert the battery, keeping an eye on + and -. This is written on the mechanism.

21. And... the clock is ready! The arrows began to move - time has passed!


That's the whole secret of assembling a quartz watch movement. And, as you can see, there are still some nuances, and you need to know them so that everything turns out easy and simple. I hope my photos and explanations will help you if you ever make a watch or decide to replace the clock mechanism in an old watch with a new one.
Install a metal hanging loop if needed. The loop is installed on a special protrusion (“patch”) at the base of the rod. The protrusion is part of the mechanism body, so the load is on the entire body and not on the rod. 
The weight of the watch when using a metal loop should not exceed 10 kg.
For plastic loop no more than 5 kg.
Install the sealing rubber washer. The sealing washer prevents the mechanism from rotating on the product. It also relieves excess “tension” when the nut is tightly tightened. 
Pass the mechanism stem through the hole in the dial. Something needs to be said about the thickness of the dial...
The diameter of the hole for the rod in the dial is 8 mm.
And when using a 9 mm shaped nut.
Install brass washer 
Tighten the nut. 
Do not tighten the nut too tightly. Overtightening the nut may damage the mechanism or affect the running accuracy.
Place the hour and minute hands on the minute counter.
It is most convenient to use a tube to install the arrows suitable diameter. A simple ballpoint pen may be suitable for this. 
The hour and minute hands should be set to 12 o'clock. Otherwise, the time will not be displayed correctly.
Set the second hand.
When setting the second hand while pressing, you must hold the mechanism with reverse side(shown in photo). Thus, so as not to squeeze out the pin on which the second hand is mounted. 
Curly nut
The figured nut is used for two reasons:1. Some people find its appearance neater. Indeed, it looks more compact than a standard washer and nut.
2. A shaped nut allows you to “increase” the height of the threaded part by 1-2 mm. This becomes relevant when for some reason these millimeters are not enough. For example, there is no mechanism with a suitable thread height.
As can be seen in the figure, dial thickness when using a shaped nut (right), it may be larger than when using a regular nut when installed on a mechanism with the same thread height. The only limitation on the amount of “increase” is the position of the hour hand - it is necessary that the figured nut does not interfere with the rotation of the hand.
The diameter of the hole in the dial for a figured nut = 9 mm (1 mm more than for a regular nut), because she goes deeper into the dial.

 The rod has two parts:
 Threaded part- for attaching the mechanism to the watch. A nut is screwed onto it.
Minute- to install an arrow on it.
Threaded part
There are different “heights” for different dial thickness.Below are options for mechanisms with different threaded parts. You can experiment and find the height you need. (here you can pick up the stock...)
Selection of stem for dial thickness:
Thread height: 6 mm
Distribution of space on the thread:
Sealing
washer: 1 mm
Washer and nut: 1 mm
Remaining space for dial: 3 mm
Available stocks:
Elements 1-10 of 14.
| View | Name | Minute type | Overall height (mm) | Thread height (mm) | Max. dial thickness (mm) |
|---|---|---|---|---|---|
 | S1 12/6 | S1 | 12 | 6 | 3 |
 | S1 16/9 | S1 | 16 | 9 | 7 |
 | S1 12/18 | S1 | 18 | 12 | 10 |
 | S1 Seiko 13/5.2 | S1 Seiko | 13 | 5.2 | 3.2 |
 | S1 Seiko 15/6.7 | S1 Seiko | 15 | 6.7 | 4.7 |
 | S1 Seiko 17/9 | S1 Seiko | 17 | 9 | 7 |
 | S2 15/6.7 | S2 | 15 | 6.7 | 4.7 |
 | S2 17/8.7 | S2 | 17 | 8.7 | 6.7 |
 | S2 22/11.7 | S2 | 22 | 11.7 | 10.7 |
 | S2 23/14.7 | S2 | 23 | 14.7 | 13.7 |